
Red Hat Training
A Red Hat training course is available for RHEL 8
Deploying different types of servers
Setting up and configuring web servers and reverse proxies, network file services, database servers, mail transport agents, and printers
Abstract
Making open source more inclusive
Red Hat is committed to replacing problematic language in our code, documentation, and web properties. We are beginning with these four terms: master, slave, blacklist, and whitelist. Because of the enormity of this endeavor, these changes will be implemented gradually over several upcoming releases. For more details, see our CTO Chris Wright’s message.
Providing feedback on Red Hat documentation
We appreciate your feedback on our documentation. Let us know how we can improve it.
Submitting feedback through Jira (account required)
- Log in to the Jira website.
- Click Create in the top navigation bar.
- Enter a descriptive title in the Summary field.
- Enter your suggestion for improvement in the Description field. Include links to the relevant parts of the documentation.
- Click Create at the bottom of the dialogue.
Chapter 1. Setting up the Apache HTTP web server
1.1. Introduction to the Apache HTTP web server
A web server is a network service that serves content to a client over the web. This typically means web pages, but any other documents can be served as well. Web servers are also known as HTTP servers, as they use the hypertext transport protocol (HTTP).
The Apache HTTP Server, httpd, is an open source web server developed by the Apache Software Foundation.
If you are upgrading from a previous release of Red Hat Enterprise Linux, you have to update the httpd service configuration accordingly. This section reviews some of the newly added features, and guides you through the update of prior configuration files.
1.2. Notable changes in the Apache HTTP Server
The Apache HTTP Server has been updated from version 2.4.6 in RHEL 7 to version 2.4.37 in RHEL 8. This updated version includes several new features, but maintains backwards compatibility with the RHEL 7 version at the level of configuration and Application Binary Interface (ABI) of external modules.
New features include:
-
HTTP/2support is now provided by themod_http2package, which is a part of thehttpdmodule. -
systemd socket activation is supported. See
httpd.socket(8)man page for more details.
Multiple new modules have been added:
-
mod_proxy_hcheck- a proxy health-check module -
mod_proxy_uwsgi- a Web Server Gateway Interface (WSGI) proxy -
mod_proxy_fdpass- provides support for the passing the socket of the client to another process -
mod_cache_socache- an HTTP cache using, for example, memcache backend -
mod_md- an ACME protocol SSL/TLS certificate service
-
The following modules now load by default:
-
mod_request -
mod_macro -
mod_watchdog
-
-
A new subpackage,
httpd-filesystem, has been added, which contains the basic directory layout for the Apache HTTP Server including the correct permissions for the directories. -
Instantiated service support,
httpd@.servicehas been introduced. See thehttpd.serviceman page for more information.
-
A new
httpd-init.servicereplaces the%post scriptto create a self-signedmod_sslkey pair.
-
Automated TLS certificate provisioning and renewal using the Automatic Certificate Management Environment (ACME) protocol is now supported with the
mod_mdpackage (for use with certificate providers such asLet’s Encrypt). -
The Apache HTTP Server now supports loading TLS certificates and private keys from hardware security tokens directly from
PKCS#11modules. As a result, amod_sslconfiguration can now usePKCS#11URLs to identify the TLS private key, and, optionally, the TLS certificate in theSSLCertificateKeyFileandSSLCertificateFiledirectives. A new
ListenFreedirective in the/etc/httpd/conf/httpd.conffile is now supported.Similarly to the
Listendirective,ListenFreeprovides information about IP addresses, ports, or IP address-and-port combinations that the server listens to. However, withListenFree, theIP_FREEBINDsocket option is enabled by default. Hence,httpdis allowed to bind to a nonlocal IP address or to an IP address that does not exist yet. This allowshttpdto listen on a socket without requiring the underlying network interface or the specified dynamic IP address to be up at the time whenhttpdis trying to bind to it.Note that the
ListenFreedirective is currently available only in RHEL 8.For more details on
ListenFree, see the following table:Table 1.1. ListenFree directive’s syntax, status, and modules
Syntax Status Modules ListenFree [IP-address:]portnumber [protocol]
MPM
event, worker, prefork, mpm_winnt, mpm_netware, mpmt_os2
Other notable changes include:
The following modules have been removed:
-
mod_file_cache mod_nssUse
mod_sslas a replacement. For details about migrating frommod_nss, see Section 1.14, “Exporting a private key and certificates from an NSS database to use them in an Apache web server configuration”.-
mod_perl
-
-
The default type of the DBM authentication database used by the Apache HTTP Server in RHEL 8 has been changed from
SDBMtodb5. -
The
mod_wsgimodule for the Apache HTTP Server has been updated to Python 3. WSGI applications are now supported only with Python 3, and must be migrated from Python 2. The multi-processing module (MPM) configured by default with the Apache HTTP Server has changed from a multi-process, forked model (known as
prefork) to a high-performance multi-threaded model,event.Any third-party modules that are not thread-safe need to be replaced or removed. To change the configured MPM, edit the
/etc/httpd/conf.modules.d/00-mpm.conffile. See thehttpd.service(8)man page for more information.- The minimum UID and GID allowed for users by suEXEC are now 1000 and 500, respectively (previously 100 and 100).
-
The
/etc/sysconfig/httpdfile is no longer a supported interface for setting environment variables for thehttpdservice. Thehttpd.service(8)man page has been added for the systemd service. -
Stopping the
httpdservice now uses a “graceful stop” by default. -
The
mod_auth_kerbmodule has been replaced by themod_auth_gssapimodule.
1.3. Updating the configuration
To update the configuration files from the Apache HTTP Server version used in Red Hat Enterprise Linux 7, choose one of the following options:
-
If
/etc/sysconfig/httpdis used to set environment variables, create a systemd drop-in file instead. - If any third-party modules are used, ensure they are compatible with a threaded MPM.
- If suexec is used, ensure user and group IDs meet the new minimums.
You can check the configuration for possible errors by using the following command:
# apachectl configtest
Syntax OK
1.4. The Apache configuration files
The httpd, by default, reads the configuration files after start. You can see the list of the locations of configuration files in the table below.
Table 1.2. The httpd service configuration files
| Path | Description |
|---|---|
|
| The main configuration file. |
|
| An auxiliary directory for configuration files that are included in the main configuration file. |
|
| An auxiliary directory for configuration files which load installed dynamic modules packaged in Red Hat Enterprise Linux. In the default configuration, these configuration files are processed first. |
Although the default configuration is suitable for most situations, you can use also other configuration options. For any changes to take effect, restart the web server first.
To check the configuration for possible errors, type the following at a shell prompt:
# apachectl configtest
Syntax OK
To make the recovery from mistakes easier, make a copy of the original file before editing it.
1.5. Managing the httpd service
This section describes how to start, stop, and restart the httpd service.
Prerequisites
- The Apache HTTP Server is installed.
Procedure
To start the
httpdservice, enter:# systemctl start httpdTo stop the
httpdservice, enter:# systemctl stop httpdTo restart the
httpdservice, enter:# systemctl restart httpd
1.6. Setting up a single-instance Apache HTTP Server
You can set up a single-instance Apache HTTP Server to serve static HTML content.
Follow the procedure if the web server should provide the same content for all domains associated with the server. If you want to provide different content for different domains, set up name-based virtual hosts. For details, see Configuring Apache name-based virtual hosts.
Procedure
Install the
httpdpackage:# yum install httpdIf you use
firewalld, open the TCP port80in the local firewall:# firewall-cmd --permanent --add-port=80/tcp # firewall-cmd --reload
Enable and start the
httpdservice:# systemctl enable --now httpdOptional: Add HTML files to the
/var/www/html/directory.NoteWhen adding content to
/var/www/html/, files and directories must be readable by the user under whichhttpdruns by default. The content owner can be the either therootuser androotuser group, or another user or group of the administrator’s choice. If the content owner is therootuser androotuser group, the files must be readable by other users. The SELinux context for all the files and directories must behttpd_sys_content_t, which is applied by default to all content within the/var/wwwdirectory.
Verification steps
Connect with a web browser to
http://server_IP_or_host_name/.If the
/var/www/html/directory is empty or does not contain anindex.htmlorindex.htmfile, Apache displays theRed Hat Enterprise Linux Test Page. If/var/www/html/contains HTML files with a different name, you can load them by entering the URL to that file, such ashttp://server_IP_or_host_name/example.html.
Additional resources
- Apache manual: Installing the Apache HTTP server manual.
-
See the
httpd.service(8)man page.
1.7. Configuring Apache name-based virtual hosts
Name-based virtual hosts enable Apache to serve different content for different domains that resolve to the IP address of the server.
You can set up a virtual host for both the example.com and example.net domain with separate document root directories. Both virtual hosts serve static HTML content.
Prerequisites
Clients and the web server resolve the
example.comandexample.netdomain to the IP address of the web server.Note that you must manually add these entries to your DNS server.
Procedure
Install the
httpdpackage:# yum install httpdEdit the
/etc/httpd/conf/httpd.conffile:Append the following virtual host configuration for the
example.comdomain:<VirtualHost *:80> DocumentRoot "/var/www/example.com/" ServerName example.com CustomLog /var/log/httpd/example.com_access.log combined ErrorLog /var/log/httpd/example.com_error.log </VirtualHost>These settings configure the following:
-
All settings in the
<VirtualHost *:80>directive are specific for this virtual host. -
DocumentRootsets the path to the web content of the virtual host. ServerNamesets the domains for which this virtual host serves content.To set multiple domains, add the
ServerAliasparameter to the configuration and specify the additional domains separated with a space in this parameter.-
CustomLogsets the path to the access log of the virtual host. ErrorLogsets the path to the error log of the virtual host.NoteApache uses the first virtual host found in the configuration also for requests that do not match any domain set in the
ServerNameandServerAliasparameters. This also includes requests sent to the IP address of the server.
-
All settings in the
Append a similar virtual host configuration for the
example.netdomain:<VirtualHost *:80> DocumentRoot "/var/www/example.net/" ServerName example.net CustomLog /var/log/httpd/example.net_access.log combined ErrorLog /var/log/httpd/example.net_error.log </VirtualHost>Create the document roots for both virtual hosts:
# mkdir /var/www/example.com/
# mkdir /var/www/example.net/
If you set paths in the
DocumentRootparameters that are not within/var/www/, set thehttpd_sys_content_tcontext on both document roots:# semanage fcontext -a -t httpd_sys_content_t "/srv/example.com(/.*)?" # restorecon -Rv /srv/example.com/ # semanage fcontext -a -t httpd_sys_content_t "/srv/example.net(/.\*)?" # restorecon -Rv /srv/example.net/
These commands set the
httpd_sys_content_tcontext on the/srv/example.com/and/srv/example.net/directory.Note that you must install the
policycoreutils-python-utilspackage to run therestoreconcommand.If you use
firewalld, open port80in the local firewall:# firewall-cmd --permanent --add-port=80/tcp # firewall-cmd --reload
Enable and start the
httpdservice:# systemctl enable --now httpd
Verification steps
Create a different example file in each virtual host’s document root:
# echo "vHost example.com" > /var/www/example.com/index.html
# echo "vHost example.net" > /var/www/example.net/index.html
-
Use a browser and connect to
http://example.com. The web server shows the example file from theexample.comvirtual host. -
Use a browser and connect to
http://example.net. The web server shows the example file from theexample.netvirtual host.
Additional resources
1.8. Configuring Kerberos authentication for the Apache HTTP web server
To perform Kerberos authentication in the Apache HTTP web server, RHEL 8 uses the mod_auth_gssapi Apache module. The Generic Security Services API (GSSAPI) is an interface for applications that make requests to use security libraries, such as Kerberos. The gssproxy service allows to implement privilege separation for the httpd server, which optimizes this process from the security point of view.
The mod_auth_gssapi module replaces the removed mod_auth_kerb module.
Prerequisites
-
The
httpdandgssproxypackages are installed. -
The Apache web server is set up and the
httpdservice is running.
1.8.1. Setting up GSS-Proxy in an IdM environment
This procedure describes how to set up GSS-Proxy to perform Kerberos authentication in the Apache HTTP web server.
Procedure
Enable access to the
keytabfile of HTTP/<SERVER_NAME>@realm principal by creating the service principal:# ipa service-add HTTP/<SERVER_NAME>Retrieve the
keytabfor the principal stored in the/etc/gssproxy/http.keytabfile:# ipa-getkeytab -s $(awk '/^server =/ {print $3}' /etc/ipa/default.conf) -k /etc/gssproxy/http.keytab -p HTTP/$(hostname -f)This step sets permissions to 400, thus only the
rootuser has access to thekeytabfile. Theapacheuser does not.Create the
/etc/gssproxy/80-httpd.conffile with the following content:[service/HTTP] mechs = krb5 cred_store = keytab:/etc/gssproxy/http.keytab cred_store = ccache:/var/lib/gssproxy/clients/krb5cc_%U euid = apache
Restart and enable the
gssproxyservice:# systemctl restart gssproxy.service # systemctl enable gssproxy.service
Additional resources
-
gssproxy(8)man pages -
gssproxy-mech(8)man pages -
gssproxy.conf(5)man pages
1.9. Configuring TLS encryption on an Apache HTTP Server
By default, Apache provides content to clients using an unencrypted HTTP connection. This section describes how to enable TLS encryption and configure frequently used encryption-related settings on an Apache HTTP Server.
Prerequisites
- The Apache HTTP Server is installed and running.
1.9.1. Adding TLS encryption to an Apache HTTP Server
You can enable TLS encryption on an Apache HTTP Server for the example.com domain.
Prerequisites
- The Apache HTTP Server is installed and running.
The private key is stored in the
/etc/pki/tls/private/example.com.keyfile.For details about creating a private key and certificate signing request (CSR), as well as how to request a certificate from a certificate authority (CA), see your CA’s documentation. Alternatively, if your CA supports the ACME protocol, you can use the
mod_mdmodule to automate retrieving and provisioning TLS certificates.-
The TLS certificate is stored in the
/etc/pki/tls/certs/example.com.crtfile. If you use a different path, adapt the corresponding steps of the procedure. -
The CA certificate is stored in the
/etc/pki/tls/certs/ca.crtfile. If you use a different path, adapt the corresponding steps of the procedure. - Clients and the web server resolve the host name of the server to the IP address of the web server.
Procedure
Install the
mod_sslpackage:# yum install mod_sslEdit the
/etc/httpd/conf.d/ssl.conffile and add the following settings to the<VirtualHost _default_:443>directive:Set the server name:
ServerName example.com
ImportantThe server name must match the entry set in the
Common Namefield of the certificate.Optional: If the certificate contains additional host names in the
Subject Alt Names(SAN) field, you can configuremod_sslto provide TLS encryption also for these host names. To configure this, add theServerAliasesparameter with corresponding names:ServerAlias www.example.com server.example.comSet the paths to the private key, the server certificate, and the CA certificate:
SSLCertificateKeyFile "/etc/pki/tls/private/example.com.key"
SSLCertificateFile "/etc/pki/tls/certs/example.com.crt"
SSLCACertificateFile "/etc/pki/tls/certs/ca.crt"
For security reasons, configure that only the
rootuser can access the private key file:# chown root:root /etc/pki/tls/private/example.com.key # chmod 600 /etc/pki/tls/private/example.com.key
WarningIf the private key was accessed by unauthorized users, revoke the certificate, create a new private key, and request a new certificate. Otherwise, the TLS connection is no longer secure.
If you use
firewalld, open port443in the local firewall:# firewall-cmd --permanent --add-port=443/tcp # firewall-cmd --reload
Restart the
httpdservice:# systemctl restart httpdNoteIf you protected the private key file with a password, you must enter this password each time when the
httpdservice starts.
Verification steps
-
Use a browser and connect to
https://example.com.
Additional resources
1.9.2. Setting the supported TLS protocol versions on an Apache HTTP Server
By default, the Apache HTTP Server on RHEL uses the system-wide crypto policy that defines safe default values, which are also compatible with recent browsers. For example, the DEFAULT policy defines that only the TLSv1.2 and TLSv1.3 protocol versions are enabled in apache.
You can manually configure which TLS protocol versions your Apache HTTP Server supports. Follow the procedure if your environment requires to enable only specific TLS protocol versions, for example:
-
If your environment requires that clients can also use the weak
TLS1(TLSv1.0) orTLS1.1protocol. -
If you want to configure that Apache only supports the
TLSv1.2orTLSv1.3protocol.
Prerequisites
- TLS encryption is enabled on the server as described in Adding TLS encryption to an Apache HTTP server.
Procedure
Edit the
/etc/httpd/conf/httpd.conffile, and add the following setting to the<VirtualHost>directive for which you want to set the TLS protocol version. For example, to enable only theTLSv1.3protocol:SSLProtocol -All TLSv1.3Restart the
httpdservice:# systemctl restart httpd
Verification steps
Use the following command to verify that the server supports
TLSv1.3:# openssl s_client -connect example.com:443 -tls1_3Use the following command to verify that the server does not support
TLSv1.2:# openssl s_client -connect example.com:443 -tls1_2If the server does not support the protocol, the command returns an error:
140111600609088:error:1409442E:SSL routines:ssl3_read_bytes:tlsv1 alert protocol version:ssl/record/rec_layer_s3.c:1543:SSL alert number 70
- Optional: Repeat the command for other TLS protocol versions.
Additional resources
-
update-crypto-policies(8)man page - Using system-wide cryptographic policies.
-
For further details about the
SSLProtocolparameter, refer to themod_ssldocumentation in the Apache manual: Installing the Apache HTTP server manual.
1.9.3. Setting the supported ciphers on an Apache HTTP Server
By default, the Apache HTTP Server uses the system-wide crypto policy that defines safe default values, which are also compatible with recent browsers. For the list of ciphers the system-wide crypto allows, see the /etc/crypto-policies/back-ends/openssl.config file.
You can manually configure which ciphers your Apache HTTP Server supports. Follow the procedure if your environment requires specific ciphers.
Prerequisites
- TLS encryption is enabled on the server as described in Adding TLS encryption to an Apache HTTP server.
Procedure
Edit the
/etc/httpd/conf/httpd.conffile, and add theSSLCipherSuiteparameter to the<VirtualHost>directive for which you want to set the TLS ciphers:SSLCipherSuite "EECDH+AESGCM:EDH+AESGCM:AES256+EECDH:AES256+EDH:!SHA1:!SHA256"This example enables only the
EECDH+AESGCM,EDH+AESGCM,AES256+EECDH, andAES256+EDHciphers and disables all ciphers which use theSHA1andSHA256message authentication code (MAC).Restart the
httpdservice:# systemctl restart httpd
Verification steps
To display the list of ciphers the Apache HTTP Server supports:
Install the
nmappackage:# yum install nmapUse the
nmaputility to display the supported ciphers:# nmap --script ssl-enum-ciphers -p 443 example.com ... PORT STATE SERVICE 443/tcp open https | ssl-enum-ciphers: | TLSv1.2: | ciphers: | TLS_ECDHE_RSA_WITH_AES_256_GCM_SHA384 (ecdh_x25519) - A | TLS_DHE_RSA_WITH_AES_256_GCM_SHA384 (dh 2048) - A | TLS_ECDHE_RSA_WITH_CHACHA20_POLY1305_SHA256 (ecdh_x25519) - A ...
Additional resources
-
update-crypto-policies(8)man page - Using system-wide cryptographic policies.
- SSLCipherSuite
1.10. Configuring TLS client certificate authentication
Client certificate authentication enables administrators to allow only users who authenticate using a certificate to access resources on the web server. You can configure client certificate authentication for the /var/www/html/Example/ directory.
If the Apache HTTP Server uses the TLS 1.3 protocol, certain clients require additional configuration. For example, in Firefox, set the security.tls.enable_post_handshake_auth parameter in the about:config menu to true. For further details, see Transport Layer Security version 1.3 in Red Hat Enterprise Linux 8.
Prerequisites
- TLS encryption is enabled on the server as described in Adding TLS encryption to an Apache HTTP server.
Procedure
Edit the
/etc/httpd/conf/httpd.conffile and add the following settings to the<VirtualHost>directive for which you want to configure client authentication:<Directory "/var/www/html/Example/"> SSLVerifyClient require </Directory>
The
SSLVerifyClient requiresetting defines that the server must successfully validate the client certificate before the client can access the content in the/var/www/html/Example/directory.Restart the
httpdservice:# systemctl restart httpd
Verification steps
Use the
curlutility to access thehttps://example.com/Example/URL without client authentication:$ curl https://example.com/Example/ curl: (56) OpenSSL SSL_read: error:1409445C:SSL routines:ssl3_read_bytes:tlsv13 alert certificate required, errno 0The error indicates that the web server requires a client certificate authentication.
Pass the client private key and certificate, as well as the CA certificate to
curlto access the same URL with client authentication:$ curl --cacert ca.crt --key client.key --cert client.crt https://example.com/Example/If the request succeeds,
curldisplays theindex.htmlfile stored in the/var/www/html/Example/directory.
Additional resources
1.11. Securing web applications on a web server using ModSecurity
ModSecurity is an open source web application firewall (WAF) supported by various web servers such as Apache, Nginx, and IIS, which reduces security risks in web applications. ModSecurity provides customizable rule sets for configuring your server.
The mod_security-crs package contains the core rule set (CRS) with rules against cross-website scripting, bad user agents, SQL injection, Trojans, session hijacking, and other exploits.
1.11.1. Deploying the ModSecurity web-based application firewall for Apache
To reduce risks related to running web-based applications on your web server by deploying ModSecurity, install the mod_security and mod_security_crs packages for the Apache HTTP server. The mod_security_crs package provides the core rule set (CRS) for the ModSecurity web-based application firewall (WAF) module.
Procedure
Install the
mod_security,mod_security_crs, andhttpdpackages:# yum install -y mod_security mod_security_crs httpdStart the
httpdserver:# systemctl restart httpd
Verification
Verify that the ModSecurity web-based application firewall is enabled on your Apache HTTP server:
# httpd -M | grep security
 security2_module (shared)
Check that the
/etc/httpd/modsecurity.d/activated_rules/directory contains rules provided bymod_security_crs:# ls /etc/httpd/modsecurity.d/activated_rules/ ... REQUEST-921-PROTOCOL-ATTACK.conf REQUEST-930-APPLICATION-ATTACK-LFI.conf ...
1.11.2. Adding a custom rule to ModSecurity
If the rules contained in the ModSecurity core rule set (CRS) do not fit your scenario and if you want to prevent additional possible attacks, you can add your custom rules to the rule set used by the ModSecurity web-based application firewall. The following example demonstrates the addition of a simple rule. For creating more complex rules, see the reference manual on the ModSecurity Wiki website.
Prerequisites
- ModSecurity for Apache is installed and enabled.
Procedure
Open the
/etc/httpd/conf.d/mod_security.conffile in a text editor of your choice, for example:# vi /etc/httpd/conf.d/mod_security.confAdd the following example rule after the line starting with
SecRuleEngine On:SecRule ARGS:data "@contains evil" "deny,status:403,msg:'param data contains evil data',id:1"
The previous rule forbids the use of resources to the user if the
dataparameter contains theevilstring.- Save the changes, and quit the editor.
Restart the
httpdserver:# systemctl restart httpd
Verification
Create a
test.htmlpage:# echo "mod_security test" > /var/www/html/test.htmlRestart the
httpdserver:# systemctl restart httpdRequest
test.htmlwithout malicious data in theGETvariable of the HTTP request:$ curl http://localhost/test.html?data=good mod_security testRequest
test.htmlwith malicious data in theGETvariable of the HTTP request:$ curl localhost/test.html?data=xxxevilxxx <!DOCTYPE HTML PUBLIC "-//IETF//DTD HTML 2.0//EN"> <html><head> <title>403 Forbidden</title> </head><body> <h1>Forbidden</h1> <p>You do not have permission to access this resource.</p> </body></html>Check the
/var/log/httpd/error_logfile, and locate the log entry about denying access with theparam data containing an evil datamessage:[Wed May 25 08:01:31.036297 2022] [:error] [pid 5839:tid 139874434791168] [client ::1:45658] [client ::1] ModSecurity: Access denied with code 403 (phase 2). String match "evil" at ARGS:data. [file "/etc/httpd/conf.d/mod_security.conf"] [line "4"] [id "1"] [msg "param data contains evil data"] [hostname "localhost"] [uri "/test.html"] [unique_id "Yo4amwIdsBG3yZqSzh2GuwAAAIY"]
Additional resources
1.12. Installing the Apache HTTP Server manual
You can install the Apache HTTP Server manual. This manual provides a detailed documentation of, for example:
- Configuration parameters and directives
- Performance tuning
- Authentication settings
- Modules
- Content caching
- Security tips
- Configuring TLS encryption
After installing the manual, you can display it using a web browser.
Prerequisites
- The Apache HTTP Server is installed and running.
Procedure
Install the
httpd-manualpackage:# yum install httpd-manualOptional: By default, all clients connecting to the Apache HTTP Server can display the manual. To restrict access to a specific IP range, such as the
192.0.2.0/24subnet, edit the/etc/httpd/conf.d/manual.conffile and add theRequire ip 192.0.2.0/24setting to the<Directory "/usr/share/httpd/manual">directive:<Directory "/usr/share/httpd/manual"> ... Require ip 192.0.2.0/24 ... </Directory>Restart the
httpdservice:# systemctl restart httpd
Verification steps
-
To display the Apache HTTP Server manual, connect with a web browser to
http://host_name_or_IP_address/manual/
1.13. Working with Apache modules
The httpd service is a modular application, and you can extend it with a number of Dynamic Shared Objects (DSOs). Dynamic Shared Objects are modules that you can dynamically load or unload at runtime as necessary. You can find these modules in the /usr/lib64/httpd/modules/ directory.
1.13.1. Loading a DSO module
As an administrator, you can choose the functionality to include in the server by configuring which modules the server should load. To load a particular DSO module, use the LoadModule directive. Note that modules provided by a separate package often have their own configuration file in the /etc/httpd/conf.modules.d/ directory.
Prerequisites
-
You have installed the
httpdpackage.
Procedure
Search for the module name in the configuration files in the
/etc/httpd/conf.modules.d/directory:# grep mod_ssl.so /etc/httpd/conf.modules.d/*Edit the configuration file in which the module name was found, and uncomment the
LoadModuledirective of the module:LoadModule ssl_module modules/mod_ssl.soIf the module was not found, for example, because a RHEL package does not provide the module, create a configuration file, such as
/etc/httpd/conf.modules.d/30-example.confwith the following directive:LoadModule ssl_module modules/<custom_module>.soRestart the
httpdservice:# systemctl restart httpd
1.13.2. Compiling a custom Apache module
You can create your own module and build it with the help of the httpd-devel package, which contains the include files, the header files, and the APache eXtenSion (apxs) utility required to compile a module.
Prerequisites
-
You have the
httpd-develpackage installed.
Procedure
Build a custom module with the following command:
# apxs -i -a -c module_name.c
Verification steps
- Load the module the same way as described in Loading a DSO module.
1.14. Exporting a private key and certificates from an NSS database to use them in an Apache web server configuration
RHEL 8 no longer provides the mod_nss module for the Apache web server, and Red Hat recommends using the mod_ssl module. If you store your private key and certificates in a Network Security Services (NSS) database, for example, because you migrated the web server from RHEL 7 to RHEL 8, follow this procedure to extract the key and certificates in Privacy Enhanced Mail (PEM) format. You can then use the files in the mod_ssl configuration as described in Configuring TLS encryption on an Apache HTTP server.
This procedure assumes that the NSS database is stored in /etc/httpd/alias/ and that you store the exported private key and certificates in the /etc/pki/tls/ directory.
Prerequisites
- The private key, the certificate, and the certificate authority (CA) certificate are stored in an NSS database.
Procedure
List the certificates in the NSS database:
# certutil -d /etc/httpd/alias/ -L
Certificate Nickname           Trust Attributes
                               SSL,S/MIME,JAR/XPI

Example CA                     C,,
Example Server Certificate     u,u,u
You need the nicknames of the certificates in the next steps.
To extract the private key, you must temporarily export the key to a PKCS #12 file:
Use the nickname of the certificate associated with the private key, to export the key to a PKCS #12 file:
# pk12util -o /etc/pki/tls/private/export.p12 -d /etc/httpd/alias/ -n "Example Server Certificate"
Enter password for PKCS12 file: password
Re-enter password: password
pk12util: PKCS12 EXPORT SUCCESSFUL
Note that you must set a password on the PKCS #12 file. You need this password in the next step.
Export the private key from the PKCS #12 file:
# openssl pkcs12 -in /etc/pki/tls/private/export.p12 -out /etc/pki/tls/private/server.key -nocerts -nodes
Enter Import Password: password
MAC verified OK
Delete the temporary PKCS #12 file:
# rm /etc/pki/tls/private/export.p12
Set the permissions on
/etc/pki/tls/private/server.keyto ensure that only therootuser can access this file:# chown root:root /etc/pki/tls/private/server.key # chmod 0600 /etc/pki/tls/private/server.key
Use the nickname of the server certificate in the NSS database to export the CA certificate:
# certutil -d /etc/httpd/alias/ -L -n "Example Server Certificate" -a -o /etc/pki/tls/certs/server.crtSet the permissions on
/etc/pki/tls/certs/server.crtto ensure that only therootuser can access this file:# chown root:root /etc/pki/tls/certs/server.crt # chmod 0600 /etc/pki/tls/certs/server.crt
Use the nickname of the CA certificate in the NSS database to export the CA certificate:
#certutil -d /etc/httpd/alias/ -L -n "Example CA" -a -o /etc/pki/tls/certs/ca.crtFollow Configuring TLS encryption on an Apache HTTP server to configure the Apache web server, and:
-
Set the
SSLCertificateKeyFileparameter to/etc/pki/tls/private/server.key. -
Set the
SSLCertificateFileparameter to/etc/pki/tls/certs/server.crt. -
Set the
SSLCACertificateFileparameter to/etc/pki/tls/certs/ca.crt.
-
Set the
Additional resources
-
certutil(1)man page -
pk12util(1)man page -
pkcs12(1ssl)man page
1.15. Additional resources
-
httpd(8) -
httpd.service(8) -
httpd.conf(5) -
apachectl(8) - Using GSS-Proxy for Apache httpd operation.
- Configuring applications to use cryptographic hardware through PKCS #11.
Chapter 2. Setting up and configuring NGINX
NGINX is a high performance and modular server that you can use, for example, as a:
- Web server
- Reverse proxy
- Load balancer
This section describes how to NGINX in these scenarios.
2.1. Installing and preparing NGINX
Red Hat uses Application Streams to provide different versions of NGINX. You can do the following:
- Select a stream and install NGINX
- Open the required ports in the firewall
-
Enable and start the
nginxservice
Using the default configuration, NGINX runs as a web server on port 80 and provides content from the /usr/share/nginx/html/ directory.
Prerequisites
- RHEL 8 is installed.
- The host is subscribed to the Red Hat Customer Portal.
-
The
firewalldservice is enabled and started.
Procedure
Display the available NGINX module streams:
# yum module list nginx
Red Hat Enterprise Linux 8 for x86_64 - AppStream (RPMs)
Name        Stream        Profiles        Summary
nginx       1.14 [d]      common [d]      nginx webserver
nginx       1.16          common [d]      nginx webserver
...

Hint: [d]efault, [e]nabled, [x]disabled, [i]nstalled
If you want to install a different stream than the default, select the stream:
# yum module enable nginx:stream_versionInstall the
nginxpackage:# yum install nginxOpen the ports on which NGINX should provide its service in the firewall. For example, to open the default ports for HTTP (port 80) and HTTPS (port 443) in
firewalld, enter:# firewall-cmd --permanent --add-port={80/tcp,443/tcp} # firewall-cmd --reload
Enable the
nginxservice to start automatically when the system boots:# systemctl enable nginxOptionally, start the
nginxservice:# systemctl start nginxIf you do not want to use the default configuration, skip this step, and configure NGINX accordingly before you start the service.
Verification steps
Use the
yumutility to verify that thenginxpackage is installed:# yum list installed nginx Installed Packages nginx.x86_64 1:1.14.1-9.module+el8.0.0+4108+af250afe @rhel-8-for-x86_64-appstream-rpmsEnsure that the ports on which NGINX should provide its service are opened in the firewalld:
# firewall-cmd --list-ports
80/tcp 443/tcp
Verify that the
nginxservice is enabled:# systemctl is-enabled nginx enabled
Additional resources
- For details about Subscription Manager, see the Using and Configuring Subscription Manager guide.
- For further details about Application Streams, modules, and installing packages, see the Installing, managing, and removing user-space components guide.
- For details about configuring firewalls, see the Securing networks guide.
2.2. Configuring NGINX as a web server that provides different content for different domains
By default, NGINX acts as a web server that provides the same content to clients for all domain names associated with the IP addresses of the server. This procedure explains how to configure NGINX:
-
To serve requests to the
example.comdomain with content from the/var/www/example.com/directory -
To serve requests to the
example.netdomain with content from the/var/www/example.net/directory -
To serve all other requests, for example, to the IP address of the server or to other domains associated with the IP address of the server, with content from the
/usr/share/nginx/html/directory
Prerequisites
- NGINX is installed
Clients and the web server resolve the
example.comandexample.netdomain to the IP address of the web server.Note that you must manually add these entries to your DNS server.
Procedure
Edit the
/etc/nginx/nginx.conffile:By default, the
/etc/nginx/nginx.conffile already contains a catch-all configuration. If you have deleted this part from the configuration, re-add the followingserverblock to thehttpblock in the/etc/nginx/nginx.conffile:server { listen 80 default_server; listen [::]:80 default_server; server_name _; root /usr/share/nginx/html; }These settings configure the following:
-
The
listendirective define which IP address and ports the service listens. In this case, NGINX listens on port80on both all IPv4 and IPv6 addresses. Thedefault_serverparameter indicates that NGINX uses thisserverblock as the default for requests matching the IP addresses and ports. -
The
server_nameparameter defines the host names for which thisserverblock is responsible. Settingserver_nameto_configures NGINX to accept any host name for thisserverblock. -
The
rootdirective sets the path to the web content for thisserverblock.
-
The
Append a similar
serverblock for theexample.comdomain to thehttpblock:server { server_name example.com; root /var/www/example.com/; access_log /var/log/nginx/example.com/access.log; error_log /var/log/nginx/example.com/error.log; }-
The
access_logdirective defines a separate access log file for this domain. -
The
error_logdirective defines a separate error log file for this domain.
-
The
Append a similar
serverblock for theexample.netdomain to thehttpblock:server { server_name example.net; root /var/www/example.net/; access_log /var/log/nginx/example.net/access.log; error_log /var/log/nginx/example.net/error.log; }
Create the root directories for both domains:
# mkdir -p /var/www/example.com/
# mkdir -p /var/www/example.net/
Set the
httpd_sys_content_tcontext on both root directories:# semanage fcontext -a -t httpd_sys_content_t "/var/www/example.com(/.*)?" # restorecon -Rv /var/www/example.com/ # semanage fcontext -a -t httpd_sys_content_t "/var/www/example.net(/.\*)?" # restorecon -Rv /var/www/example.net/
These commands set the
httpd_sys_content_tcontext on the/var/www/example.com/and/var/www/example.net/directories.Note that you must install the
policycoreutils-python-utilspackage to run therestoreconcommands.Create the log directories for both domains:
# mkdir /var/log/nginx/example.com/
# mkdir /var/log/nginx/example.net/
Restart the
nginxservice:# systemctl restart nginx
Verification steps
Create a different example file in each virtual host’s document root:
# echo "Content for example.com" > /var/www/example.com/index.html
# echo "Content for example.net" > /var/www/example.net/index.html
# echo "Catch All content" > /usr/share/nginx/html/index.html
-
Use a browser and connect to
http://example.com. The web server shows the example content from the/var/www/example.com/index.htmlfile. -
Use a browser and connect to
http://example.net. The web server shows the example content from the/var/www/example.net/index.htmlfile. -
Use a browser and connect to
http://IP_address_of_the_server. The web server shows the example content from the/usr/share/nginx/html/index.htmlfile.
2.3. Adding TLS encryption to an NGINX web server
You can enable TLS encryption on an NGINX web server for the example.com domain.
Prerequisites
- NGINX is installed.
The private key is stored in the
/etc/pki/tls/private/example.com.keyfile.For details about creating a private key and certificate signing request (CSR), as well as how to request a certificate from a certificate authority (CA), see your CA’s documentation.
-
The TLS certificate is stored in the
/etc/pki/tls/certs/example.com.crtfile. If you use a different path, adapt the corresponding steps of the procedure. - The CA certificate has been appended to the TLS certificate file of the server.
- Clients and the web server resolve the host name of the server to the IP address of the web server.
-
Port
443is open in the local firewall.
Procedure
Edit the
/etc/nginx/nginx.conffile, and add the followingserverblock to thehttpblock in the configuration:server { listen 443 ssl; server_name example.com; root /usr/share/nginx/html; ssl_certificate /etc/pki/tls/certs/example.com.crt; ssl_certificate_key /etc/pki/tls/private/example.com.key; }For security reasons, configure that only the
rootuser can access the private key file:# chown root:root /etc/pki/tls/private/example.com.key # chmod 600 /etc/pki/tls/private/example.com.key
WarningIf the private key was accessed by unauthorized users, revoke the certificate, create a new private key, and request a new certificate. Otherwise, the TLS connection is no longer secure.
Restart the
nginxservice:# systemctl restart nginx
Verification steps
-
Use a browser and connect to
https://example.com
Additional resources
2.4. Configuring NGINX as a reverse proxy for the HTTP traffic
You can configure the NGINX web server to act as a reverse proxy for HTTP traffic. For example, you can use this functionality to forward requests to a specific subdirectory on a remote server. From the client perspective, the client loads the content from the host it accesses. However, NGINX loads the actual content from the remote server and forwards it to the client.
This procedure explains how to forward traffic to the /example directory on the web server to the URL https://example.com.
Prerequisites
- NGINX is installed as described in Installing and preparing NGINX.
- Optional: TLS encryption is enabled on the reverse proxy.
Procedure
Edit the
/etc/nginx/nginx.conffile and add the following settings to theserverblock that should provide the reverse proxy:location /example { proxy_pass https://example.com; }The
locationblock defines that NGINX passes all requests in the/exampledirectory tohttps://example.com.Set the
httpd_can_network_connectSELinux boolean parameter to1to configure that SELinux allows NGINX to forward traffic:# setsebool -P httpd_can_network_connect 1Restart the
nginxservice:# systemctl restart nginx
Verification steps
-
Use a browser and connect to
http://host_name/exampleand the content ofhttps://example.comis shown.
2.5. Configuring NGINX as an HTTP load balancer
You can use the NGINX reverse proxy feature to load-balance traffic. This procedure describes how to configure NGINX as an HTTP load balancer that sends requests to different servers, based on which of them has the least number of active connections. If both servers are not available, the procedure also defines a third host for fallback reasons.
Prerequisites
- NGINX is installed as described in Installing and preparing NGINX.
Procedure
Edit the
/etc/nginx/nginx.conffile and add the following settings:http { upstream backend { least_conn; server server1.example.com; server server2.example.com; server server3.example.com backup; } server { location / { proxy_pass http://backend; } } }The
least_conndirective in the host group namedbackenddefines that NGINX sends requests toserver1.example.comorserver2.example.com, depending on which host has the least number of active connections. NGINX usesserver3.example.comonly as a backup in case that the other two hosts are not available.With the
proxy_passdirective set tohttp://backend, NGINX acts as a reverse proxy and uses thebackendhost group to distribute requests based on the settings of this group.Instead of the
least_connload balancing method, you can specify:- No method to use round robin and distribute requests evenly across servers.
-
ip_hashto send requests from one client address to the same server based on a hash calculated from the first three octets of the IPv4 address or the whole IPv6 address of the client. -
hashto determine the server based on a user-defined key, which can be a string, a variable, or a combination of both. Theconsistentparameter configures that NGINX distributes requests across all servers based on the user-defined hashed key value. -
randomto send requests to a randomly selected server.
Restart the
nginxservice:# systemctl restart nginx
2.6. Additional resources
- For the official NGINX documentation see https://nginx.org/en/docs/. Note that Red Hat does not maintain this documentation and that it might not work with the NGINX version you have installed.
- Configuring applications to use cryptographic hardware through PKCS #11.
Chapter 3. Using Samba as a server
Samba implements the Server Message Block (SMB) protocol in Red Hat Enterprise Linux. The SMB protocol is used to access resources on a server, such as file shares and shared printers. Additionally, Samba implements the Distributed Computing Environment Remote Procedure Call (DCE RPC) protocol used by Microsoft Windows.
You can run Samba as:
- An Active Directory (AD) or NT4 domain member
- A standalone server
An NT4 Primary Domain Controller (PDC) or Backup Domain Controller (BDC)
NoteRed Hat supports the PDC and BDC modes only in existing installations with Windows versions which support NT4 domains. Red Hat recommends not setting up a new Samba NT4 domain, because Microsoft operating systems later than Windows 7 and Windows Server 2008 R2 do not support NT4 domains.
Red Hat does not support running Samba as an AD domain controller (DC).
Independently of the installation mode, you can optionally share directories and printers. This enables Samba to act as a file and print server.
3.1. Understanding the different Samba services and modes
The samba package provides multiple services. Depending on your environment and the scenario you want to configure, you require one or more of these services and configure Samba in different modes.
3.1.1. The Samba services
Samba provides the following services:
smbdThis service provides file sharing and printing services using the SMB protocol. Additionally, the service is responsible for resource locking and for authenticating connecting users. For authenticating domain members,
smbdrequireswinbindd. Thesmbsystemdservice starts and stops thesmbddaemon.To use the
smbdservice, install thesambapackage.nmbdThis service provides host name and IP resolution using the NetBIOS over IPv4 protocol. Additionally to the name resolution, the
nmbdservice enables browsing the SMB network to locate domains, work groups, hosts, file shares, and printers. For this, the service either reports this information directly to the broadcasting client or forwards it to a local or master browser. Thenmbsystemdservice starts and stops thenmbddaemon.Note that modern SMB networks use DNS to resolve clients and IP addresses. For Kerberos a working DNS setup is required.
To use the
nmbdservice, install thesambapackage.winbinddThis service provides an interface for the Name Service Switch (NSS) to use AD or NT4 domain users and groups on the local system. This enables, for example, domain users to authenticate to services hosted on a Samba server or to other local services. The
winbindsystemdservice starts and stops thewinbindddaemon.If you set up Samba as a domain member,
winbinddmust be started before thesmbdservice. Otherwise, domain users and groups are not available to the local system..To use the
winbinddservice, install thesamba-winbindpackage.ImportantRed Hat only supports running Samba as a server with the
winbinddservice to provide domain users and groups to the local system. Due to certain limitations, such as missing Windows access control list (ACL) support and NT LAN Manager (NTLM) fallback, SSSD is not supported.
3.1.2. The Samba security services
The security parameter in the [global] section in the /etc/samba/smb.conf file manages how Samba authenticates users that are connecting to the service. Depending on the mode you install Samba in, the parameter must be set to different values:
- On an AD domain member, set
security = ads In this mode, Samba uses Kerberos to authenticate AD users.
For details about setting up Samba as a domain member, see Setting up Samba as an AD domain member server.
- On a standalone server, set
security = user In this mode, Samba uses a local database to authenticate connecting users.
For details about setting up Samba as a standalone server, see Setting up Samba as a standalone server.
- On an NT4 PDC or BDC, set
security = user - In this mode, Samba authenticates users to a local or LDAP database.
- On an NT4 domain member, set
security = domain In this mode, Samba authenticates connecting users to an NT4 PDC or BDC. You cannot use this mode on AD domain members.
For details about setting up Samba as a domain member, see Setting up Samba as an AD domain member server.
Additional resources
-
securityparameter in thesmb.conf(5)man page
3.1.3. Scenarios when Samba services and Samba client utilities load and reload their configuration
The following describes when Samba services and utilities load and reload their configuration:
Samba services reload their configuration:
- Automatically every 3 minutes
-
On manual request, for example, when you run the
smbcontrol all reload-configcommand.
- Samba client utilities read their configuration only when you start them.
Note that certain parameters, such as security require a restart of the smb service to take effect and a reload is not sufficient.
Additional resources
-
The
How configuration changes are appliedsection in thesmb.conf(5)man page -
The
smbd(8),nmbd(8), andwinbindd(8)man pages
3.1.4. Editing the Samba configuration in a safe way
Samba services automatically reload their configuration every 3 minutes. To prevent that the services reload the changes before you have verified the configuration using the testparm utility, you can edit the Samba configuration in a safe way.
Prerequisites
- Samba is installed.
Procedure
Create a copy of the
/etc/samba/smb.conffile:# cp /etc/samba/smb.conf /etc/samba/samba.conf.copy- Edit the copied file and make the required changes.
Verify the configuration in the
/etc/samba/samba.conf.copyfile:# testparm -s /etc/samba/samba.conf.copyIf
testparmreports errors, fix them and run the command again.Override the
/etc/samba/smb.conffile with the new configuration:# mv /etc/samba/samba.conf.copy /etc/samba/smb.confWait until the Samba services automatically reload their configuration or manually reload the configuration:
# smbcontrol all reload-config
3.2. Verifying the smb.conf file by using the testparm utility
The testparm utility verifies that the Samba configuration in the /etc/samba/smb.conf file is correct. The utility detects invalid parameters and values, but also incorrect settings, such as for ID mapping. If testparm reports no problem, the Samba services will successfully load the /etc/samba/smb.conf file. Note that testparm cannot verify that the configured services will be available or work as expected.
Red Hat recommends that you verify the /etc/samba/smb.conf file by using testparm after each modification of this file.
Prerequisites
- You installed Samba.
-
The
/etc/samba/smb.conffile exits.
Procedure
Run the
testparmutility as therootuser:# testparm Load smb config files from /etc/samba/smb.conf rlimit_max: increasing rlimit_max (1024) to minimum Windows limit (16384) Unknown parameter encountered: "log levell" Processing section "[example_share]" Loaded services file OK. ERROR: The idmap range for the domain * (tdb) overlaps with the range of DOMAIN (ad)! Server role: ROLE_DOMAIN_MEMBER Press enter to see a dump of your service definitions # Global parameters [global] ... [example_share] ...
The previous example output reports a non-existent parameter and an incorrect ID mapping configuration.
-
If
testparmreports incorrect parameters, values, or other errors in the configuration, fix the problem and run the utility again.
3.3. Setting up Samba as a standalone server
You can set up Samba as a server that is not a member of a domain. In this installation mode, Samba authenticates users to a local database instead of to a central DC. Additionally, you can enable guest access to allow users to connect to one or multiple services without authentication.
3.3.1. Setting up the server configuration for the standalone server
You can set up the server configuration for a Samba standalone server.
Procedure
Install the
sambapackage:# yum install sambaEdit the
/etc/samba/smb.conffile and set the following parameters:[global] workgroup = Example-WG netbios name = Server security = user log file = /var/log/samba/%m.log log level = 1
This configuration defines a standalone server named
Serverwithin theExample-WGwork group. Additionally, this configuration enables logging on a minimal level (1) and log files will be stored in the/var/log/samba/directory. Samba will expand the%mmacro in thelog fileparameter to the NetBIOS name of connecting clients. This enables individual log files for each client.Optionally, configure file or printer sharing. See:
Verify the
/etc/samba/smb.conffile:# testparmIf you set up shares that require authentication, create the user accounts.
For details, see Creating and enabling local user accounts.
Open the required ports and reload the firewall configuration by using the
firewall-cmdutility:# firewall-cmd --permanent --add-service=samba # firewall-cmd --reload
Enable and start the
smbservice:# systemctl enable --now smb
Additional resources
-
smb.conf(5)man page
3.3.2. Creating and enabling local user accounts
To enable users to authenticate when they connect to a share, you must create the accounts on the Samba host both in the operating system and in the Samba database. Samba requires the operating system account to validate the Access Control Lists (ACL) on file system objects and the Samba account to authenticate connecting users.
If you use the passdb backend = tdbsam default setting, Samba stores user accounts in the /var/lib/samba/private/passdb.tdb database.
You can create a local Samba user named example.
Prerequisites
- Samba is installed and configured as a standalone server.
Procedure
Create the operating system account:
# useradd -M -s /sbin/nologin exampleThis command adds the
exampleaccount without creating a home directory. If the account is only used to authenticate to Samba, assign the/sbin/nologincommand as shell to prevent the account from logging in locally.Set a password to the operating system account to enable it:
# passwd example Enter new UNIX password:
passwordRetype new UNIX password:passwordpasswd: password updated successfullySamba does not use the password set on the operating system account to authenticate. However, you need to set a password to enable the account. If an account is disabled, Samba denies access if this user connects.
Add the user to the Samba database and set a password to the account:
# smbpasswd -a example New SMB password:
passwordRetype new SMB password:passwordAdded user example.Use this password to authenticate when using this account to connect to a Samba share.
Enable the Samba account:
# smbpasswd -e example
Enabled user example.
3.4. Understanding and configuring Samba ID mapping
Windows domains distinguish users and groups by unique Security Identifiers (SID). However, Linux requires unique UIDs and GIDs for each user and group. If you run Samba as a domain member, the winbindd service is responsible for providing information about domain users and groups to the operating system.
To enable the winbindd service to provide unique IDs for users and groups to Linux, you must configure ID mapping in the /etc/samba/smb.conf file for:
- The local database (default domain)
- The AD or NT4 domain the Samba server is a member of
- Each trusted domain from which users must be able to access resources on this Samba server
Samba provides different ID mapping back ends for specific configurations. The most frequently used back ends are:
| Back end | Use case |
|---|---|
|
|
The |
|
| AD domains only |
|
| AD and NT4 domains |
|
|
AD, NT4, and the |
3.4.1. Planning Samba ID ranges
Regardless of whether you store the Linux UIDs and GIDs in AD or if you configure Samba to generate them, each domain configuration requires a unique ID range that must not overlap with any of the other domains.
If you set overlapping ID ranges, Samba fails to work correctly.
Example 3.1. Unique ID Ranges
The following shows non-overlapping ID mapping ranges for the default (*), AD-DOM, and the TRUST-DOM domains.
[global]
...
idmap config * : backend = tdb
idmap config * : range = 10000-999999

idmap config AD-DOM:backend = rid
idmap config AD-DOM:range = 2000000-2999999

idmap config TRUST-DOM:backend = rid
idmap config TRUST-DOM:range = 4000000-4999999
You can only assign one range per domain. Therefore, leave enough space between the domains ranges. This enables you to extend the range later if your domain grows.
If you later assign a different range to a domain, the ownership of files and directories previously created by these users and groups will be lost.
3.4.2. The * default domain
In a domain environment, you add one ID mapping configuration for each of the following:
- The domain the Samba server is a member of
- Each trusted domain that should be able to access the Samba server
However, for all other objects, Samba assigns IDs from the default domain. This includes:
- Local Samba users and groups
-
Samba built-in accounts and groups, such as
BUILTIN\Administrators
You must configure the default domain as described to enable Samba to operate correctly.
The default domain back end must be writable to permanently store the assigned IDs.
For the default domain, you can use one of the following back ends:
tdbWhen you configure the default domain to use the
tdbback end, set an ID range that is big enough to include objects that will be created in the future and that are not part of a defined domain ID mapping configuration.For example, set the following in the
[global]section in the/etc/samba/smb.conffile:idmap config * : backend = tdb idmap config * : range = 10000-999999
For further details, see Using the TDB ID mapping back end.
autoridWhen you configure the default domain to use the
autoridback end, adding additional ID mapping configurations for domains is optional.For example, set the following in the
[global]section in the/etc/samba/smb.conffile:idmap config * : backend = autorid idmap config * : range = 10000-999999
For further details, see Using the autorid ID mapping back end.
3.4.3. Using the tdb ID mapping back end
The winbindd service uses the writable tdb ID mapping back end by default to store Security Identifier (SID), UID, and GID mapping tables. This includes local users, groups, and built-in principals.
Use this back end only for the * default domain. For example:
idmap config * : backend = tdb
idmap config * : range = 10000-999999
Additional resources
3.4.4. Using the ad ID mapping back end
You can configure a Samba AD member to use the ad ID mapping back end.
The ad ID mapping back end implements a read-only API to read account and group information from AD. This provides the following benefits:
- All user and group settings are stored centrally in AD.
- User and group IDs are consistent on all Samba servers that use this back end.
- The IDs are not stored in a local database which can corrupt, and therefore file ownerships cannot be lost.
The ad ID mapping back end does not support Active Directory domains with one-way trusts. If you configure a domain member in an Active Directory with one-way trusts, use instead one of the following ID mapping back ends: tdb, rid, or autorid.
The ad back end reads the following attributes from AD:
| AD attribute name | Object type | Mapped to |
|---|---|---|
|
| User and group | User or group name, depending on the object |
|
| User | User ID (UID) |
|
| Group | Group ID (GID) |
|
| User | Path to the shell of the user |
|
| User | Path to the home directory of the user |
|
| User | Primary group ID |
[a]
Samba only reads this attribute if you set idmap config DOMAIN:unix_nss_info = yes.
[b]
Samba only reads this attribute if you set idmap config DOMAIN:unix_primary_group = yes.
| ||
Prerequisites
-
Both users and groups must have unique IDs set in AD, and the IDs must be within the range configured in the
/etc/samba/smb.conffile. Objects whose IDs are outside of the range will not be available on the Samba server. - Users and groups must have all required attributes set in AD. If required attributes are missing, the user or group will not be available on the Samba server. The required attributes depend on your configuration. .Prerequisites
- You installed Samba.
-
The Samba configuration, except ID mapping, exists in the
/etc/samba/smb.conffile.
Procedure
Edit the
[global]section in the/etc/samba/smb.conffile:Add an ID mapping configuration for the default domain (
*) if it does not exist. For example:idmap config * : backend = tdb idmap config * : range = 10000-999999Enable the
adID mapping back end for the AD domain:idmap config DOMAIN : backend = adSet the range of IDs that is assigned to users and groups in the AD domain. For example:
idmap config DOMAIN : range = 2000000-2999999
ImportantThe range must not overlap with any other domain configuration on this server. Additionally, the range must be set big enough to include all IDs assigned in the future. For further details, see Planning Samba ID ranges.
Set that Samba uses the RFC 2307 schema when reading attributes from AD:
idmap config DOMAIN : schema_mode = rfc2307To enable Samba to read the login shell and the path to the users home directory from the corresponding AD attribute, set:
idmap config DOMAIN : unix_nss_info = yesAlternatively, you can set a uniform domain-wide home directory path and login shell that is applied to all users. For example:
template shell = /bin/bash
template homedir = /home/%U
By default, Samba uses the
primaryGroupIDattribute of a user object as the user’s primary group on Linux. Alternatively, you can configure Samba to use the value set in thegidNumberattribute instead:idmap config DOMAIN : unix_primary_group = yes
Verify the
/etc/samba/smb.conffile:# testparmReload the Samba configuration:
# smbcontrol all reload-config
Additional resources
- The * default domain
-
smb.conf(5)andidmap_ad(8)man pages -
VARIABLE SUBSTITUTIONSsection in thesmb.conf(5)man page
3.4.5. Using the rid ID mapping back end
You can configure a Samba domain member to use the rid ID mapping back end.
Samba can use the relative identifier (RID) of a Windows SID to generate an ID on Red Hat Enterprise Linux.
The RID is the last part of a SID. For example, if the SID of a user is S-1-5-21-5421822485-1151247151-421485315-30014, then 30014 is the corresponding RID.
The rid ID mapping back end implements a read-only API to calculate account and group information based on an algorithmic mapping scheme for AD and NT4 domains. When you configure the back end, you must set the lowest and highest RID in the idmap config DOMAIN : range parameter. Samba will not map users or groups with a lower or higher RID than set in this parameter.
As a read-only back end, rid cannot assign new IDs, such as for BUILTIN groups. Therefore, do not use this back end for the * default domain.
Benefits of using the rid back end
- All domain users and groups that have an RID within the configured range are automatically available on the domain member.
- You do not need to manually assign IDs, home directories, and login shells.
Drawbacks of using the rid back end
- All domain users get the same login shell and home directory assigned. However, you can use variables.
-
User and group IDs are only the same across Samba domain members if all use the
ridback end with the same ID range settings. - You cannot exclude individual users or groups from being available on the domain member. Only users and groups outside of the configured range are excluded.
-
Based on the formulas the
winbinddservice uses to calculate the IDs, duplicate IDs can occur in multi-domain environments if objects in different domains have the same RID.
Prerequisites
- You installed Samba.
-
The Samba configuration, except ID mapping, exists in the
/etc/samba/smb.conffile.
Procedure
Edit the
[global]section in the/etc/samba/smb.conffile:Add an ID mapping configuration for the default domain (
*) if it does not exist. For example:idmap config * : backend = tdb idmap config * : range = 10000-999999Enable the
ridID mapping back end for the domain:idmap config DOMAIN : backend = ridSet a range that is big enough to include all RIDs that will be assigned in the future. For example:
idmap config DOMAIN : range = 2000000-2999999
Samba ignores users and groups whose RIDs in this domain are not within the range.
ImportantThe range must not overlap with any other domain configuration on this server. Additionally, the range must be set big enough to include all IDs assigned in the future. For further details, see Planning Samba ID ranges.
Set a shell and home directory path that will be assigned to all mapped users. For example:
template shell = /bin/bash
template homedir = /home/%U
Verify the
/etc/samba/smb.conffile:# testparmReload the Samba configuration:
# smbcontrol all reload-config
Additional resources
- The * default domain
-
VARIABLE SUBSTITUTIONSsection in thesmb.conf(5)man page -
Calculation of the local ID from a RID, see the
idmap_rid(8)man page
3.4.6. Using the autorid ID mapping back end
You can configure a Samba domain member to use the autorid ID mapping back end.
The autorid back end works similar to the rid ID mapping back end, but can automatically assign IDs for different domains. This enables you to use the autorid back end in the following situations:
-
Only for the
*default domain -
For the
*default domain and additional domains, without the need to create ID mapping configurations for each of the additional domains - Only for specific domains
If you use autorid for the default domain, adding additional ID mapping configuration for domains is optional.
Parts of this section were adopted from the idmap config autorid documentation published in the Samba Wiki. License: CC BY 4.0. Authors and contributors: See the history tab on the Wiki page.
Benefits of using the autorid back end
- All domain users and groups whose calculated UID and GID is within the configured range are automatically available on the domain member.
- You do not need to manually assign IDs, home directories, and login shells.
- No duplicate IDs, even if multiple objects in a multi-domain environment have the same RID.
Drawbacks
- User and group IDs are not the same across Samba domain members.
- All domain users get the same login shell and home directory assigned. However, you can use variables.
- You cannot exclude individual users or groups from being available on the domain member. Only users and groups whose calculated UID or GID is outside of the configured range are excluded.
Prerequisites
- You installed Samba.
-
The Samba configuration, except ID mapping, exists in the
/etc/samba/smb.conffile.
Procedure
Edit the
[global]section in the/etc/samba/smb.conffile:Enable the
autoridID mapping back end for the*default domain:idmap config * : backend = autorid
Set a range that is big enough to assign IDs for all existing and future objects. For example:
idmap config * : range = 10000-999999Samba ignores users and groups whose calculated IDs in this domain are not within the range.
WarningAfter you set the range and Samba starts using it, you can only increase the upper limit of the range. Any other change to the range can result in new ID assignments, and thus in losing file ownerships.
Optionally, set a range size. For example:
idmap config * : rangesize = 200000Samba assigns this number of continuous IDs for each domain’s object until all IDs from the range set in the
idmap config * : rangeparameter are taken.NoteIf you set a rangesize, you need to adapt the range accordingly. The range needs to be a multiple of the rangesize.
Set a shell and home directory path that will be assigned to all mapped users. For example:
template shell = /bin/bash
template homedir = /home/%U
Optionally, add additional ID mapping configuration for domains. If no configuration for an individual domain is available, Samba calculates the ID using the
autoridback end settings in the previously configured*default domain.ImportantThe range must not overlap with any other domain configuration on this server. Additionally, the range must be set big enough to include all IDs assigned in the future. For further details, see Planning Samba ID ranges.
Verify the
/etc/samba/smb.conffile:# testparmReload the Samba configuration:
# smbcontrol all reload-config
Additional resources
-
THE MAPPING FORMULASsection in theidmap_autorid(8)man page -
rangesizeparameter description in theidmap_autorid(8)man page -
VARIABLE SUBSTITUTIONSsection in thesmb.conf(5)man page
3.5. Setting up Samba as an AD domain member server
If you are running an AD or NT4 domain, use Samba to add your Red Hat Enterprise Linux server as a member to the domain to gain the following:
- Access domain resources on other domain members
-
Authenticate domain users to local services, such as
sshd - Share directories and printers hosted on the server to act as a file and print server
3.5.1. Joining a RHEL system to an AD domain
Samba Winbind is an alternative to the System Security Services Daemon (SSSD) for connecting a Red Hat Enterprise Linux (RHEL) system with Active Directory (AD). You can join a RHEL system to an AD domain by using realmd to configure Samba Winbind.
Procedure
If your AD requires the deprecated RC4 encryption type for Kerberos authentication, enable support for these ciphers in RHEL:
# update-crypto-policies --set DEFAULT:AD-SUPPORTInstall the following packages:
# yum install realmd oddjob-mkhomedir oddjob samba-winbind-clients \
       samba-winbind samba-common-tools samba-winbind-krb5-locator
To share directories or printers on the domain member, install the
sambapackage:# yum install sambaBackup the existing
/etc/samba/smb.confSamba configuration file:# mv /etc/samba/smb.conf /etc/samba/smb.conf.bakJoin the domain. For example, to join a domain named
ad.example.com:# realm join --membership-software=samba --client-software=winbind ad.example.comUsing the previous command, the
realmutility automatically:-
Creates a
/etc/samba/smb.conffile for a membership in thead.example.comdomain -
Adds the
winbindmodule for user and group lookups to the/etc/nsswitch.conffile -
Updates the Pluggable Authentication Module (PAM) configuration files in the
/etc/pam.d/directory -
Starts the
winbindservice and enables the service to start when the system boots
-
Creates a
-
Optionally, set an alternative ID mapping back end or customized ID mapping settings in the
/etc/samba/smb.conffile. For details, see Understanding and configuring Samba ID mapping. Verify that the
winbindservice is running:# systemctl status winbind ... Active: active (running) since Tue 2018-11-06 19:10:40 CET; 15s agoImportantTo enable Samba to query domain user and group information, the
winbindservice must be running before you startsmb.If you installed the
sambapackage to share directories and printers, enable and start thesmbservice:# systemctl enable --now smb-
Optionally, if you are authenticating local logins to Active Directory, enable the
winbind_krb5_localauthplug-in. See Using the local authorization plug-in for MIT Kerberos.
Verification steps
Display an AD user’s details, such as the AD administrator account in the AD domain:
# getent passwd "AD\administrator"
AD\administrator:*:10000:10000::/home/administrator@AD:/bin/bash
Query the members of the domain users group in the AD domain:
# getent group "AD\Domain Users"
    AD\domain users:x:10000:user1,user2
Optionally, verify that you can use domain users and groups when you set permissions on files and directories. For example, to set the owner of the
/srv/samba/example.txtfile toAD\administratorand the group toAD\Domain Users:# chown "AD\administrator":"AD\Domain Users" /srv/samba/example.txtVerify that Kerberos authentication works as expected:
On the AD domain member, obtain a ticket for the
administrator@AD.EXAMPLE.COMprincipal:# kinit administrator@AD.EXAMPLE.COMDisplay the cached Kerberos ticket:
# klist
Ticket cache: KCM:0
Default principal: administrator@AD.EXAMPLE.COM

Valid starting       Expires              Service principal
01.11.2018 10:00:00  01.11.2018 20:00:00  krbtgt/AD.EXAMPLE.COM@AD.EXAMPLE.COM
        renew until 08.11.2018 05:00:00
Display the available domains:
# wbinfo --all-domains
BUILTIN
SAMBA-SERVER
AD
Additional resources
- If you do not want to use the deprecated RC4 ciphers, you can enable the AES encryption type in AD. See
- Enabling the AES encryption type in Active Directory using a GPO
-
realm(8)man page
3.5.2. Using the local authorization plug-in for MIT Kerberos
The winbind service provides Active Directory users to the domain member. In certain situations, administrators want to enable domain users to authenticate to local services, such as an SSH server, which are running on the domain member. When using Kerberos to authenticate the domain users, enable the winbind_krb5_localauth plug-in to correctly map Kerberos principals to Active Directory accounts through the winbind service.
For example, if the sAMAccountName attribute of an Active Directory user is set to EXAMPLE and the user tries to log with the user name lowercase, Kerberos returns the user name in upper case. As a consequence, the entries do not match and authentication fails.
Using the winbind_krb5_localauth plug-in, the account names are mapped correctly. Note that this only applies to GSSAPI authentication and not for getting the initial ticket granting ticket (TGT).
Prerequisites
- Samba is configured as a member of an Active Directory.
- Red Hat Enterprise Linux authenticates log in attempts against Active Directory.
-
The
winbindservice is running.
Procedure
Edit the /etc/krb5.conf file and add the following section:
[plugins]
localauth = {
     module = winbind:/usr/lib64/samba/krb5/winbind_krb5_localauth.so
     enable_only = winbind
}
Additional resources
-
winbind_krb5_localauth(8)man page.
3.6. Setting up Samba on an IdM domain member
You can set up Samba on a host that is joined to a Red Hat Identity Management (IdM) domain. Users from IdM and also, if available, from trusted Active Directory (AD) domains, can access shares and printer services provided by Samba.
Using Samba on an IdM domain member is an unsupported Technology Preview feature and contains certain limitations. For example, IdM trust controllers do not support the Active Directory Global Catalog service, and they do not support resolving IdM groups using the Distributed Computing Environment / Remote Procedure Calls (DCE/RPC) protocols. As a consequence, AD users can only access Samba shares and printers hosted on IdM clients when logged in to other IdM clients; AD users logged into a Windows machine can not access Samba shares hosted on an IdM domain member.
Customers deploying Samba on IdM domain members are encouraged to provide feedback to Red Hat.
If users from AD domains need to access shares and printer services provided by Samba, ensure the AES encryption type is enabled is AD. For more information, see Enabling the AES encryption type in Active Directory using a GPO.
Prerequisites
- The host is joined as a client to the IdM domain.
- Both the IdM servers and the client must run on RHEL 8.1 or later.
3.6.1. Preparing the IdM domain for installing Samba on domain members
Before you can set up Samba on an IdM client, you must prepare the IdM domain using the ipa-adtrust-install utility on an IdM server.
Any system where you run the ipa-adtrust-install command automatically becomes an AD trust controller. However, you must run ipa-adtrust-install only once on an IdM server.
Prerequisites
- IdM server is installed.
- You need root privileges to install packages and restart IdM services.
Procedure
Install the required packages:
[root@ipaserver ~]# yum install ipa-server-trust-ad samba-clientAuthenticate as the IdM administrative user:
[root@ipaserver ~]# kinit adminRun the
ipa-adtrust-installutility:[root@ipaserver ~]# ipa-adtrust-installThe DNS service records are created automatically if IdM was installed with an integrated DNS server.
If you installed IdM without an integrated DNS server,
ipa-adtrust-installprints a list of service records that you must manually add to DNS before you can continue.The script prompts you that the
/etc/samba/smb.confalready exists and will be rewritten:WARNING: The smb.conf already exists. Running ipa-adtrust-install will break your existing Samba configuration. Do you wish to continue? [no]:
yesThe script prompts you to configure the
slapi-nisplug-in, a compatibility plug-in that allows older Linux clients to work with trusted users:Do you want to enable support for trusted domains in Schema Compatibility plugin? This will allow clients older than SSSD 1.9 and non-Linux clients to work with trusted users. Enable trusted domains support in slapi-nis? [no]:
yesWhen prompted, enter the NetBIOS name for the IdM domain or press Enter to accept the name suggested:
Trust is configured but no NetBIOS domain name found, setting it now.
Enter the NetBIOS name for the IPA domain.
Only up to 15 uppercase ASCII letters, digits and dashes are allowed.
Example: EXAMPLE.

NetBIOS domain name [IDM]:
You are prompted to run the SID generation task to create a SID for any existing users:
Do you want to run the ipa-sidgen task? [no]:
yesThis is a resource-intensive task, so if you have a high number of users, you can run this at another time.
(Optional) By default, the Dynamic RPC port range is defined as
49152-65535for Windows Server 2008 and later. If you need to define a different Dynamic RPC port range for your environment, configure Samba to use different ports and open those ports in your firewall settings. The following example sets the port range to55000-65000.[root@ipaserver ~]# net conf setparm global 'rpc server dynamic port range' 55000-65000 [root@ipaserver ~]# firewall-cmd --add-port=55000-65000/tcp [root@ipaserver ~]# firewall-cmd --runtime-to-permanent
Restart the
ipaservice:[root@ipaserver ~]# ipactl restartUse the
smbclientutility to verify that Samba responds to Kerberos authentication from the IdM side:[root@ipaserver ~]#
smbclient -L server.idm.example.com -U user_name --use-kerberos=requiredlp_load_ex: changing to config backend registry Sharename Type Comment --------- ---- ------- IPC$ IPC IPC Service (Samba 4.15.2) ...
3.6.2. Installing and configuring a Samba server on an IdM client
You can install and configure Samba on a client enrolled in an IdM domain.
Prerequisites
- Both the IdM servers and the client must run on RHEL 8.1 or later.
- The IdM domain is prepared as described in Preparing the IdM domain for installing Samba on domain members.
- If IdM has a trust configured with AD, enable the AES encryption type for Kerberos. For example, use a group policy object (GPO) to enable the AES encryption type. For details, see Enabling AES encryption in Active Directory using a GPO.
Procedure
Install the
ipa-client-sambapackage:[root@idm_client]# yum install ipa-client-sambaUse the
ipa-client-sambautility to prepare the client and create an initial Samba configuration:[root@idm_client]# ipa-client-samba Searching for IPA server... IPA server: DNS discovery Chosen IPA master: idm_server.idm.example.com SMB principal to be created: cifs/idm_client.idm.example.com@IDM.EXAMPLE.COM NetBIOS name to be used: IDM_CLIENT Discovered domains to use: Domain name: idm.example.com NetBIOS name: IDM SID: S-1-5-21-525930803-952335037-206501584 ID range: 212000000 - 212199999 Domain name: ad.example.com NetBIOS name: AD SID: None ID range: 1918400000 - 1918599999 Continue to configure the system with these values? [no]: yes Samba domain member is configured. Please check configuration at /etc/samba/smb.conf and start smb and winbind services
By default,
ipa-client-sambaautomatically adds the[homes]section to the/etc/samba/smb.conffile that dynamically shares a user’s home directory when the user connects. If users do not have home directories on this server, or if you do not want to share them, remove the following lines from/etc/samba/smb.conf:[homes] read only = noShare directories and printers. For details, see:
Open the ports required for a Samba client in the local firewall:
[root@idm_client]# firewall-cmd --permanent --add-service=samba-client
[root@idm_client]# firewall-cmd --reload
Enable and start the
smbandwinbindservices:[root@idm_client]# systemctl enable --now smb winbind
Verification steps
Run the following verification step on a different IdM domain member that has the samba-client package installed:
List the shares on the Samba server using Kerberos authentication:
$
smbclient -L idm_client.idm.example.com -U user_name --use-kerberos=requiredlp_load_ex: changing to config backend registry Sharename Type Comment --------- ---- ------- example Disk IPC$ IPC IPC Service (Samba 4.15.2) ...
Additional resources
-
ipa-client-samba(1)man page
3.6.3. Manually adding an ID mapping configuration if IdM trusts a new domain
Samba requires an ID mapping configuration for each domain from which users access resources. On an existing Samba server running on an IdM client, you must manually add an ID mapping configuration after the administrator added a new trust to an Active Directory (AD) domain.
Prerequisites
- You configured Samba on an IdM client. Afterward, a new trust was added to IdM.
- The DES and RC4 encryption types for Kerberos must be disabled in the trusted AD domain. For security reasons, RHEL 8 does not support these weak encryption types.
Procedure
Authenticate using the host’s keytab:
[root@idm_client]# kinit -kUse the
ipa idrange-findcommand to display both the base ID and the ID range size of the new domain. For example, the following command displays the values for thead.example.comdomain:[root@idm_client]# ipa idrange-find --name="AD.EXAMPLE.COM_id_range" --raw --------------- 1 range matched --------------- cn: AD.EXAMPLE.COM_id_range ipabaseid: 1918400000 ipaidrangesize: 200000 ipabaserid: 0 ipanttrusteddomainsid: S-1-5-21-968346183-862388825-1738313271 iparangetype: ipa-ad-trust ---------------------------- Number of entries returned 1 ----------------------------
You need the values from the
ipabaseidandipaidrangesizeattributes in the next steps.To calculate the highest usable ID, use the following formula:
maximum_range = ipabaseid + ipaidrangesize - 1
With the values from the previous step, the highest usable ID for the
ad.example.comdomain is1918599999(1918400000 + 200000 - 1).Edit the
/etc/samba/smb.conffile, and add the ID mapping configuration for the domain to the[global]section:idmap config AD : range = 1918400000 - 1918599999 idmap config AD : backend = sss
Specify the value from
ipabaseidattribute as the lowest and the computed value from the previous step as the highest value of the range.Restart the
smbandwinbindservices:[root@idm_client]# systemctl restart smb winbind
Verification steps
List the shares on the Samba server using Kerberos authentication:
$
smbclient -L idm_client.idm.example.com -U user_name --use-kerberos=requiredlp_load_ex: changing to config backend registry Sharename Type Comment --------- ---- ------- example Disk IPC$ IPC IPC Service (Samba 4.15.2) ...
3.6.4. Additional resources
3.13. Configuring Samba for macOS clients
The fruit virtual file system (VFS) Samba module provides enhanced compatibility with Apple server message block (SMB) clients.
3.15. Setting up Samba as a print server
If you set up Samba as a print server, clients in your network can use Samba to print. Additionally, Windows clients can, if configured, download the driver from the Samba server.
Parts of this section were adopted from the Setting up Samba as a Print Server documentation published in the Samba Wiki. License: CC BY 4.0. Authors and contributors: See the history tab on the Wiki page.
Prerequisites
Samba has been set up in one of the following modes:
3.15.1. Enabling print server support in Samba
By default, print server support is not enabled in Samba. To use Samba as a print server, you must configure Samba accordingly.
Print jobs and printer operations require remote procedure calls (RPCs). By default, Samba starts the rpcd_spoolss service on demand to manage RPCs. During the first RPC call, or when you update the printer list in CUPS, Samba retrieves the printer information from CUPS. This can require approximately 1 second per printer. Therefore, if you have more than 50 printers, tune the rpcd_spoolss settings.
Prerequisites
The printers are configured in a CUPS server.
For details about configuring printers in CUPS, see the documentation provided in the CUPS web console (https://printserver:631/help) on the print server.
Procedure
Edit the
/etc/samba/smb.conffile:Add the
[printers]section to enable the printing backend in Samba:[printers] comment = All Printers path = /var/tmp/ printable = yes create mask = 0600
ImportantThe
[printers]share name is hard-coded and cannot be changed.If the CUPS server runs on a different host or port, specify the setting in the
[printers]section:cups server = printserver.example.com:631If you have many printers, set the number of idle seconds to a higher value than the numbers of printers connected to CUPS. For example, if you have 100 printers, set in the
[global]section:rpcd_spoolss:idle_seconds = 200If this setting does not scale in your environment, also increase the number of
rpcd_spoolssworkers in the[global]section:rpcd_spoolss:num_workers = 10By default,
rpcd_spoolssstarts 5 workers.
Verify the
/etc/samba/smb.conffile:# testparmOpen the required ports and reload the firewall configuration using the
firewall-cmdutility:# firewall-cmd --permanent --add-service=samba # firewall-cmd --reload
Restart the
smbservice:# systemctl restart smbAfter restarting the service, Samba automatically shares all printers that are configured in the CUPS back end. If you want to manually share only specific printers, see Manually sharing specific printers.
Verification
Submit a print job. For example, to print a PDF file, enter:
# smbclient -Uuser //sambaserver.example.com/printer_name -c "print example.pdf"
3.15.2. Manually sharing specific printers
If you configured Samba as a print server, by default, Samba shares all printers that are configured in the CUPS back end. The following procedure explains how to share only specific printers.
Prerequisites
- Samba is set up as a print server
Procedure
Edit the
/etc/samba/smb.conffile:In the
[global]section, disable automatic printer sharing by setting:load printers = no
Add a section for each printer you want to share. For example, to share the printer named
examplein the CUPS back end asExample-Printerin Samba, add the following section:[Example-Printer] path = /var/tmp/ printable = yes printer name = exampleYou do not need individual spool directories for each printer. You can set the same spool directory in the
pathparameter for the printer as you set in the[printers]section.
Verify the
/etc/samba/smb.conffile:# testparmReload the Samba configuration:
# smbcontrol all reload-config
3.16. Setting up automatic printer driver downloads for Windows clients on Samba print servers
If you are running a Samba print server for Windows clients, you can upload drivers and preconfigure printers. If a user connects to a printer, Windows automatically downloads and installs the driver locally on the client. The user does not require local administrator permissions for the installation. Additionally, Windows applies preconfigured driver settings, such as the number of trays.
Parts of this section were adopted from the Setting up Automatic Printer Driver Downloads for Windows Clients documentation published in the Samba Wiki. License: CC BY 4.0. Authors and contributors: See the history tab on the Wiki page.
Prerequisites
- Samba is set up as a print server
3.16.1. Basic information about printer drivers
This section provides general information about printer drivers.
Supported driver model version
Samba only supports the printer driver model version 3 which is supported in Windows 2000 and later, and Windows Server 2000 and later. Samba does not support the driver model version 4, introduced in Windows 8 and Windows Server 2012. However, these and later Windows versions also support version 3 drivers.
Package-aware drivers
Samba does not support package-aware drivers.
Preparing a printer driver for being uploaded
Before you can upload a driver to a Samba print server:
- Unpack the driver if it is provided in a compressed format.
Some drivers require to start a setup application that installs the driver locally on a Windows host. In certain situations, the installer extracts the individual files into the operating system’s temporary folder during the setup runs. To use the driver files for uploading:
- Start the installer.
- Copy the files from the temporary folder to a new location.
- Cancel the installation.
Ask your printer manufacturer for drivers that support uploading to a print server.
Providing 32-bit and 64-bit drivers for a printer to a client
To provide the driver for a printer for both 32-bit and 64-bit Windows clients, you must upload a driver with exactly the same name for both architectures. For example, if you are uploading the 32-bit driver named Example PostScript and the 64-bit driver named Example PostScript (v1.0), the names do not match. Consequently, you can only assign one of the drivers to a printer and the driver will not be available for both architectures.
3.16.2. Enabling users to upload and preconfigure drivers
To be able to upload and preconfigure printer drivers, a user or a group needs to have the SePrintOperatorPrivilege privilege granted. A user must be added into the printadmin group. Red Hat Enterprise Linux automatically creates this group when you install the samba package. The printadmin group gets assigned the lowest available dynamic system GID that is lower than 1000.
Procedure
For example, to grant the
SePrintOperatorPrivilegeprivilege to theprintadmingroup:# net rpc rights grant "printadmin" SePrintOperatorPrivilege -U "DOMAIN\administrator" Enter DOMAIN\administrator's password: Successfully granted rights.
NoteIn a domain environment, grant
SePrintOperatorPrivilegeto a domain group. This enables you to centrally manage the privilege by updating a user’s group membership.To list all users and groups having
SePrintOperatorPrivilegegranted:# net rpc rights list privileges SePrintOperatorPrivilege -U "DOMAIN\administrator" Enter administrator's password: SePrintOperatorPrivilege: BUILTIN\Administrators DOMAIN\printadmin
3.16.4. Creating a GPO to enable clients to trust the Samba print server
For security reasons, recent Windows operating systems prevent clients from downloading non-package-aware printer drivers from an untrusted server. If your print server is a member in an AD, you can create a Group Policy Object (GPO) in your domain to trust the Samba server.
Prerequisites
- The Samba print server is a member of an AD domain.
- The Windows computer you are using to create the GPO must have the Windows Remote Server Administration Tools (RSAT) installed. For details, see the Windows documentation.
Procedure
-
Log into a Windows computer using an account that is allowed to edit group policies, such as the AD domain
Administratoruser. -
Open the
Group Policy Management Console. Right-click to your AD domain and select
Create a GPO in this domain, and Link it here.
-
Enter a name for the GPO, such as
Legacy Printer Driver Policyand clickOK. The new GPO will be displayed under the domain entry. -
Right-click to the newly-created GPO and select
Editto open theGroup Policy Management Editor. Navigate to → → → .

On the right side of the window, double-click
Point and Print Restrictionto edit the policy:Enable the policy and set the following options:
-
Select
Users can only point and print to these serversand enter the fully-qualified domain name (FQDN) of the Samba print server to the field next to this option. In both check boxes under
Security Prompts, selectDo not show warning or elevation prompt.
-
Select
- Click OK.
Double-click
Package Point and Print - Approved serversto edit the policy:-
Enable the policy and click the
Showbutton. Enter the FQDN of the Samba print server.

-
Close both the
Show Contentsand the policy’s properties window by clickingOK.
-
Enable the policy and click the
-
Close the
Group Policy Management Editor. -
Close the
Group Policy Management Console.
After the Windows domain members applied the group policy, printer drivers are automatically downloaded from the Samba server when a user connects to a printer.
Additional resources
- For using group policies, see the Windows documentation.
3.16.5. Uploading drivers and preconfiguring printers
Use the Print Management application on a Windows client to upload drivers and preconfigure printers hosted on the Samba print server. For further details, see the Windows documentation.
3.17. Running Samba on a server with FIPS mode enabled
This section provides an overview of the limitations of running Samba with FIPS mode enabled. It also provides the procedure for enabling FIPS mode on a Red Hat Enterprise Linux host running Samba.
3.17.1. Limitations of using Samba in FIPS mode
The following Samba modes and features work in FIPS mode under the indicated conditions:
- Samba as a domain member only in Active Directory (AD) or Red Hat Identity Management (IdM) environments with Kerberos authentication that uses AES ciphers.
- Samba as a file server on an Active Directory domain member. However, this requires that clients use Kerberos to authenticate to the server.
Due to the increased security of FIPS, the following Samba features and modes do not work if FIPS mode is enabled:
- NT LAN Manager (NTLM) authentication because RC4 ciphers are blocked
- The server message block version 1 (SMB1) protocol
- The stand-alone file server mode because it uses NTLM authentication
- NT4-style domain controllers
- NT4-style domain members. Note that Red Hat continues supporting the primary domain controller (PDC) functionality IdM uses in the background.
- Password changes against the Samba server. You can only perform password changes using Kerberos against an Active Directory domain controller.
The following feature is not tested in FIPS mode and, therefore, is not supported by Red Hat:
- Running Samba as a print server
3.17.2. Using Samba in FIPS mode
You can enable the FIPS mode on a RHEL host that runs Samba.
Prerequisites
- Samba is configured on the Red Hat Enterprise Linux host.
- Samba runs in a mode that is supported in FIPS mode.
Procedure
Enable the FIPS mode on RHEL:
# fips-mode-setup --enableReboot the server:
# rebootUse the
testparmutility to verify the configuration:# testparm -sIf the command displays any errors or incompatibilities, fix them to ensure that Samba works correctly.
Additional resources
3.18. Tuning the performance of a Samba server
Learn what settings can improve the performance of Samba in certain situations, and which settings can have a negative performance impact.
Parts of this section were adopted from the Performance Tuning documentation published in the Samba Wiki. License: CC BY 4.0. Authors and contributors: See the history tab on the Wiki page.
Prerequisites
- Samba is set up as a file or print server
3.18.1. Setting the SMB protocol version
Each new SMB version adds features and improves the performance of the protocol. The recent Windows and Windows Server operating systems always supports the latest protocol version. If Samba also uses the latest protocol version, Windows clients connecting to Samba benefit from the performance improvements. In Samba, the default value of the server max protocol is set to the latest supported stable SMB protocol version.
To always have the latest stable SMB protocol version enabled, do not set the server max protocol parameter. If you set the parameter manually, you will need to modify the setting with each new version of the SMB protocol, to have the latest protocol version enabled.
The following procedure explains how to use the default value in the server max protocol parameter.
Procedure
-
Remove the
server max protocolparameter from the[global]section in the/etc/samba/smb.conffile. Reload the Samba configuration
# smbcontrol all reload-config
3.18.3. Settings that can have a negative performance impact
By default, the kernel in Red Hat Enterprise Linux is tuned for high network performance. For example, the kernel uses an auto-tuning mechanism for buffer sizes. Setting the socket options parameter in the /etc/samba/smb.conf file overrides these kernel settings. As a result, setting this parameter decreases the Samba network performance in most cases.
To use the optimized settings from the Kernel, remove the socket options parameter from the [global] section in the /etc/samba/smb.conf.
3.19. Configuring Samba to be compatible with clients that require an SMB version lower than the default
Samba uses a reasonable and secure default value for the minimum server message block (SMB) version it supports. However, if you have clients that require an older SMB version, you can configure Samba to support it.
3.19.1. Setting the minimum SMB protocol version supported by a Samba server
In Samba, the server min protocol parameter in the /etc/samba/smb.conf file defines the minimum server message block (SMB) protocol version the Samba server supports. You can change the minimum SMB protocol version.
By default, Samba on RHEL 8.2 and later supports only SMB2 and newer protocol versions. Red Hat recommends to not use the deprecated SMB1 protocol. However, if your environment requires SMB1, you can manually set the server min protocol parameter to NT1 to re-enable SMB1.
Prerequisites
- Samba is installed and configured.
Procedure
Edit the
/etc/samba/smb.conffile, add theserver min protocolparameter, and set the parameter to the minimum SMB protocol version the server should support. For example, to set the minimum SMB protocol version toSMB3, add:server min protocol = SMB3
Restart the
smbservice:# systemctl restart smb
Additional resources
-
smb.conf(5)man page
3.20. Frequently used Samba command-line utilities
This chapter describes frequently used commands when working with a Samba server.
3.20.1. Using the net ads join and net rpc join commands
Using the join subcommand of the net utility, you can join Samba to an AD or NT4 domain. To join the domain, you must create the /etc/samba/smb.conf file manually, and optionally update additional configurations, such as PAM.
Red Hat recommends using the realm utility to join a domain. The realm utility automatically updates all involved configuration files.
Procedure
Manually create the
/etc/samba/smb.conffile with the following settings:For an AD domain member:
[global]
workgroup = domain_name
security = ads
passdb backend = tdbsam
realm = AD_REALM
For an NT4 domain member:
[global]
workgroup = domain_name
security = user
passdb backend = tdbsam
-
Add an ID mapping configuration for the
*default domain and for the domain you want to join to the[global] section in the/etc/samba/smb.conffile. Verify the
/etc/samba/smb.conffile:# testparmJoin the domain as the domain administrator:
To join an AD domain:
# net ads join -U "DOMAIN\administrator"To join an NT4 domain:
# net rpc join -U "DOMAIN\administrator"
Append the
winbindsource to thepasswdandgroupdatabase entry in the/etc/nsswitch.conffile:passwd: files
winbindgroup: fileswinbindEnable and start the
winbindservice:# systemctl enable --now winbindOptionally, configure PAM using the
authselectutility.For details, see the
authselect(8)man page.Optionally for AD environments, configure the Kerberos client.
For details, see the documentation of your Kerberos client.
Additional resources
3.20.2. Using the net rpc rights command
In Windows, you can assign privileges to accounts and groups to perform special operations, such as setting ACLs on a share or upload printer drivers. On a Samba server, you can use the net rpc rights command to manage privileges.
Listing privileges you can set
To list all available privileges and their owners, use the net rpc rights list command. For example:
# net rpc rights list -U "DOMAIN\administrator"
Enter DOMAIN\administrator's password:
     SeMachineAccountPrivilege  Add machines to domain
      SeTakeOwnershipPrivilege  Take ownership of files or other objects
             SeBackupPrivilege  Back up files and directories
            SeRestorePrivilege  Restore files and directories
     SeRemoteShutdownPrivilege  Force shutdown from a remote system
      SePrintOperatorPrivilege  Manage printers
           SeAddUsersPrivilege  Add users and groups to the domain
       SeDiskOperatorPrivilege  Manage disk shares
           SeSecurityPrivilege  System security
Granting privileges
To grant a privilege to an account or group, use the net rpc rights grant command.
For example, grant the SePrintOperatorPrivilege privilege to the DOMAIN\printadmin group:
# net rpc rights grant "DOMAIN\printadmin" SePrintOperatorPrivilege -U "DOMAIN\administrator"
Enter DOMAIN\administrator's password:
Successfully granted rights.
Revoking privileges
To revoke a privilege from an account or group, use the net rpc rights revoke command.
For example, to revoke the SePrintOperatorPrivilege privilege from the DOMAIN\printadmin group:
# net rpc rights remoke "DOMAIN\printadmin" SePrintOperatorPrivilege -U "DOMAIN\administrator"
Enter DOMAIN\administrator's password:
Successfully revoked rights.
3.20.4. Using the net user command
The net user command enables you to perform the following actions on an AD DC or NT4 PDC:
- List all user accounts
- Add users
- Remove Users
Specifying a connection method, such as ads for AD domains or rpc for NT4 domains, is only required when you list domain user accounts. Other user-related subcommands can auto-detect the connection method.
Pass the -U user_name parameter to the command to specify a user that is allowed to perform the requested action.
Listing domain user accounts
To list all users in an AD domain:
# net ads user -U "DOMAIN\administrator"To list all users in an NT4 domain:
# net rpc user -U "DOMAIN\administrator"Adding a user account to the domain
On a Samba domain member, you can use the net user add command to add a user account to the domain.
For example, add the user account to the domain:
Add the account:
# net user add user password -U "DOMAIN\administrator"
User user added
Optionally, use the remote procedure call (RPC) shell to enable the account on the AD DC or NT4 PDC. For example:
# net rpc shell -U DOMAIN\administrator -S DC_or_PDC_name Talking to domain DOMAIN (S-1-5-21-1424831554-512457234-5642315751) net rpc>
user edit disabled user: noSet user's disabled flag from [yes] to [no] net rpc>exit
Deleting a user account from the domain
On a Samba domain member, you can use the net user delete command to remove a user account from the domain.
For example, to remove the user account from the domain:
# net user delete user -U "DOMAIN\administrator"
User user deleted
3.20.5. Using the rpcclient utility
The rpcclient utility enables you to manually execute client-side Microsoft Remote Procedure Call (MS-RPC) functions on a local or remote SMB server. However, most of the features are integrated into separate utilities provided by Samba. Use rpcclient only for testing MS-PRC functions.
Prerequisites
-
The
samba-clientpackage is installed.
Examples
For example, you can use the rpcclient utility to:
Manage the printer Spool Subsystem (SPOOLSS).
Example 3.7. Assigning a Driver to a Printer
# rpcclient server_name -U "DOMAIN\administrator" -c 'setdriver "printer_name" "driver_name"'
Enter DOMAIN\administrators password:
Successfully set printer_name to driver driver_name.
Retrieve information about an SMB server.
Example 3.8. Listing all File Shares and Shared Printers
# rpcclient server_name -U "DOMAIN\administrator" -c 'netshareenum'
Enter DOMAIN\administrators password:
netname: Example_Share
	remark:
	path:   C:\srv\samba\example_share\
	password:
netname: Example_Printer
	remark:
	path:   C:\var\spool\samba\
	password:
Perform actions using the Security Account Manager Remote (SAMR) protocol.
Example 3.9. Listing Users on an SMB Server
# rpcclient server_name -U "DOMAIN\administrator" -c 'enumdomusers'
Enter DOMAIN\administrators password:
user:[user1] rid:[0x3e8]
user:[user2] rid:[0x3e9]
If you run the command against a standalone server or a domain member, it lists the users in the local database. Running the command against an AD DC or NT4 PDC lists the domain users.
Additional resources
-
rpcclient(1)man page
3.20.6. Using the samba-regedit application
Certain settings, such as printer configurations, are stored in the registry on the Samba server. You can use the ncurses-based samba-regedit application to edit the registry of a Samba server.

Prerequisites
-
The
samba-clientpackage is installed.
Procedure
To start the application, enter:
# samba-regeditUse the following keys:
- Cursor up and cursor down: Navigate through the registry tree and the values.
- Enter: Opens a key or edits a value.
-
Tab: Switches between the
KeyandValuepane. - Ctrl+C: Closes the application.
3.20.7. Using the smbcontrol utility
The smbcontrol utility enables you to send command messages to the smbd, nmbd, winbindd, or all of these services. These control messages instruct the service, for example, to reload its configuration.
Prerequisites
-
The
samba-common-toolspackage is installed.
Procedure
-
Reload the configuration of the
smbd,nmbd,winbinddservices by sending thereload-configmessage type to thealldestination:
# smbcontrol all reload-configAdditional resources
-
smbcontrol(1)man page
3.20.8. Using the smbpasswd utility
The smbpasswd utility manages user accounts and passwords in the local Samba database.
Prerequisites
-
The
samba-common-toolspackage is installed.
Procedure
If you run the command as a user,
smbpasswdchanges the Samba password of the user who run the command. For example:[user@server ~]$ smbpasswd New SMB password: password Retype new SMB password: password
If you run
smbpasswdas therootuser, you can use the utility, for example, to:Create a new user:
[root@server ~]# smbpasswd -a user_name New SMB password:
passwordRetype new SMB password:passwordAdded user user_name.NoteBefore you can add a user to the Samba database, you must create the account in the local operating system. See the Adding a new user from the command line section in the Configuring basic system settings guide.
Enable a Samba user:
[root@server ~]# smbpasswd -e user_name
Enabled user user_name.
Disable a Samba user:
[root@server ~]# smbpasswd -x user_name
Disabled user user_name
Delete a user:
[root@server ~]# smbpasswd -x user_name
Deleted user user_name.
Additional resources
-
smbpasswd(8)man page
3.20.9. Using the smbstatus utility
The smbstatus utility reports on:
-
Connections per PID of each
smbddaemon to the Samba server. This report includes the user name, primary group, SMB protocol version, encryption, and signing information. -
Connections per Samba share. This report includes the PID of the
smbddaemon, the IP of the connecting machine, the time stamp when the connection was established, encryption, and signing information. - A list of locked files. The report entries include further details, such as opportunistic lock (oplock) types
Prerequisites
-
The
sambapackage is installed. -
The
smbdservice is running.
Procedure
# smbstatus

Samba version 4.15.2
PID  Username              Group                Machine                            Protocol Version  Encryption  Signing
....-------------------------------------------------------------------------------------------------------------------------
963  DOMAIN\administrator  DOMAIN\domain users  client-pc  (ipv4:192.0.2.1:57786)  SMB3_02           -           AES-128-CMAC

Service  pid  Machine    Connected at                  Encryption  Signing:
....---------------------------------------------------------------------------
example  969  192.0.2.1  Thu Nov  1 10:00:00 2018 CEST  -           AES-128-CMAC

Locked files:
Pid  Uid    DenyMode   Access    R/W     Oplock      SharePath           Name      Time
....--------------------------------------------------------------------------------------------------------
969  10000  DENY_WRITE 0x120089  RDONLY  LEASE(RWH)  /srv/samba/example  file.txt  Thu Nov  1 10:00:00 2018
Additional resources
-
smbstatus(1)man page
3.20.10. Using the smbtar utility
The smbtar utility backs up the content of an SMB share or a subdirectory of it and stores the content in a tar archive. Alternatively, you can write the content to a tape device.
Prerequisites
-
The
samba-clientpackage is installed.
Procedure
Use the following command to back up the content of the
demodirectory on the//server/example/share and store the content in the/root/example.tararchive:# smbtar -s server -x example -u user_name -p password -t /root/example.tar
Additional resources
-
smbtar(1)man page
3.20.11. Using the wbinfo utility
The wbinfo utility queries and returns information created and used by the winbindd service.
Prerequisites
-
The
samba-winbind-clientspackage is installed.
Procedure
You can use wbinfo, for example, to:
List domain users:
# wbinfo -u
AD\administrator
AD\guest
...
List domain groups:
# wbinfo -g
AD\domain computers
AD\domain admins
AD\domain users
...
Display the SID of a user:
# wbinfo --name-to-sid="AD\administrator"
S-1-5-21-1762709870-351891212-3141221786-500 SID_USER (1)
Display information about domains and trusts:
# wbinfo --trusted-domains --verbose
Domain Name   DNS Domain            Trust Type  Transitive  In   Out
BUILTIN                             None        Yes         Yes  Yes
server                              None        Yes         Yes  Yes
DOMAIN1       domain1.example.com   None        Yes         Yes  Yes
DOMAIN2       domain2.example.com   External    No          Yes  Yes
Additional resources
-
wbinfo(1)man page
3.21. Additional resources
-
smb.conf(5)man page -
/usr/share/docs/samba-version/directory contains general documentation, example scripts, and LDAP schema files, provided by the Samba project - Setting up Samba and the Clustered Trivial Database (CDTB) to share directories stored on an GlusterFS volume
- Mounting an SMB Share on Red Hat Enterprise Linux
Chapter 4. Setting up and configuring a BIND DNS server
BIND is a feature-rich DNS server that is fully compliant with the Internet Engineering Task Force (IETF) DNS standards and draft standards. For example, administrators frequently use BIND as:
- Caching DNS server in the local network
- Authoritative DNS server for zones
- Secondary server to provide high availability for zones
4.1. Considerations about protecting BIND with SELinux or running it in a change-root environment
To secure a BIND installation, you can:
Run the
namedservice without a change-root environment. In this case, SELinux inenforcingmode prevents exploitation of known BIND security vulnerabilities. By default, Red Hat Enterprise Linux uses SELinux inenforcingmode.ImportantRunning BIND on RHEL with SELinux in
enforcingmode is more secure than running BIND in a change-root environment.Run the
named-chrootservice in a change-root environment.Using the change-root feature, administrators can define that the root directory of a process and its sub-processes is different to the
/directory. When you start thenamed-chrootservice, BIND switches its root directory to/var/named/chroot/. As a consequence, the service usesmount --bindcommands to make the files and directories listed in/etc/named-chroot.filesavailable in/var/named/chroot/, and the process has no access to files outside of/var/named/chroot/.
If you decide to use BIND:
-
In normal mode, use the
namedservice. -
In a change-root environment, use the
named-chrootservice. This requires that you install, additionally, thenamed-chrootpackage.
Additional resources
-
The
Red Hat SELinux BIND security profilesection in thenamed(8)man page
4.2. The BIND Administrator Reference Manual
The comprehensive BIND Administrator Reference Manual, that is included in the bind package, provides:
- Configuration examples
- Documentation on advanced features
- A configuration reference
- Security considerations
To display the BIND Administrator Reference Manual on a host that has the bind package installed, open the /usr/share/doc/bind/Bv9ARM.html file in a browser.
4.3. Configuring BIND as a caching DNS server
By default, the BIND DNS server resolves and caches successful and failed lookups. The service then answers requests to the same records from its cache. This significantly improves the speed of DNS lookups.
Prerequisites
- The IP address of the server is static.
Procedure
Install the
bindandbind-utilspackages:# yum install bind bind-utilsThese packages provide BIND 9.11. If you require BIND 9.16, install the
bind9.16andbind9.16-utilspackages.If you want to run BIND in a change-root environment install the
bind-chrootpackage:# yum install bind-chrootNote that running BIND on a host with SELinux in
enforcingmode, which is default, is more secure.Edit the
/etc/named.conffile, and make the following changes in theoptionsstatement:Update the
listen-onandlisten-on-v6statements to specify on which IPv4 and IPv6 interfaces BIND should listen:listen-on port 53 { 127.0.0.1; 192.0.2.1; }; listen-on-v6 port 53 { ::1; 2001:db8:1::1; };
Update the
allow-querystatement to configure from which IP addresses and ranges clients can query this DNS server:allow-query { localhost; 192.0.2.0/24; 2001:db8:1::/64; };Add an
allow-recursionstatement to define from which IP addresses and ranges BIND accepts recursive queries:allow-recursion { localhost; 192.0.2.0/24; 2001:db8:1::/64; };WarningDo not allow recursion on public IP addresses of the server. Otherwise, the server can become part of large-scale DNS amplification attacks.
By default, BIND resolves queries by recursively querying from the root servers to an authoritative DNS server. Alternatively, you can configure BIND to forward queries to other DNS servers, such as the ones of your provider. In this case, add a
forwardersstatement with the list of IP addresses of the DNS servers that BIND should forward queries to:forwarders { 198.51.100.1; 203.0.113.5; };As a fall-back behavior, BIND resolves queries recursively if the forwarder servers do not respond. To disable this behavior, add a
forward only;statement.
Verify the syntax of the
/etc/named.conffile:# named-checkconfIf the command displays no output, the syntax is correct.
Update the
firewalldrules to allow incoming DNS traffic:# firewall-cmd --permanent --add-service=dns # firewall-cmd --reload
Start and enable BIND:
# systemctl enable --now namedIf you want to run BIND in a change-root environment, use the
systemctl enable --now named-chrootcommand to enable and start the service.
Verification
Use the newly set up DNS server to resolve a domain:
# dig @localhost www.example.org
...
www.example.org.    86400    IN    A    198.51.100.34

;; Query time: 917 msec
...
This example assumes that BIND runs on the same host and responds to queries on the
localhostinterface.After querying a record for the first time, BIND adds the entry to its cache.
Repeat the previous query:
# dig @localhost www.example.org
...
www.example.org.    85332    IN    A    198.51.100.34

;; Query time: 1 msec
...
Because of the cached entry, further requests for the same record are significantly faster until the entry expires.
Next steps
- Configure the clients in your network to use this DNS server. If a DHCP server provides the DNS server setting to the clients, update the DHCP server’s configuration accordingly.
Additional resources
- Considerations about protecting BIND with SELinux or running it in a change-root environment
-
named.conf(5)man page -
/usr/share/doc/bind/sample/etc/named.conf - The BIND Administrator Reference Manual
4.4. Configuring logging on a BIND DNS server
The configuration in the default /etc/named.conf file, as provided by the bind package, uses the default_debug channel and logs messages to the /var/named/data/named.run file. The default_debug channel only logs entries when the server’s debug level is non-zero.
Using different channels and categories, you can configure BIND to write different events with a defined severity to separate files.
Prerequisites
- BIND is already configured, for example, as a caching name server.
-
The
namedornamed-chrootservice is running.
Procedure
Edit the
/etc/named.conffile, and addcategoryandchannelphrases to theloggingstatement, for example:logging { ... category notify { zone_transfer_log; }; category xfer-in { zone_transfer_log; }; category xfer-out { zone_transfer_log; }; channel zone_transfer_log { file "/var/named/log/transfer.log" versions 10 size 50m; print-time yes; print-category yes; print-severity yes; severity info; }; ... };With this example configuration, BIND logs messages related to zone transfers to
/var/named/log/transfer.log. BIND creates up to10versions of the log file and rotates them if they reach a maximum size of50MB.The
categoryphrase defines to which channels BIND sends messages of a category.The
channelphrase defines the destination of log messages including the number of versions, the maximum file size, and the severity level BIND should log to a channel. Additional settings, such as enabling logging the time stamp, category, and severity of an event are optional, but useful for debugging purposes.Create the log directory if it does not exist, and grant write permissions to the
nameduser on this directory:# mkdir /var/named/log/ # chown named:named /var/named/log/ # chmod 700 /var/named/log/
Verify the syntax of the
/etc/named.conffile:# named-checkconfIf the command displays no output, the syntax is correct.
Restart BIND:
# systemctl restart namedIf you run BIND in a change-root environment, use the
systemctl restart named-chrootcommand to restart the service.
Verification
Display the content of the log file:
# cat /var/named/log/transfer.log
...
06-Jul-2022 15:08:51.261 xfer-out: info: client @0x7fecbc0b0700 192.0.2.2#36121/key example-transfer-key (example.com): transfer of 'example.com/IN': AXFR started: TSIG example-transfer-key (serial 2022070603)
06-Jul-2022 15:08:51.261 xfer-out: info: client @0x7fecbc0b0700 192.0.2.2#36121/key example-transfer-key (example.com): transfer of 'example.com/IN': AXFR ended
Additional resources
-
named.conf(5)man page - The BIND Administrator Reference Manual
4.5. Writing BIND ACLs
Controlling access to certain features of BIND can prevent unauthorized access and attacks, such as denial of service (DoS). BIND access control list (acl) statements are lists of IP addresses and ranges. Each ACL has a nickname that you can use in several statements, such as allow-query, to refer to the specified IP addresses and ranges.
BIND uses only the first matching entry in an ACL. For example, if you define an ACL { 192.0.2/24; !192.0.2.1; } and the host with IP address 192.0.2.1 connects, access is granted even if the second entry excludes this address.
BIND has the following built-in ACLs:
-
none: Matches no hosts. -
any: Matches all hosts. -
localhost: Matches the loopback addresses127.0.0.1and::1, as well as the IP addresses of all interfaces on the server that runs BIND. -
localnets: Matches the loopback addresses127.0.0.1and::1, as well as all subnets the server that runs BIND is directly connected to.
Prerequisites
- BIND is already configured, for example, as a caching name server.
-
The
namedornamed-chrootservice is running.
Procedure
Edit the
/etc/named.conffile and make the following changes:Add
aclstatements to the file. For example, to create an ACL namedinternal-networksfor127.0.0.1,192.0.2.0/24, and2001:db8:1::/64, enter:acl internal-networks { 127.0.0.1; 192.0.2.0/24; 2001:db8:1::/64; }; acl dmz-networks { 198.51.100.0/24; 2001:db8:2::/64; };
Use the ACL’s nickname in statements that support them, for example:
allow-query { internal-networks; dmz-networks; };
allow-recursion { internal-networks; };
Verify the syntax of the
/etc/named.conffile:# named-checkconfIf the command displays no output, the syntax is correct.
Reload BIND:
# systemctl reload namedIf you run BIND in a change-root environment, use the
systemctl reload named-chrootcommand to reload the service.
Verification
Execute an action that triggers a feature which uses the configured ACL. For example, the ACL in this procedure allows only recursive queries from the defined IP addresses. In this case, enter the following command on a host that is not within the ACL’s definition to attempt resolving an external domain:
# dig +short @192.0.2.1 www.example.comIf the command returns no output, BIND denied access, and the ACL works. For a verbose output on the client, use the command without
+shortoption:# dig @192.0.2.1 www.example.com ... ;; WARNING: recursion requested but not available ...
Additional resources
-
The
Access control listssection in the The BIND Administrator Reference Manual.
4.6. Configuring zones on a BIND DNS server
A DNS zone is a database with resource records for a specific sub-tree in the domain space. For example, if you are responsible for the example.com domain, you can set up a zone for it in BIND. As a result, clients can, resolve www.example.com to the IP address configured in this zone.
4.6.1. The SOA record in zone files
The start of authority (SOA) record is a required record in a DNS zone. This record is important, for example, if multiple DNS servers are authoritative for a zone but also to DNS resolvers.
A SOA record in BIND has the following syntax:
name class type mname rname serial refresh retry expire minimum
For better readability, administrators typically split the record in zone files into multiple lines with comments that start with a semicolon (;). Note that, if you split a SOA record, parentheses keep the record together:
@ IN SOA ns1.example.com. hostmaster.example.com. (
                          2022070601 ; serial number
                          1d         ; refresh period
                          3h         ; retry period
                          3d         ; expire time
                          3h )       ; minimum TTL
Note the trailing dot at the end of the fully-qualified domain names (FQDNs). FQDNs consist of multiple domain labels, separated by dots. Because the DNS root has an empty label, FQDNs end with a dot. Therefore, BIND appends the zone name to names without a trailing dot. A hostname without a trailing dot, for example, ns1.example.com would be expanded to ns1.example.com.example.com., which is not the correct address of the primary name server.
These are the fields in a SOA record:
-
name: The name of the zone, the so-calledorigin. If you set this field to@, BIND expands it to the zone name defined in/etc/named.conf. -
class: In SOA records, you must set this field always to Internet (IN). -
type: In SOA records, you must set this field always toSOA. -
mname(master name): The hostname of the primary name server of this zone. -
rname(responsible name): The email address of who is responsible for this zone. Note that the format is different. You must replace the at sign (@) with a dot (.). serial: The version number of this zone file. Secondary name servers only update their copies of the zone if the serial number on the primary server is higher.The format can be any numeric value. A commonly-used format is
<year><month><day><two-digit-number>. With this format, you can, theoretically, change the zone file up to a hundred times per day.-
refresh: The amount of time secondary servers should wait before checking the primary server if the zone was updated. -
retry: The amount of time after that a secondary server retries to query the primary server after a failed attempt. -
expire: The amount of time after that a secondary server stops querying the primary server, if all previous attempts failed. -
minimum: RFC 2308 changed the meaning of this field to the negative caching time. Compliant resolvers use it to determine how long to cacheNXDOMAINname errors.
A numeric value in the refresh, retry, expire, and minimum fields define a time in seconds. However, for better readability, use time suffixes, such as m for minute, h for hours, and d for days. For example, 3h stands for 3 hours.
4.6.2. Setting up a forward zone on a BIND primary server
Forward zones map names to IP addresses and other information. For example, if you are responsible for the domain example.com, you can set up a forward zone in BIND to resolve names, such as www.example.com.
Prerequisites
- BIND is already configured, for example, as a caching name server.
-
The
namedornamed-chrootservice is running.
Procedure
Add a zone definition to the
/etc/named.conffile:zone "example.com" { type master; file "example.com.zone"; allow-query { any; }; allow-transfer { none; }; };
These settings define:
-
This server as the primary server (
type master) for theexample.comzone. -
The
/var/named/example.com.zonefile is the zone file. If you set a relative path, as in this example, this path is relative to the directory you set indirectoryin theoptionsstatement. - Any host can query this zone. Alternatively, specify IP ranges or BIND access control list (ACL) nicknames to limit the access.
- No host can transfer the zone. Allow zone transfers only when you set up secondary servers and only for the IP addresses of the secondary servers.
-
This server as the primary server (
Verify the syntax of the
/etc/named.conffile:# named-checkconfIf the command displays no output, the syntax is correct.
Create the
/var/named/example.com.zonefile, for example, with the following content:$TTL 8h @ IN SOA ns1.example.com. hostmaster.example.com. ( 2022070601 ; serial number 1d ; refresh period 3h ; retry period 3d ; expire time 3h ) ; minimum TTL IN NS ns1.example.com. IN MX 10 mail.example.com. www IN A 192.0.2.30 www IN AAAA 2001:db8:1::30 ns1 IN A 192.0.2.1 ns1 IN AAAA 2001:db8:1::1 mail IN A 192.0.2.20 mail IN AAAA 2001:db8:1::20
This zone file:
-
Sets the default time-to-live (TTL) value for resource records to 8 hours. Without a time suffix, such as
hfor hour, BIND interprets the value as seconds. - Contains the required SOA resource record with details about the zone.
-
Sets
ns1.example.comas an authoritative DNS server for this zone. To be functional, a zone requires at least one name server (NS) record. However, to be compliant with RFC 1912, you require at least two name servers. -
Sets
mail.example.comas the mail exchanger (MX) of theexample.comdomain. The numeric value in front of the host name is the priority of the record. Entries with a lower value have a higher priority. -
Sets the IPv4 and IPv6 addresses of
www.example.com,mail.example.com, andns1.example.com.
-
Sets the default time-to-live (TTL) value for resource records to 8 hours. Without a time suffix, such as
Set secure permissions on the zone file that allow only the
namedgroup to read it:# chown root:named /var/named/example.com.zone # chmod 640 /var/named/example.com.zone
Verify the syntax of the
/var/named/example.com.zonefile:# named-checkzone example.com /var/named/example.com.zone zone example.com/IN: loaded serial 2022070601 OK
Reload BIND:
# systemctl reload namedIf you run BIND in a change-root environment, use the
systemctl reload named-chrootcommand to reload the service.
Verification
Query different records from the
example.comzone, and verify that the output matches the records you have configured in the zone file:# dig +short @localhost AAAA www.example.com 2001:db8:1::30 # dig +short @localhost NS example.com ns1.example.com. # dig +short @localhost A ns1.example.com 192.0.2.1
This example assumes that BIND runs on the same host and responds to queries on the
localhostinterface.
4.6.3. Setting up a reverse zone on a BIND primary server
Reverse zones map IP addresses to names. For example, if you are responsible for IP range 192.0.2.0/24, you can set up a reverse zone in BIND to resolve IP addresses from this range to hostnames.
If you create a reverse zone for whole classful networks, name the zone accordingly. For example, for the class C network 192.0.2.0/24, the name of the zone is 2.0.192.in-addr.arpa. If you want to create a reverse zone for a different network size, for example 192.0.2.0/28, the name of the zone is 28-2.0.192.in-addr.arpa.
Prerequisites
- BIND is already configured, for example, as a caching name server.
-
The
namedornamed-chrootservice is running.
Procedure
Add a zone definition to the
/etc/named.conffile:zone "2.0.192.in-addr.arpa" { type master; file "2.0.192.in-addr.arpa.zone"; allow-query { any; }; allow-transfer { none; }; };
These settings define:
-
This server as the primary server (
type master) for the2.0.192.in-addr.arpareverse zone. -
The
/var/named/2.0.192.in-addr.arpa.zonefile is the zone file. If you set a relative path, as in this example, this path is relative to the directory you set indirectoryin theoptionsstatement. - Any host can query this zone. Alternatively, specify IP ranges or BIND access control list (ACL) nicknames to limit the access.
- No host can transfer the zone. Allow zone transfers only when you set up secondary servers and only for the IP addresses of the secondary servers.
-
This server as the primary server (
Verify the syntax of the
/etc/named.conffile:# named-checkconfIf the command displays no output, the syntax is correct.
Create the
/var/named/2.0.192.in-addr.arpa.zonefile, for example, with the following content:$TTL 8h @ IN SOA ns1.example.com. hostmaster.example.com. ( 2022070601 ; serial number 1d ; refresh period 3h ; retry period 3d ; expire time 3h ) ; minimum TTL IN NS ns1.example.com. 1 IN PTR ns1.example.com. 30 IN PTR www.example.com.
This zone file:
-
Sets the default time-to-live (TTL) value for resource records to 8 hours. Without a time suffix, such as
hfor hour, BIND interprets the value as seconds. - Contains the required SOA resource record with details about the zone.
-
Sets
ns1.example.comas an authoritative DNS server for this reverse zone. To be functional, a zone requires at least one name server (NS) record. However, to be compliant with RFC 1912, you require at least two name servers. -
Sets the pointer (
PTR) record for the192.0.2.1and192.0.2.30addresses.
-
Sets the default time-to-live (TTL) value for resource records to 8 hours. Without a time suffix, such as
Set secure permissions on the zone file that only allow the
namedgroup to read it:# chown root:named /var/named/2.0.192.in-addr.arpa.zone # chmod 640 /var/named/2.0.192.in-addr.arpa.zone
Verify the syntax of the
/var/named/2.0.192.in-addr.arpa.zonefile:# named-checkzone 2.0.192.in-addr.arpa /var/named/2.0.192.in-addr.arpa.zone zone 2.0.192.in-addr.arpa/IN: loaded serial 2022070601 OK
Reload BIND:
# systemctl reload namedIf you run BIND in a change-root environment, use the
systemctl reload named-chrootcommand to reload the service.
Verification
Query different records from the reverse zone, and verify that the output matches the records you have configured in the zone file:
# dig +short @localhost -x 192.0.2.1
ns1.example.com.

# dig +short @localhost -x 192.0.2.30
www.example.com.
This example assumes that BIND runs on the same host and responds to queries on the
localhostinterface.
4.6.4. Updating a BIND zone file
In certain situations, for example if an IP address of a server changes, you must update a zone file. If multiple DNS servers are responsible for a zone, perform this procedure only on the primary server. Other DNS servers that store a copy of the zone will receive the update through a zone transfer.
Prerequisites
- The zone is configured.
-
The
namedornamed-chrootservice is running.
Procedure
Optional: Identify the path to the zone file in the
/etc/named.conffile:options { ... directory "/var/named"; } zone "example.com" { ... file "example.com.zone"; };You find the path to the zone file in the
filestatement in the zone’s definition. A relative path is relative to the directory set indirectoryin theoptionsstatement.Edit the zone file:
- Make the required changes.
Increment the serial number in the start of authority (SOA) record.
ImportantIf the serial number is equal to or lower than the previous value, secondary servers will not update their copy of the zone.
Verify the syntax of the zone file:
# named-checkzone example.com /var/named/example.com.zone
zone example.com/IN: loaded serial 2022062802
OK
Reload BIND:
# systemctl reload namedIf you run BIND in a change-root environment, use the
systemctl reload named-chrootcommand to reload the service.
Verification
Query the record you have added, modified, or removed, for example:
# dig +short @localhost A ns2.example.com
192.0.2.2
This example assumes that BIND runs on the same host and responds to queries on the
localhostinterface.
4.6.5. DNSSEC zone signing using the automated key generation and zone maintenance features
You can sign zones with domain name system security extensions (DNSSEC) to ensure authentication and data integrity. Such zones contain additional resource records. Clients can use them to verify the authenticity of the zone information.
If you enable the DNSSEC policy feature for a zone, BIND performs the following actions automatically:
- Creates the keys
- Signs the zone
- Maintains the zone, including re-signing and periodically replacing the keys.
To enable external DNS servers to verify the authenticity of a zone, you must add the public key of the zone to the parent zone. Contact your domain provider or registry for further details on how to accomplish this.
This procedure uses the built-in default DNSSEC policy in BIND. This policy uses single ECDSAP256SHA key signatures. Alternatively, create your own policy to use custom keys, algorithms, and timings.
Prerequisites
-
BIND 9.16 or later is installed. To meet this requirement, install the
bind9.16package instead ofbind. - The zone for which you want to enable DNSSEC is configured.
-
The
namedornamed-chrootservice is running. - The server synchronizes the time with a time server. An accurate system time is important for DNSSEC validation.
Procedure
Edit the
/etc/named.conffile, and adddnssec-policy default;to the zone for which you want to enable DNSSEC:zone "example.com" { ... dnssec-policy default; };
Reload BIND:
# systemctl reload namedIf you run BIND in a change-root environment, use the
systemctl reload named-chrootcommand to reload the service.BIND stores the public key in the
/var/named/K<zone_name>.+<algorithm>+<key_ID>.keyfile. Use this file to display the public key of the zone in the format that the parent zone requires:DS record format:
# dnssec-dsfromkey /var/named/Kexample.com.+013+61141.key
example.com. IN DS 61141 13 2 3E184188CF6D2521EDFDC3F07CFEE8D0195AACBD85E68BAE0620F638B4B1B027
DNSKEY format:
# grep DNSKEY /var/named/Kexample.com.+013+61141.key
example.com. 3600 IN DNSKEY 257 3 13 sjzT3jNEp120aSO4mPEHHSkReHUf7AABNnT8hNRTzD5cKMQSjDJin2I3 5CaKVcWO1pm+HltxUEt+X9dfp8OZkg==
- Request to add the public key of the zone to the parent zone. Contact your domain provider or registry for further details on how to accomplish this.
Verification
Query your own DNS server for a record from the zone for which you enabled DNSSEC signing:
# dig +dnssec +short @localhost A www.example.com
192.0.2.30
A 13 3 28800 20220718081258 20220705120353 61141 example.com. e7Cfh6GuOBMAWsgsHSVTPh+JJSOI/Y6zctzIuqIU1JqEgOOAfL/Qz474 M0sgi54m1Kmnr2ANBKJN9uvOs5eXYw==
This example assumes that BIND runs on the same host and responds to queries on the
localhostinterface.After the public key has been added to the parent zone and propagated to other servers, verify that the server sets the authenticated data (
ad) flag on queries to the signed zone:# dig @localhost example.com +dnssec ... ;; flags: qr rd ra ad; QUERY: 1, ANSWER: 2, AUTHORITY: 0, ADDITIONAL: 1 ...
4.7. Configuring zone transfers among BIND DNS servers
Zone transfers ensure that all DNS servers that have a copy of the zone use up-to-date data.
Prerequisites
- On the future primary server, the zone for which you want to set up zone transfers is already configured.
- On the future secondary server, BIND is already configured, for example, as a caching name server.
-
On both servers, the
namedornamed-chrootservice is running.
Procedure
On the existing primary server:
Create a shared key, and append it to the
/etc/named.conffile:# tsig-keygen example-transfer-key | tee -a /etc/named.conf key "example-transfer-key" { algorithm hmac-sha256; secret "q7ANbnyliDMuvWgnKOxMLi313JGcTZB5ydMW5CyUGXQ="; };
This command displays the output of the
tsig-keygencommand and automatically appends it to/etc/named.conf.You will require the output of the command later on the secondary server as well.
Edit the zone definition in the
/etc/named.conffile:In the
allow-transferstatement, define that servers must provide the key specified in theexample-transfer-keystatement to transfer a zone:zone "example.com" { ... allow-transfer { key example-transfer-key; }; };
Alternatively, use BIND access control list (ACL) nicknames in the
allow-transferstatement.By default, after a zone has been updated, BIND notifies all name servers which have a name server (
NS) record in this zone. If you do not plan to add anNSrecord for the secondary server to the zone, you can, configure that BIND notifies this server anyway. For that, add thealso-notifystatement with the IP addresses of this secondary server to the zone:zone "example.com" { ... also-notify { 192.0.2.2; 2001:db8:1::2; }; };
Verify the syntax of the
/etc/named.conffile:# named-checkconfIf the command displays no output, the syntax is correct.
Reload BIND:
# systemctl reload namedIf you run BIND in a change-root environment, use the
systemctl reload named-chrootcommand to reload the service.
On the future secondary server:
Edit the
/etc/named.conffile as follows:Add the same key definition as on the primary server:
key "example-transfer-key" {
        algorithm hmac-sha256;
        secret "q7ANbnyliDMuvWgnKOxMLi313JGcTZB5ydMW5CyUGXQ=";
};
Add the zone definition to the
/etc/named.conffile:zone "example.com" { type slave; file "slaves/example.com.zone"; allow-query { any; }; allow-transfer { none; }; masters { 192.0.2.1 key example-transfer-key; 2001:db8:1::1 key example-transfer-key; }; };
These settings state:
-
This server is a secondary server (
type slave) for theexample.comzone. -
The
/var/named/slaves/example.com.zonefile is the zone file. If you set a relative path, as in this example, this path is relative to the directory you set indirectoryin theoptionsstatement. To separate zone files for which this server is secondary from primary ones, you can store them, for example, in the/var/named/slaves/directory. - Any host can query this zone. Alternatively, specify IP ranges or ACL nicknames to limit the access.
- No host can transfer the zone from this server.
-
The IP addresses of the primary server of this zone are
192.0.2.1and2001:db8:1::2. Alternatively, you can specify ACL nicknames. This secondary server will use the key namedexample-transfer-keyto authenticate to the primary server.
-
This server is a secondary server (
Verify the syntax of the
/etc/named.conffile:# named-checkconfReload BIND:
# systemctl reload namedIf you run BIND in a change-root environment, use the
systemctl reload named-chrootcommand to reload the service.
-
Optional: Modify the zone file on the primary server and add an
NSrecord for the new secondary server.
Verification
On the secondary server:
Display the
systemdjournal entries of thenamedservice:# journalctl -u named ... Jul 06 15:08:51 ns2.example.com named[2024]: zone example.com/IN: Transfer started. Jul 06 15:08:51 ns2.example.com named[2024]: transfer of 'example.com/IN' from 192.0.2.1#53: connected using 192.0.2.2#45803 Jul 06 15:08:51 ns2.example.com named[2024]: zone example.com/IN: transferred serial 2022070101 Jul 06 15:08:51 ns2.example.com named[2024]: transfer of 'example.com/IN' from 192.0.2.1#53: Transfer status: success Jul 06 15:08:51 ns2.example.com named[2024]: transfer of 'example.com/IN' from 192.0.2.1#53: Transfer completed: 1 messages, 29 records, 2002 bytes, 0.003 secs (667333 bytes/sec)If you run BIND in a change-root environment, use the
journalctl -u named-chrootcommand to display the journal entries.Verify that BIND created the zone file:
# ls -l /var/named/slaves/
total 4
-rw-r--r--. 1 named named 2736 Jul  6 15:08 example.com.zone
Note that, by default, secondary servers store zone files in a binary raw format.
Query a record of the transferred zone from the secondary server:
# dig +short @192.0.2.2 AAAA www.example.com
2001:db8:1::30
This example assumes that the secondary server you set up in this procedure listens on IP address
192.0.2.2.
4.8. Configuring response policy zones in BIND to override DNS records
Using DNS blocking and filtering, administrators can rewrite a DNS response to block access to certain domains or hosts. In BIND, response policy zones (RPZs) provide this feature. You can configure different actions for blocked entries, such as returning an NXDOMAIN error or not responding to the query.
If you have multiple DNS servers in your environment, use this procedure to configure the RPZ on the primary server, and later configure zone transfers to make the RPZ available on your secondary servers.
Prerequisites
- BIND is already configured, for example, as a caching name server.
-
The
namedornamed-chrootservice is running.
Procedure
Edit the
/etc/named.conffile, and make the following changes:Add a
response-policydefinition to theoptionsstatement:options { ... response-policy { zone "rpz.local"; }; ... }You can set a custom name for the RPZ in the
zonestatement inresponse-policy. However, you must use the same name in the zone definition in the next step.Add a
zonedefinition for the RPZ you set in the previous step:zone "rpz.local" { type master; file "rpz.local"; allow-query { localhost; 192.0.2.0/24; 2001:db8:1::/64; }; allow-transfer { none; }; };
These settings state:
-
This server is the primary server (
type master) for the RPZ namedrpz.local. -
The
/var/named/rpz.localfile is the zone file. If you set a relative path, as in this example, this path is relative to the directory you set indirectoryin theoptionsstatement. -
Any hosts defined in
allow-querycan query this RPZ. Alternatively, specify IP ranges or BIND access control list (ACL) nicknames to limit the access. - No host can transfer the zone. Allow zone transfers only when you set up secondary servers and only for the IP addresses of the secondary servers.
-
This server is the primary server (
Verify the syntax of the
/etc/named.conffile:# named-checkconfIf the command displays no output, the syntax is correct.
Create the
/var/named/rpz.localfile, for example, with the following content:$TTL 10m @ IN SOA ns1.example.com. hostmaster.example.com. ( 2022070601 ; serial number 1h ; refresh period 1m ; retry period 3d ; expire time 1m ) ; minimum TTL IN NS ns1.example.com. example.org IN CNAME . *.example.org IN CNAME . example.net IN CNAME rpz-drop. *.example.net IN CNAME rpz-drop.
This zone file:
-
Sets the default time-to-live (TTL) value for resource records to 10 minutes. Without a time suffix, such as
hfor hour, BIND interprets the value as seconds. - Contains the required start of authority (SOA) resource record with details about the zone.
-
Sets
ns1.example.comas an authoritative DNS server for this zone. To be functional, a zone requires at least one name server (NS) record. However, to be compliant with RFC 1912, you require at least two name servers. -
Return an
NXDOMAINerror for queries toexample.organd hosts in this domain. -
Drop queries to
example.netand hosts in this domain.
For a full list of actions and examples, see IETF draft: DNS Response Policy Zones (RPZ).
-
Sets the default time-to-live (TTL) value for resource records to 10 minutes. Without a time suffix, such as
Verify the syntax of the
/var/named/rpz.localfile:# named-checkzone rpz.local /var/named/rpz.local zone rpz.local/IN: loaded serial 2022070601 OK
Reload BIND:
# systemctl reload namedIf you run BIND in a change-root environment, use the
systemctl reload named-chrootcommand to reload the service.
Verification
Attempt to resolve a host in
example.org, that is configured in the RPZ to return anNXDOMAINerror:# dig @localhost www.example.org ... ;; ->>HEADER<<- opcode: QUERY, status: NXDOMAIN, id: 30286 ...
This example assumes that BIND runs on the same host and responds to queries on the
localhostinterface.Attempt to resolve a host in the
example.netdomain, that is configured in the RPZ to drop queries:# dig @localhost www.example.net ... ;; connection timed out; no servers could be reached ...
Additional resources
4.9. Recording DNS queries by using dnstap
As a network administrator, you can record Domain Name System (DNS) details to analyze DNS traffic patterns, monitor DNS server performance, and troubleshoot DNS issues. If you want an advanced way to monitor and log details of incoming name queries, use the dnstap interface that records sent messages from the named service. You can capture and record DNS queries to collect information about websites or IP addresses.
Prerequisites
-
The
bind-9.11.26-2package or a later version is installed.
If you already have a BIND version installed and running, adding a new version of BIND will overwrite the existing version.
Procedure
Enable
dnstapand the target file by editing the/etc/named.conffile in theoptionsblock:options { # ... dnstap { all; }; # Configure filter dnstap-output file "/var/named/data/dnstap.bin"; # ... }; # end of optionsTo specify which types of DNS traffic you want to log, add
dnstapfilters to thednstapblock in the/etc/named.conffile. You can use the following filters:-
auth- Authoritative zone response or answer. -
client- Internal client query or answer. -
forwarder- Forwarded query or response from it. -
resolver- Iterative resolution query or response. -
update- Dynamic zone update requests. -
all- Any from the above options. queryorresponse- If you do not specify aqueryor aresponsekeyword,dnstaprecords both.NoteThe
dnstapfilter contains multiple definitions delimited by a;in thednstap {}block with the following syntax:dnstap { ( all | auth | client | forwarder | resolver | update ) [ ( query | response ) ]; … };
-
To apply your changes, restart the
namedservice:# systemctl restart named.serviceConfigure a periodic rollout for active logs
In the following example, the
cronscheduler runs the content of the user-edited script once a day. Therolloption with the value3specifies thatdnstapcan create up to three backup log files. The value3overrides theversionparameter of thednstap-outputvariable, and limits the number of backup log files to three. Additionally, the binary log file is moved to another directory and renamed, and it never reaches the.2suffix, even if three backup log files already exist. You can skip this step if automatic rolling of binary logs based on size limit is sufficient.Example: sudoedit /etc/cron.daily/dnstap #!/bin/sh rndc dnstap -roll 3 mv /var/named/data/dnstap.bin.1 /var/log/named/dnstap/dnstap-$(date -I).bin # use dnstap-read to analyze saved logs sudo chmod a+x /etc/cron.daily/dnstap
Handle and analyze logs in a human-readable format by using the
dnstap-readutility:In the following example, the
dnstap-readutility prints the output in theYAMLfile format.Example: dnstap-read -y [file-name]
Chapter 5. Deploying an NFS server
By using the Network File System (NFS) protocol, remote users can mount shared directories over a network and use them as they were mounted locally. This enables you to consolidate resources onto centralized servers on the network.
5.1. Key features of minor NFSv4 versions
Each minor NFSv4 version brings enhancements aimed at improving performance and security. Use these improvements to utilize the full potential of NFSv4, ensuring efficient and reliable file sharing across networks.
Key features of NFSv4.2
- Server-side copy
- Server-side copy is a capability of the NFS server to copy files on the server without transferring the data back and forth over the network.
- Sparse files
- Enables files to have one or more empty spaces, or gaps, which are unallocated or uninitialized data blocks consisting only of zeros. This enables applications to map out the location of holes in the sparse file.
- Space reservation
- Clients can reserve or allocate space on the storage server before writing data. This prevents the server from running out of space.
- Labeled NFS
- Enforces data access rights and enables SELinux labels between a client and a server for individual files on an NFS file system.
- Layout enhancements
- Provides functionality to enable Parallel NFS (pNFS) servers to collect better performance statistics.
Key features of NFSv4.1
- Client-side support for pNFS
- The support of high-speed I/O to clustered servers enables you to store data on multiple machines, to provide direct access to data, and synchronization of updates to metadata.
- Sessions
- Sessions maintain the server’s state relative to the connections belonging to a client. These sessions provide improved performance and efficiency by reducing the overhead associated with establishing and terminating connections for each Remote Procedure Call (RPC) operation.
Key features of NFSv4.0
- RPC and security
-
The
RPCSEC_GSSframework enhances RPC security. The NFSv4 protocol introduces a new operation for in-band security negotiation. This enables clients to query server policies for accessing file system resources securely. - Procedure and operation structure
-
NFS 4.0 introduces the
COMPOUNDprocedure, which enables clients to merge multiple operations into a single request to reduce RPCs. - File system model
NFS 4.0 retains the hierarchical file system model, treating files as byte streams and encoding names with UTF-8 for internationalization.
File handle types
With volatile file handles, servers can adjust to file system changes and enable clients to adapt as needed without requiring permanent file handles.
Attribute types
The file attribute structure includes required, recommended, and named attributes, each serving distinct purposes. Required attributes, derived from NFSv3, are essential for distinguishing file types, while recommended attributes, such as ACLs, provide enhanced access control.
Multi-server namespace
Namespaces span across multiple servers, simplify file system transfers based on attributes, support referrals, redundancy, and seamless server migration.
- OPEN and CLOSE operations
- These operations can combine file lookup, creation, and semantic sharing at a single point and make the file access management more efficient.
- File locking
- File locking is part of the protocol, eliminating the need for RPC callbacks. File lock state is managed by the server under a lease-based model, where failure to renew the lease may result in state release by the server.
- Client caching and delegation
- Caching resembles previous versions, with client-determined timeouts for attribute and directory caching. Delegations in NFS 4.0 allow the server to assign certain responsibilities to the client, guaranteeing specific file sharing semantics and enabling local file operations without immediate server interaction.
5.2. The AUTH_SYS authentication method
The AUTH_SYS method, which is also known as AUTH_UNIX, is a client authentication mechanism. With AUTH_SYS, the client sends the User ID (UID) and Group ID (GID) of the user to the server to verify its identity and permissions when accessing files. It is considered less secure as it relies on the client-provided information, making it susceptible to unauthorized access if misconfigured.
Mapping mechanisms ensure that NFS clients can access files with the appropriate permissions on the server, even if the UID and GID assignments differ between systems. UIDs and GIDs are mapped between NFS client and server by the following mechanisms:
- Direct mapping
UIDs and GIDs are directly mapped by NFS servers and clients between local and remote systems. This requires consistent UID and GID assignments across all systems participating in NFS file sharing. For example, a user with UID 1000 on a client can only access the files on a share that a user with UID 1000 on the server has access to.
For a simplified ID management in an NFS environment, administrators often rely on centralized services, such as LDAP or Network Information Service (NIS) to manage UID and GID mappings across multiple systems.
- User and Group ID mapping
-
NFS servers and clients can use the
idmapdservice to translate UIDs and GIDs between different systems for consistent identification and permission assignment.
5.3. The AUTH_GSS authentication method
Kerberos is a network authentication protocol that allows secure authentication for clients and servers over a non-secure network. It uses symmetric key cryptography and requires a trusted Key Distribution Center (KDC) to authenticate users and services.
Unlike AUTH_SYS, with the RPCSEC_GSS Kerberos mechanism, the server does not depend on the client to correctly represent which user is accessing the file. Instead, cryptography is used to authenticate users to the server, which prevents a malicious client from impersonating a user without having that user’s Kerberos credentials.
In the /etc/exports file, the sec option defines one or multiple methods of Kerberos security that the share should provide, and clients can mount the share with one of these methods. The sec option supports the following values:
-
sys: no cryptographic protection (default) -
krb5: authentication only -
krb5i: authentication and integrity protection -
krb5p: authentication, integrity checking, and traffic encryption
Note that the more cryptographic functionality a method provides, the lower is the performance.
5.4. File permissions on exported file systems
File permissions on exported file systems determine access rights to files and directories for clients accessing them over NFS.
Once the NFS file system is mounted by a remote host, the only protection each shared file has is its file system permissions. If two users that share the same User ID (UID) value mount the same NFS file system on different client systems, they can modify each other’s files.
NFS treats the root user on the client as equivalent to the root user on the server. However, by default, the NFS server maps root to the nobody account when accessing an NFS share. The root_squash option controls this behavior.
Additional resources
-
exports(5)man page
5.5. Services required on an NFS server
Red Hat Enterprise Linux (RHEL) uses a combination of a kernel module and user-space processes to provide NFS file shares:
Table 5.1. Services required on an NFS server
| Service name | NFS versions | Description |
|---|---|---|
|
| 3, 4 | The NFS kernel module that services requests for shared NFS file systems. |
|
| 3 |
This process accepts port reservations from local remote procedure call (RPC) services, makes them available or advertised, allowing corresponding remote RPC services to access them. The |
|
| 3, 4 |
This service processes It checks that the requested NFS share is currently exported by the NFS server and that the client is allowed to access it. |
|
| 3, 4 | This process advertises explicit NFS versions and protocols the server defines. It works with the kernel to meet the dynamic demands of NFS clients, such as providing server threads each time an NFS client connects.
The |
|
| 3 | This kernel module implements the Network Lock Manager (NLM) protocol, which enables clients to lock files on the server. RHEL loads the module automatically when the NFS server runs. |
|
| 3, 4 | This service provides user quota information for remote users. |
|
| 4 | This process provides NFSv4 client and server upcalls, which map between NFSv4 names (strings in the form of `user@domain`) and local user and group IDs. |
|
| 3, 4 |
This service handles |
|
| 4 | This service provides a NFSv4 client tracking daemon that prevents the server from granting lock reclaims when other clients have taken conflicting locks during a network partition combined with a server reboot. |
|
| 3 | This service provides notification to other NFSv3 clients when the local host reboots, and to the kernel when a remote NFSv3 host reboots. |
Additional resources
-
rpcbind(8),rpc.mountd(8),rpc.nfsd(8),rpc.statd(8),rpc.rquotad(8),rpc.idmapd(8),nfsdcld(8)man pages
5.6. The /etc/exports configuration file
The /etc/exports file controls which directories the server exports. Each line contains an export point, a whitespace-separated list of clients that are allowed to mount the directory, and options for each of the clients:
<directory> <host_or_network_1>(<options_1>) <host_or_network_n>(<options_n>)...
The following are the individual parts of an /etc/exports entry:
- <export>
- The directory that is being exported.
- <host_or_network>
- The host or network to which the export is being shared. For example, you can specify a hostname, an IP address, or an IP network.
- <options>
- The options for the host or network.
Adding a space between a client and options, changes the behavior. For example, the following lines do not have the same meaning:
/projects	client.example.com(rw)
/projects	client.example.com (rw)
In the first line, the server allows only client.example.com to mount the /projects directory in read-write mode, and no other hosts can mount the share. However, due to the space between client.example.com and (rw) in the second line, the server exports the directory to client.example.com in read-only mode (default setting), but all other hosts can mount the share in read-write mode.
The NFS server uses the following default settings for each exported directory:
Table 5.2. Default options of entries in /etc/exports
| Default setting | Description |
|---|---|
|
| Exports the directory in read-only mode. |
|
| The NFS server does not reply to requests before changes made by previous requests are written to disk. |
|
| The server delays writing to the disk if it suspects another write request is pending.. |
|
|
Prevents that the |
5.7. Configuring an NFSv4-only server
If you do not have any NFSv3 clients in your network, you can configure the NFS server to support only NFSv4 or specific minor protocol versions of it. Using only NFSv4 on the server reduces the number of ports that are open to the network.
Procedure
Install the
nfs-utilspackage:# dnf install nfs-utilsEdit the
/etc/nfs.conffile, and make the following changes:Disable the
vers3parameter in the[nfsd]section to disable NFSv3:[nfsd] vers3=n
Optional: If you require only specific NFSv4 minor versions, uncomment all
vers4.<minor_version>parameters and set them accordingly, for example:[nfsd] vers3=n # vers4=y vers4.0=n vers4.1=n vers4.2=y
With this configuration, the server provides only NFS version 4.2.
ImportantIf you require only a specific NFSv4 minor version, set only the parameters for the minor versions. Do not uncomment the
vers4parameter to avoid an unpredictable activation or deactivation of minor versions. By default, thevers4parameter enables or disables all NFSv4 minor versions. However, this behavior changes if you setvers4in conjunction with otherversparameters.
Disable all NFSv3-related services:
# systemctl mask --now rpc-statd.service rpcbind.service rpcbind.socketOptional: Create a directory that you want to share, for example:
# mkdir -p /nfs/projects/If you want to share an existing directory, skip this step.
Set the permissions you require on the
/nfs/projects/directory:# chmod 2770 /nfs/projects/ # chgrp users /nfs/projects/
These commands set write permissions for the
usersgroup on the/nfs/projects/directory and ensure that the same group is automatically set on new entries created in this directory.Add an export point to the
/etc/exportsfile for each directory that you want to share:/nfs/projects/ 192.0.2.0/24(rw) 2001:db8::/32(rw)
This entry shares the
/nfs/projects/directory to be accessible with read and write access to clients in the192.0.2.0/24and2001:db8::/32subnets.Open the relevant ports in
firewalld:# firewall-cmd --permanent --add-service nfs # firewall-cmd --reload
Enable and start the NFS server:
# systemctl enable --now nfs-server
Verification
On the server, verify that the server provides only the NFS versions that you have configured:
# cat /proc/fs/nfsd/versions
-3 +4 -4.0 -4.1 +4.2
On a client, perform the following steps:
Install the
nfs-utilspackage:# dnf install nfs-utilsMount an exported NFS share:
# mount server.example.com:/nfs/projects/ /mnt/As a user which is a member of the
usersgroup, create a file in/mnt/:# touch /mnt/fileList the directory to verify that the file was created:
# ls -l /mnt/
total 0
-rw-r--r--. 1 demo users 0 Jan 16 14:18 file
5.8. Configuring an NFSv3 server with optional NFSv4 support
In a network which still uses NFSv3 clients, configure the server to provide shares by using the NFSv3 protocol. If you also have newer clients in your network, you can, additionally, enable NFSv4. By default, Red Hat Enterprise Linux NFS clients use the latest NFS version that the server provides.
Procedure
Install the
nfs-utilspackage:# dnf install nfs-utilsOptional: By default, NFSv3 and NFSv4 are enabled. If you do not require NFSv4 or only specific minor versions, uncomment all
vers4.<minor_version>parameters and set them accordingly:[nfsd] # vers3=y # vers4=y vers4.0=n vers4.1=n vers4.2=y
With this configuration, the server provides only the NFS version 3 and 4.2.
ImportantIf you require only a specific NFSv4 minor version, set only the parameters for the minor versions. Do not uncomment the
vers4parameter to avoid an unpredictable activation or deactivation of minor versions. By default, thevers4parameter enables or disables all NFSv4 minor versions. However, this behavior changes if you setvers4in conjunction with otherversparameters.By default, NFSv3 RPC services use random ports. To enable a firewall configuration, configure fixed port numbers in the
/etc/nfs.conffile:In the
[lockd]section, set a fixed port number for thenlockmgrRPC service, for example:[lockd] port=5555With this setting, the service automatically uses this port number for both the UDP and TCP protocol.
In the
[statd]section, set a fixed port number for therpc.statdservice, for example:[statd] port=6666With this setting, the service automatically uses this port number for both the UDP and TCP protocol.
Optional: Create a directory that you want to share, for example:
# mkdir -p /nfs/projects/If you want to share an existing directory, skip this step.
Set the permissions you require on the
/nfs/projects/directory:# chmod 2770 /nfs/projects/ # chgrp users /nfs/projects/
These commands set write permissions for the
usersgroup on the/nfs/projects/directory and ensure that the same group is automatically set on new entries created in this directory.Add an export point to the
/etc/exportsfile for each directory that you want to share:/nfs/projects/ 192.0.2.0/24(rw) 2001:db8::/32(rw)
This entry shares the
/nfs/projects/directory to be accessible with read and write access to clients in the192.0.2.0/24and2001:db8::/32subnets.Open the relevant ports in
firewalld:# firewall-cmd --permanent --add-service={nfs,rpc-bind,mountd} # firewall-cmd --permanent --add-port={5555/tcp,5555/udp,6666/tcp,6666/udp} # firewall-cmd --reload
Enable and start the NFS server:
# systemctl enable --now rpc-statd nfs-server
Verification
On the server, verify that the server provides only the NFS versions that you have configured:
# cat /proc/fs/nfsd/versions
+3 +4 -4.0 -4.1 +4.2
On a client, perform the following steps:
Install the
nfs-utilspackage:# dnf install nfs-utilsMount an exported NFS share:
# mount -o vers=<version> server.example.com:/nfs/projects/ /mnt/Verify that the share was mounted with the specified NFS version:
# mount | grep "/mnt"
server.example.com:/nfs/projects/ on /mnt type nfs (rw,relatime,vers=3,...
As a user which is a member of the
usersgroup, create a file in/mnt/:# touch /mnt/fileList the directory to verify that the file was created:
# ls -l /mnt/
total 0
-rw-r--r--. 1 demo users 0 Jan 16 14:18 file
5.9. Enabling quota support on an NFS server
If you want to restrict the amount of data a user or a group can store, you can configure quotas on the file system. On an NFS server, the rpc-rquotad service ensures that the quota is also applied to users on NFS clients.
Prerequisites
Procedure
Verify that quotas are enabled on the directories that you export:
For ext file system, enter:
# quotaon -p /nfs/projects/ group quota on /nfs/projects (/dev/sdb1) is on user quota on /nfs/projects (/dev/sdb1) is on project quota on /nfs/projects (/dev/sdb1) is offFor an XFS file system, enter:
# findmnt /nfs/projects TARGET SOURCE FSTYPE OPTIONS /nfs/projects /dev/sdb1 xfs rw,relatime,seclabel,attr2,inode64,logbufs=8,logbsize=32k,usrquota,grpquota
Install the
quota-rpcpackage:# dnf install rpc-quotadOptional. By default, the quota RPC service runs on port 875. If you want to run the service on a different port, append
-p <port_number>to theRPCRQUOTADOPTSvariable in the/etc/sysconfig/rpc-rquotadfile:RPCRQUOTADOPTS="-p __<port_number>__"
Optional: By default, remote hosts can only read quotas. To allow clients to set quotas, append the
-Soption to theRPCRQUOTADOPTSvariable in the/etc/sysconfig/rpc-rquotadfile:RPCRQUOTADOPTS="-S"
Open the port in
firewalld:# firewall-cmd --permanent --add-port=875/udp # firewall-cmd --reload
Enable and start the
rpc-quotadservice:# systemctl enable --now rpc-rquotad
Verification
On the client:
Mount the exported share:
# mount server.example.com:/nfs/projects/ /mnt/Display the quota. The command depends on the file system of the exported directory. For example:
To display the quota of a specific user on all mounted ext file systems, enter:
# quota -u <user_name> Disk quotas for user demo (uid 1000): Filesystem space quota limit grace files quota limit grace server.example.com:/nfs/projects 0K 100M 200M 0 0 0To display the user and group quota on an XFS file system, enter:
# xfs_quota -x -c "report -h" /mnt/ User quota on /nfs/projects (/dev/vdb1) Blocks User ID Used Soft Hard Warn/Grace ---------- --------------------------------- root 0 0 0 00 [------] demo 0 100M 200M 00 [------]
Additional resources
-
quota(1)man page -
xfs_quota(8)man page
5.10. Enabling NFS over RDMA on an NFS server
Remote Direct Memory Access (RDMA) is a protocol that enables a client system to directly transfer data from the memory of a storage server into its own memory. This enhances storage throughput, decreases latency in data transfer between the server and client, and reduces CPU load on both ends. If both the NFS server and clients are connected over RDMA, clients can use NFSoRDMA to mount an exported directory.
Prerequisites
- The NFS service is running and configured
- An InfiniBand or RDMA over Converged Ethernet (RoCE) device is installed on the server.
- IP over InfiniBand (IPoIB) is configured on the server, and the InfiniBand device has an IP address assigned.
Procedure
Install the
rdma-corepackage:# dnf install rdma-coreIf the package was already installed, verify that the
xprtrdmaandsvcrdmamodules in the/etc/rdma/modules/rdma.conffile are uncommented:# NFS over RDMA client support xprtrdma # NFS over RDMA server support svcrdma
Optional. By default, NFS over RDMA uses port 20049. If you want to use a different port, set the
rdma-portsetting in the[nfsd]section of the/etc/nfs.conffile:rdma-port=_<port>_
Open the NFSoRDMA port in
firewalld:# firewall-cmd --permanent --add-port={20049/tcp,20049/udp} # firewall-cmd --reload
Adjust the port numbers if you set a different port than 20049.
Restart the
nfs-serverservice:# systemctl restart nfs-server
Verification
On a client with InfiniBand hardware, perform the following steps:
Install the following packages:
# dnf install nfs-utils rdma-coreMount an exported NFS share over RDMA:
# mount -o rdma server.example.com:/nfs/projects/ /mnt/If you set a port number other than the default (20049), pass
port=<port_number>to the command:# mount -o rdma,port=<port_number> server.example.com:/nfs/projects/ /mnt/Verify that the share was mounted with the
rdmaoption:# mount | grep "/mnt" server.example.com:/nfs/projects/ on /mnt type nfs (...,proto=rdma,...)
Additional resources
5.11. Setting up an NFS server with Kerberos in a Red Hat Identity Management domain
If you use Red Hat Identity Management (IdM), you can join your NFS server to the IdM domain. This enables you to centrally manage users and groups and to use Kerberos for authentication, integrity protection, and traffic encryption.
Prerequisites
- The NFS server is enrolled in a Red Hat Identity Management (IdM) domain.
- The NFS server is running and configured.
Procedure
Obtain a kerberos ticket as an IdM administrator:
# kinit adminCreate a
nfs/<FQDN>service principal:# ipa service-add nfs/nfs_server.idm.example.comRetrieve the
nfsservice principal from IdM, and store it in the/etc/krb5.keytabfile:# ipa-getkeytab -s idm_server.idm.example.com -p nfs/nfs_server.idm.example.com -k /etc/krb5.keytabOptional: Display the principals in the
/etc/krb5.keytabfile:# klist -k /etc/krb5.keytab Keytab name: FILE:/etc/krb5.keytab KVNO Principal ---- -------------------------------------------------------------------------- 1 nfs/nfs_server.idm.example.com@IDM.EXAMPLE.COM 1 nfs/nfs_server.idm.example.com@IDM.EXAMPLE.COM 1 nfs/nfs_server.idm.example.com@IDM.EXAMPLE.COM 1 nfs/nfs_server.idm.example.com@IDM.EXAMPLE.COM 7 host/nfs_server.idm.example.com@IDM.EXAMPLE.COM 7 host/nfs_server.idm.example.com@IDM.EXAMPLE.COM 7 host/nfs_server.idm.example.com@IDM.EXAMPLE.COM 7 host/nfs_server.idm.example.com@IDM.EXAMPLE.COMBy default, the IdM client adds the host principal to the
/etc/krb5.keytabfile when you join the host to the IdM domain. If the host principal is missing, use theipa-getkeytab -s idm_server.idm.example.com -p host/nfs_server.idm.example.com -k /etc/krb5.keytabcommand to add it.Use the
ipa-client-automountutility to configure mapping of IdM IDs:# ipa-client-automount Searching for IPA server... IPA server: DNS discovery Location: default Continue to configure the system with these values? [no]: yes Configured /etc/idmapd.conf Restarting sssd, waiting for it to become available. Started autofs
Update your
/etc/exportsfile, and add the Kerberos security method to the client options. For example:/nfs/projects/ 192.0.2.0/24(rw,sec=krb5i)If you want that your clients can select from multiple security methods, specify them separated by colons:
/nfs/projects/ 192.0.2.0/24(rw,sec=krb5:krb5i:krb5p)Reload the exported file systems:
# exportfs -r
Chapter 6. Configuring the Squid caching proxy server
Squid is a proxy server that caches content to reduce bandwidth and load web pages more quickly. This chapter describes how to set up Squid as a proxy for the HTTP, HTTPS, and FTP protocol, as well as authentication and restricting access.
6.1. Setting up Squid as a caching proxy without authentication
You can configure Squid as a caching proxy without authentication. The procedure limits access to the proxy based on IP ranges.
Prerequisites
-
The procedure assumes that the
/etc/squid/squid.conffile is as provided by thesquidpackage. If you edited this file before, remove the file and reinstall the package.
Procedure
Install the
squidpackage:# yum install squidEdit the
/etc/squid/squid.conffile:Adapt the
localnetaccess control lists (ACL) to match the IP ranges that should be allowed to use the proxy:acl localnet src 192.0.2.0/24 acl localnet 2001:db8:1::/64
By default, the
/etc/squid/squid.conffile contains thehttp_access allow localnetrule that allows using the proxy from all IP ranges specified inlocalnetACLs. Note that you must specify alllocalnetACLs before thehttp_access allow localnetrule.ImportantRemove all existing
acl localnetentries that do not match your environment.The following ACL exists in the default configuration and defines
443as a port that uses the HTTPS protocol:acl SSL_ports port 443
If users should be able to use the HTTPS protocol also on other ports, add an ACL for each of these port:
acl SSL_ports port port_numberUpdate the list of
acl Safe_portsrules to configure to which ports Squid can establish a connection. For example, to configure that clients using the proxy can only access resources on port 21 (FTP), 80 (HTTP), and 443 (HTTPS), keep only the followingacl Safe_portsstatements in the configuration:acl Safe_ports port 21 acl Safe_ports port 80 acl Safe_ports port 443
By default, the configuration contains the
http_access deny !Safe_portsrule that defines access denial to ports that are not defined inSafe_portsACLs.Configure the cache type, the path to the cache directory, the cache size, and further cache type-specific settings in the
cache_dirparameter:cache_dir ufs /var/spool/squid 10000 16 256With these settings:
-
Squid uses the
ufscache type. -
Squid stores its cache in the
/var/spool/squid/directory. -
The cache grows up to
10000MB. -
Squid creates
16level-1 sub-directories in the/var/spool/squid/directory. Squid creates
256sub-directories in each level-1 directory.If you do not set a
cache_dirdirective, Squid stores the cache in memory.
-
Squid uses the
If you set a different cache directory than
/var/spool/squid/in thecache_dirparameter:Create the cache directory:
# mkdir -p path_to_cache_directoryConfigure the permissions for the cache directory:
# chown squid:squid path_to_cache_directoryIf you run SELinux in
enforcingmode, set thesquid_cache_tcontext for the cache directory:# semanage fcontext -a -t squid_cache_t "path_to_cache_directory(/.*)?" # restorecon -Rv path_to_cache_directory
If the
semanageutility is not available on your system, install thepolicycoreutils-python-utilspackage.
Open the
3128port in the firewall:# firewall-cmd --permanent --add-port=3128/tcp # firewall-cmd --reload
Enable and start the
squidservice:# systemctl enable --now squid
Verification steps
To verify that the proxy works correctly, download a web page using the curl utility:
# curl -O -L "https://www.redhat.com/index.html" -x "proxy.example.com:3128"
If curl does not display any error and the index.html file was downloaded to the current directory, the proxy works.
6.2. Setting up Squid as a caching proxy with LDAP authentication
You can configure Squid as a caching proxy that uses LDAP to authenticate users. The procedure configures that only authenticated users can use the proxy.
Prerequisites
-
The procedure assumes that the
/etc/squid/squid.conffile is as provided by thesquidpackage. If you edited this file before, remove the file and reinstall the package. -
An service user, such as
uid=proxy_user,cn=users,cn=accounts,dc=example,dc=comexists in the LDAP directory. Squid uses this account only to search for the authenticating user. If the authenticating user exists, Squid binds as this user to the directory to verify the authentication.
Procedure
Install the
squidpackage:# yum install squidEdit the
/etc/squid/squid.conffile:To configure the
basic_ldap_authhelper utility, add the following configuration entry to the top of/etc/squid/squid.conf:auth_param basic program /usr/lib64/squid/basic_ldap_auth -b "cn=users,cn=accounts,dc=example,dc=com" -D "uid=proxy_user,cn=users,cn=accounts,dc=example,dc=com" -W /etc/squid/ldap_password -f "(&(objectClass=person)(uid=%s))" -ZZ -H ldap://ldap_server.example.com:389The following describes the parameters passed to the
basic_ldap_authhelper utility in the example above:-
-b base_DNsets the LDAP search base. -
-D proxy_service_user_DNsets the distinguished name (DN) of the account Squid uses to search for the authenticating user in the directory. -
-W path_to_password_filesets the path to the file that contains the password of the proxy service user. Using a password file prevents that the password is visible in the operating system’s process list. -f LDAP_filterspecifies the LDAP search filter. Squid replaces the%svariable with the user name provided by the authenticating user.The
(&(objectClass=person)(uid=%s))filter in the example defines that the user name must match the value set in theuidattribute and that the directory entry contains thepersonobject class.-ZZenforces a TLS-encrypted connection over the LDAP protocol using theSTARTTLScommand. Omit the-ZZin the following situations:- The LDAP server does not support encrypted connections.
- The port specified in the URL uses the LDAPS protocol.
- The -H LDAP_URL parameter specifies the protocol, the host name or IP address, and the port of the LDAP server in URL format.
-
Add the following ACL and rule to configure that Squid allows only authenticated users to use the proxy:
acl ldap-auth proxy_auth REQUIRED http_access allow ldap-auth
ImportantSpecify these settings before the
http_access denyall rule.Remove the following rule to disable bypassing the proxy authentication from IP ranges specified in
localnetACLs:http_access allow localnetThe following ACL exists in the default configuration and defines
443as a port that uses the HTTPS protocol:acl SSL_ports port 443
If users should be able to use the HTTPS protocol also on other ports, add an ACL for each of these port:
acl SSL_ports port port_numberUpdate the list of
acl Safe_portsrules to configure to which ports Squid can establish a connection. For example, to configure that clients using the proxy can only access resources on port 21 (FTP), 80 (HTTP), and 443 (HTTPS), keep only the followingacl Safe_portsstatements in the configuration:acl Safe_ports port 21 acl Safe_ports port 80 acl Safe_ports port 443
By default, the configuration contains the
http_access deny !Safe_portsrule that defines access denial to ports that are not defined inSafe_ports ACLs.Configure the cache type, the path to the cache directory, the cache size, and further cache type-specific settings in the
cache_dirparameter:cache_dir ufs /var/spool/squid 10000 16 256With these settings:
-
Squid uses the
ufscache type. -
Squid stores its cache in the
/var/spool/squid/directory. -
The cache grows up to
10000MB. -
Squid creates
16level-1 sub-directories in the/var/spool/squid/directory. Squid creates
256sub-directories in each level-1 directory.If you do not set a
cache_dirdirective, Squid stores the cache in memory.
-
Squid uses the
If you set a different cache directory than
/var/spool/squid/in thecache_dirparameter:Create the cache directory:
# mkdir -p path_to_cache_directoryConfigure the permissions for the cache directory:
# chown squid:squid path_to_cache_directoryIf you run SELinux in
enforcingmode, set thesquid_cache_tcontext for the cache directory:# semanage fcontext -a -t squid_cache_t "path_to_cache_directory(/.*)?" # restorecon -Rv path_to_cache_directory
If the
semanageutility is not available on your system, install thepolicycoreutils-python-utilspackage.
Store the password of the LDAP service user in the
/etc/squid/ldap_passwordfile, and set appropriate permissions for the file:# echo "password" > /etc/squid/ldap_password # chown root:squid /etc/squid/ldap_password # chmod 640 /etc/squid/ldap_password
Open the
3128port in the firewall:# firewall-cmd --permanent --add-port=3128/tcp # firewall-cmd --reload
Enable and start the
squidservice:# systemctl enable --now squid
Verification steps
To verify that the proxy works correctly, download a web page using the curl utility:
# curl -O -L "https://www.redhat.com/index.html" -x "user_name:password@proxy.example.com:3128"
If curl does not display any error and the index.html file was downloaded to the current directory, the proxy works.
Troubleshooting steps
To verify that the helper utility works correctly:
Manually start the helper utility with the same settings you used in the
auth_paramparameter:# /usr/lib64/squid/basic_ldap_auth -b "cn=users,cn=accounts,dc=example,dc=com" -D "uid=proxy_user,cn=users,cn=accounts,dc=example,dc=com" -W /etc/squid/ldap_password -f "(&(objectClass=person)(uid=%s))" -ZZ -H ldap://ldap_server.example.com:389Enter a valid user name and password, and press Enter:
user_name passwordIf the helper utility returns
OK, authentication succeeded.
6.3. Setting up Squid as a caching proxy with kerberos authentication
You can configure Squid as a caching proxy that authenticates users to an Active Directory (AD) using Kerberos. The procedure configures that only authenticated users can use the proxy.
Prerequisites
-
The procedure assumes that the
/etc/squid/squid.conffile is as provided by thesquidpackage. If you edited this file before, remove the file and reinstall the package.
Procedure
Install the following packages:
# yum install squid krb5-workstationAuthenticate as the AD domain administrator:
# kinit administrator@AD.EXAMPLE.COMCreate a keytab for Squid and store it in the
/etc/squid/HTTP.keytabfile:# export KRB5_KTNAME=FILE:/etc/squid/HTTP.keytab # net ads keytab CREATE -U administrator
Add the
HTTPservice principal to the keytab:# net ads keytab ADD HTTP -U administratorSet the owner of the keytab file to the
squiduser:# chown squid /etc/squid/HTTP.keytabOptionally, verify that the keytab file contains the
HTTPservice principal for the fully-qualified domain name (FQDN) of the proxy server:# klist -k /etc/squid/HTTP.keytab Keytab name: FILE:/etc/squid/HTTP.keytab KVNO Principal ---- --------------------------------------------------- ... 2 HTTP/proxy.ad.example.com@AD.EXAMPLE.COM ...Edit the
/etc/squid/squid.conffile:To configure the
negotiate_kerberos_authhelper utility, add the following configuration entry to the top of/etc/squid/squid.conf:auth_param negotiate program /usr/lib64/squid/negotiate_kerberos_auth -k /etc/squid/HTTP.keytab -s HTTP/proxy.ad.example.com@AD.EXAMPLE.COMThe following describes the parameters passed to the
negotiate_kerberos_authhelper utility in the example above:-
-k filesets the path to the key tab file. Note that the squid user must have read permissions on this file. -s HTTP/host_name@kerberos_realmsets the Kerberos principal that Squid uses.Optionally, you can enable logging by passing one or both of the following parameters to the helper utility:
-
-ilogs informational messages, such as the authenticating user. -denables debug logging.Squid logs the debugging information from the helper utility to the
/var/log/squid/cache.logfile.
-
Add the following ACL and rule to configure that Squid allows only authenticated users to use the proxy:
acl kerb-auth proxy_auth REQUIRED http_access allow kerb-auth
ImportantSpecify these settings before the
http_access deny allrule.Remove the following rule to disable bypassing the proxy authentication from IP ranges specified in
localnetACLs:http_access allow localnetThe following ACL exists in the default configuration and defines
443as a port that uses the HTTPS protocol:acl SSL_ports port 443If users should be able to use the HTTPS protocol also on other ports, add an ACL for each of these port:
acl SSL_ports port port_numberUpdate the list of
acl Safe_portsrules to configure to which ports Squid can establish a connection. For example, to configure that clients using the proxy can only access resources on port 21 (FTP), 80 (HTTP), and 443 (HTTPS), keep only the followingacl Safe_portsstatements in the configuration:acl Safe_ports port 21 acl Safe_ports port 80 acl Safe_ports port 443
By default, the configuration contains the
http_access deny !Safe_portsrule that defines access denial to ports that are not defined inSafe_portsACLs.Configure the cache type, the path to the cache directory, the cache size, and further cache type-specific settings in the
cache_dirparameter:cache_dir ufs /var/spool/squid 10000 16 256With these settings:
-
Squid uses the
ufscache type. -
Squid stores its cache in the
/var/spool/squid/directory. -
The cache grows up to
10000MB. -
Squid creates
16level-1 sub-directories in the/var/spool/squid/directory. Squid creates
256sub-directories in each level-1 directory.If you do not set a
cache_dirdirective, Squid stores the cache in memory.
-
Squid uses the
If you set a different cache directory than
/var/spool/squid/in thecache_dirparameter:Create the cache directory:
# mkdir -p path_to_cache_directoryConfigure the permissions for the cache directory:
# chown squid:squid path_to_cache_directoryIf you run SELinux in
enforcingmode, set thesquid_cache_tcontext for the cache directory:# semanage fcontext -a -t squid_cache_t "path_to_cache_directory(/.*)?" # restorecon -Rv path_to_cache_directory
If the
semanageutility is not available on your system, install thepolicycoreutils-python-utilspackage.
Open the
3128port in the firewall:# firewall-cmd --permanent --add-port=3128/tcp # firewall-cmd --reload
Enable and start the
squidservice:# systemctl enable --now squid
Verification steps
To verify that the proxy works correctly, download a web page using the curl utility:
# curl -O -L "https://www.redhat.com/index.html" --proxy-negotiate -u : -x "proxy.ad.example.com:3128"
If curl does not display any error and the index.html file exists in the current directory, the proxy works.
Troubleshooting steps
To manually test Kerberos authentication:
Obtain a Kerberos ticket for the AD account:
# kinit user@AD.EXAMPLE.COMOptionally, display the ticket:
# klistUse the
negotiate_kerberos_auth_testutility to test the authentication:# /usr/lib64/squid/negotiate_kerberos_auth_test proxy.ad.example.comIf the helper utility returns a token, the authentication succeeded:
Token: YIIFtAYGKwYBBQUCoIIFqDC...
6.4. Configuring a domain deny list in Squid
Frequently, administrators want to block access to specific domains. This section describes how to configure a domain deny list in Squid.
Prerequisites
- Squid is configured, and users can use the proxy.
Procedure
Edit the
/etc/squid/squid.conffile and add the following settings:acl domain_deny_list dstdomain "/etc/squid/domain_deny_list.txt" http_access deny all domain_deny_list
ImportantAdd these entries before the first
http_access allowstatement that allows access to users or clients.Create the
/etc/squid/domain_deny_list.txtfile and add the domains you want to block. For example, to block access toexample.comincluding subdomains and to blockexample.net, add:.example.com example.net
ImportantIf you referred to the
/etc/squid/domain_deny_list.txtfile in the squid configuration, this file must not be empty. If the file is empty, Squid fails to start.Restart the
squidservice:# systemctl restart squid
6.5. Configuring the Squid service to listen on a specific port or IP address
By default, the Squid proxy service listens on the 3128 port on all network interfaces. You can change the port and configuring Squid to listen on a specific IP address.
Prerequisites
-
The
squidpackage is installed.
Procedure
Edit the
/etc/squid/squid.conffile:To set the port on which the Squid service listens, set the port number in the
http_portparameter. For example, to set the port to8080, set:http_port 8080To configure on which IP address the Squid service listens, set the IP address and port number in the
http_portparameter. For example, to configure that Squid listens only on the192.0.2.1IP address on port3128, set:http_port 192.0.2.1:3128Add multiple
http_portparameters to the configuration file to configure that Squid listens on multiple ports and IP addresses:http_port 192.0.2.1:3128 http_port 192.0.2.1:8080
If you configured that Squid uses a different port as the default (
3128):Open the port in the firewall:
# firewall-cmd --permanent --add-port=port_number/tcp # firewall-cmd --reload
If you run SELinux in enforcing mode, assign the port to the
squid_port_tport type definition:# semanage port -a -t squid_port_t -p tcp port_numberIf the
semanageutility is not available on your system, install thepolicycoreutils-python-utilspackage.
Restart the
squidservice:# systemctl restart squid
6.6. Additional resources
-
Configuration parameters
usr/share/doc/squid-<version>/squid.conf.documented
Chapter 7. Database servers
7.1. Introduction to database servers
A database server is a service that provides features of a database management system (DBMS). DBMS provides utilities for database administration and interacts with end users, applications, and databases.
Red Hat Enterprise Linux 8 provides the following database management systems:
- MariaDB 10.3
- MariaDB 10.5 - available since RHEL 8.4
- MySQL 8.0
- PostgreSQL 10
- PostgreSQL 9.6
- PostgreSQL 12 - available since RHEL 8.1.1
- PostgreSQL 13 - available since RHEL 8.4
- PostgreSQL 15 - available since RHEL 8.8
7.2. Using MariaDB
The MariaDB server is an open source fast and robust database server that is based on the MySQL technology. MariaDB is a relational database that converts data into structured information and provides an SQL interface for accessing data. It includes multiple storage engines and plug-ins, as well as geographic information system (GIS) and JavaScript Object Notation (JSON) features.
Learn how to install and configure MariaDB on a RHEL system, how to back up MariaDB data, how to migrate from an earlier MariaDB version, and how to replicate a database using the MariaDB Galera Cluster.
7.2.1. Installing MariaDB
In RHEL 8, the MariaDB server is available in the following versions, each provided by a separate stream:
- MariaDB 10.3
- MariaDB 10.5 - available since RHEL 8.4
To install MariaDB, use the following procedure.
Procedure
Install MariaDB server packages by selecting a stream (version) from the
mariadbmodule and specifying theserverprofile. For example:# yum module install mariadb:10.3/serverStart the
mariadbservice:# systemctl start mariadb.serviceEnable the
mariadbservice to start at boot:# systemctl enable mariadb.serviceRecommended for MariaDB 10.3: To improve security when installing MariaDB, run the following command:
$ mysql_secure_installationThe command launches a fully interactive script, which prompts for each step in the process. The script enables you to improve security in the following ways:
- Setting a password for root accounts
- Removing anonymous users
Disallowing remote root logins (outside the local host)
NoteThe mysql_secure_installation script is no longer valuable in MariaDB 10.5 or later. The security enhancements are part of the default behavior since MariaDB 10.5.
The MariaDB and MySQL database servers cannot be installed in parallel in RHEL 8 due to conflicting RPM packages. Parallel installation of components is possible in Red Hat Software Collections for RHEL 7. In RHEL 8, different versions of database servers can be used in containers.
7.2.2. Configuring MariaDB
To configure the MariaDB server for networking, use the following procedure.
Procedure
Edit the
[mysqld]section of the/etc/my.cnf.d/mariadb-server.cnffile. You can set the following configuration directives:bind-address- is the address on which the server listens. Possible options are:- a host name
- an IPv4 address
- an IPv6 address
skip-networking- controls whether the server listens for TCP/IP connections. Possible values are:- 0 - to listen for all clients
- 1 - to listen for local clients only
-
port- the port on which MariaDB listens for TCP/IP connections.
Restart the
mariadbservice:# systemctl restart mariadb.service
7.2.3. Setting up TLS encryption on a MariaDB server
By default, MariaDB uses unencrypted connections. For secure connections, enable TLS support on the MariaDB server and configure your clients to establish encrypted connections.
7.2.3.1. Placing the CA certificate, server certificate, and private key on the MariaDB server
Before you can enable TLS encryption in the MariaDB server, store the certificate authority (CA) certificate, the server certificate, and the private key on the MariaDB server.
Prerequisites
The following files in Privacy Enhanced Mail (PEM) format have been copied to the server:
-
The private key of the server:
server.example.com.key.pem -
The server certificate:
server.example.com.crt.pem -
The Certificate Authority (CA) certificate:
ca.crt.pem
For details about creating a private key and certificate signing request (CSR), as well as about requesting a certificate from a CA, see your CA’s documentation.
-
The private key of the server:
Procedure
Store the CA and server certificates in the
/etc/pki/tls/certs/directory:# mv <path>/server.example.com.crt.pem /etc/pki/tls/certs/ # mv <path>/ca.crt.pem /etc/pki/tls/certs/
Set permissions on the CA and server certificate that enable the MariaDB server to read the files:
# chmod 644 /etc/pki/tls/certs/server.example.com.crt.pem /etc/pki/tls/certs/ca.crt.pemBecause certificates are part of the communication before a secure connection is established, any client can retrieve them without authentication. Therefore, you do not need to set strict permissions on the CA and server certificate files.
Store the server’s private key in the
/etc/pki/tls/private/directory:# mv <path>/server.example.com.key.pem /etc/pki/tls/private/Set secure permissions on the server’s private key:
# chmod 640 /etc/pki/tls/private/server.example.com.key.pem # chgrp mysql /etc/pki/tls/private/server.example.com.key.pem
If unauthorized users have access to the private key, connections to the MariaDB server are no longer secure.
Restore the SELinux context:
# restorecon -Rv /etc/pki/tls/
7.2.3.2. Configuring TLS on a MariaDB server
To improve security, enable TLS support on the MariaDB server. As a result, clients can transmit data with the server using TLS encryption.
Prerequisites
- You installed the MariaDB server.
-
The
mariadbservice is running. The following files in Privacy Enhanced Mail (PEM) format exist on the server and are readable by the
mysqluser:-
The private key of the server:
/etc/pki/tls/private/server.example.com.key.pem -
The server certificate:
/etc/pki/tls/certs/server.example.com.crt.pem -
The Certificate Authority (CA) certificate
/etc/pki/tls/certs/ca.crt.pem
-
The private key of the server:
- The subject distinguished name (DN) or the subject alternative name (SAN) field in the server certificate matches the server’s host name.
Procedure
Create the
/etc/my.cnf.d/mariadb-server-tls.cnffile:Add the following content to configure the paths to the private key, server and CA certificate:
[mariadb] ssl_key = /etc/pki/tls/private/server.example.com.key.pem ssl_cert = /etc/pki/tls/certs/server.example.com.crt.pem ssl_ca = /etc/pki/tls/certs/ca.crt.pem
If you have a Certificate Revocation List (CRL), configure the MariaDB server to use it:
ssl_crl = /etc/pki/tls/certs/example.crl.pemOptional: If you run MariaDB 10.5.2 or later, you can reject connection attempts without encryption. To enable this feature, append:
require_secure_transport = onOptional: If you run MariaDB 10.4.6 or later, you can set the TLS versions the server should support. For example, to support TLS 1.2 and TLS 1.3, append:
tls_version = TLSv1.2,TLSv1.3By default, the server supports TLS 1.1, TLS 1.2, and TLS 1.3.
Restart the
mariadbservice:# systemctl restart mariadb
Verification
To simplify troubleshooting, perform the following steps on the MariaDB server before you configure the local client to use TLS encryption:
Verify that MariaDB now has TLS encryption enabled:
# mysql -u root -p -e "SHOW GLOBAL VARIABLES LIKE 'have_ssl';" +---------------+-----------------+ | Variable_name | Value | +---------------+-----------------+ | have_ssl | YES | +---------------+-----------------+If the
have_sslvariable is set toyes, TLS encryption is enabled.If you configured the MariaDB service to only support specific TLS versions, display the
tls_versionvariable:# mysql -u root -p -e "SHOW GLOBAL VARIABLES LIKE 'tls_version';" +---------------+-----------------+ | Variable_name | Value | +---------------+-----------------+ | tls_version | TLSv1.2,TLSv1.3 | +---------------+-----------------+
7.2.3.3. Requiring TLS encrypted connections for specific user accounts
Users that have access to sensitive data should always use a TLS-encrypted connection to avoid sending data unencrypted over the network.
If you cannot configure on the server that a secure transport is required for all connections (require_secure_transport = on), configure individual user accounts to require TLS encryption.
Prerequisites
- The MariaDB server has TLS support enabled.
- The user you configure to require secure transport exists.
- The client trusts the CA certificate that issued the server’s certificate.
Procedure
Connect as an administrative user to the MariaDB server:
# mysql -u root -p -h server.example.comIf your administrative user has no permissions to access the server remotely, perform the command on the MariaDB server and connect to
localhost.Use the
REQUIRE SSLclause to enforce that a user must connect using a TLS-encrypted connection:MariaDB [(none)]> ALTER USER 'example'@'%' REQUIRE SSL;
Verification
Connect to the server as the
exampleuser using TLS encryption:# mysql -u example -p -h server.example.com --ssl ... MariaDB [(none)]>If no error is shown and you have access to the interactive MariaDB console, the connection with TLS succeeds.
Attempt to connect as the
exampleuser with TLS disabled:# mysql -u example -p -h server.example.com --skip-ssl ERROR 1045 (28000): Access denied for user 'example'@'server.example.com' (using password: YES)The server rejected the login attempt because TLS is required for this user but disabled (
--skip-ssl).
Additional resources
7.2.4. Globally enabling TLS encryption in MariaDB clients
If your MariaDB server supports TLS encryption, configure your clients to establish only secure connections and to verify the server certificate. This procedure describes how to enable TLS support for all users on the server.
7.2.4.1. Configuring the MariaDB client to use TLS encryption by default
On RHEL, you can globally configure that the MariaDB client uses TLS encryption and verifies that the Common Name (CN) in the server certificate matches the hostname the user connects to. This prevents man-in-the-middle attacks.
Prerequisites
- The MariaDB server has TLS support enabled.
- If the certificate authority (CA) that issued the server’s certificate is not trusted by RHEL, the CA certificate has been copied to the client.
Procedure
If RHEL does not trust the CA that issued the server’s certificate:
Copy the CA certificate to the
/etc/pki/ca-trust/source/anchors/directory:# cp <path>/ca.crt.pem /etc/pki/ca-trust/source/anchors/Set permissions that enable all users to read the CA certificate file:
# chmod 644 /etc/pki/ca-trust/source/anchors/ca.crt.pemRebuild the CA trust database:
# update-ca-trust
Create the
/etc/my.cnf.d/mariadb-client-tls.cnffile with the following content:[client-mariadb] ssl ssl-verify-server-cert
These settings define that the MariaDB client uses TLS encryption (
ssl) and that the client compares the hostname with the CN in the server certificate (ssl-verify-server-cert).
Verification
Connect to the server using the hostname, and display the server status:
# mysql -u root -p -h server.example.com -e status ... SSL: Cipher in use is TLS_AES_256_GCM_SHA384If the
SSLentry containsCipher in use is…, the connection is encrypted.Note that the user you use in this command has permissions to authenticate remotely.
If the hostname you connect to does not match the hostname in the TLS certificate of the server, the
ssl-verify-server-certparameter causes the connection to fail. For example, if you connect tolocalhost:# mysql -u root -p -h localhost -e status ERROR 2026 (HY000): SSL connection error: Validation of SSL server certificate failed
Additional resources
-
The
--ssl*parameter descriptions in themysql(1)man page.
7.2.5. Backing up MariaDB data
There are two main ways to back up data from a MariaDB database in Red Hat Enterprise Linux 8:
- Logical backup
- Physical backup
Logical backup consists of the SQL statements necessary to restore the data. This type of backup exports information and records in plain text files.
The main advantage of logical backup over physical backup is portability and flexibility. The data can be restored on other hardware configurations, MariaDB versions or Database Management System (DBMS), which is not possible with physical backups.
Note that logical backup can be performed if the mariadb.service is running. Logical backup does not include log and configuration files.
Physical backup consists of copies of files and directories that store the content.
Physical backup has the following advantages compared to logical backup:
- Output is more compact.
- Backup is smaller in size.
- Backup and restore are faster.
- Backup includes log and configuration files.
Note that physical backup must be performed when the mariadb.service is not running or all tables in the database are locked to prevent changes during the backup.
You can use one of the following MariaDB backup approaches to back up data from a MariaDB database:
-
Logical backup with
mysqldump -
Physical online backup using the
Mariabackuputility - File system backup
- Replication as a backup solution
7.2.5.1. Performing logical backup with mysqldump
The mysqldump client is a backup utility, which can be used to dump a database or a collection of databases for the purpose of a backup or transfer to another database server. The output of mysqldump typically consists of SQL statements to re-create the server table structure, populate it with data, or both. mysqldump can also generate files in other formats, including XML and delimited text formats, such as CSV.
To perform the mysqldump backup, you can use one of the following options:
- Back up one or more selected databases
- Back up all databases
- Back up a subset of tables from one database
Procedure
To dump a single database, run:
# mysqldump [options] --databases db_name > backup-file.sqlTo dump multiple databases at once, run:
# mysqldump [options] --databases db_name1 [db_name2 …] > backup-file.sqlTo dump all databases, run:
# mysqldump [options] --all-databases > backup-file.sqlTo load one or more dumped full databases back into a server, run:
# mysql < backup-file.sqlTo load a database to a remote MariaDB server, run:
# mysql --host=remote_host < backup-file.sqlTo dump a subset of tables from one database, add a list of the chosen tables at the end of the
mysqldumpcommand:# mysqldump [options] db_name [tbl_name …] > backup-file.sqlTo load a subset of tables dumped from one database, run:
# mysql db_name < backup-file.sqlNoteThe db_name database must exist at this point.
To see a list of the options that mysqldump supports, run:
$ mysqldump --help
Additional resources
- For more information about logical backup with mysqldump, see the MariaDB Documentation.
7.2.5.2. Performing physical online backup using the Mariabackup utility
Mariabackup is a utility based on the Percona XtraBackup technology, which enables performing physical online backups of InnoDB, Aria, and MyISAM tables. This utility is provided by the mariadb-backup package from the AppStream repository.
Mariabackup supports full backup capability for MariaDB server, which includes encrypted and compressed data.
Prerequisites
The
mariadb-backuppackage is installed on the system:# yum install mariadb-backup
- You must provide Mariabackup with credentials for the user under which the backup will be run. You can provide the credentials either on the command line or by a configuration file.
-
Users of Mariabackup must have the
RELOAD,LOCK TABLES, andREPLICATION CLIENTprivileges.
To create a backup of a database using Mariabackup, use the following procedure.
Procedure
To create a backup while providing credentials on the command line, run:
$ mariabackup --backup --target-dir <backup_directory> --user <backup_user> --password <backup_passwd>The
target-diroption defines the directory where the backup files are stored. If you want to perform a full backup, the target directory must be empty or not exist.The
userandpasswordoptions allow you to configure the user name and the password.To create a backup with credentials set in a configuration file:
-
Create a configuration file in the
/etc/my.cnf.d/directory, for example,/etc/my.cnf.d/mariabackup.cnf. Add the following lines into the
[xtrabackup]or[mysqld]section of the new file:[xtrabackup] user=myuser password=mypassword
Perform the backup:
$ mariabackup --backup --target-dir <backup_directory>
-
Create a configuration file in the
Mariabackup does not read options in the [mariadb] section of configuration files. If a non-default data directory is specified on a MariaDB server, you must specify this directory in the [xtrabackup] or [mysqld] sections of configuration files so that Mariabackup is able to find the data directory.
To specify a non-default data directory, include the following line in the [xtrabackup] or [mysqld] sections of MariaDB configuration files:
datadir=/var/mycustomdatadir
Additional resources
7.2.5.3. Restoring data using the Mariabackup utility
When the backup is complete, you can restore the data from the backup by using the mariabackup command with one of the following options:
-
--copy-backallows you to keep the original backup files. -
--move-backmoves the backup files to the data directory and removes the original backup files.
To restore data using the Mariabackup utility, use the following procedure.
Prerequisites
Verify that the
mariadbservice is not running:# systemctl stop mariadb.service- Verify that the data directory is empty.
-
Users of Mariabackup must have the
RELOAD,LOCK TABLES, andREPLICATION CLIENTprivileges.
Procedure
Run the
mariabackupcommand:To restore data and keep the original backup files, use the
--copy-backoption:$ mariabackup --copy-back --target-dir=/var/mariadb/backup/To restore data and remove the original backup files, use the
--move-backoption:$ mariabackup --move-back --target-dir=/var/mariadb/backup/
Fix the file permissions.
When restoring a database, Mariabackup preserves the file and directory privileges of the backup. However, Mariabackup writes the files to disk as the user and group restoring the database. After restoring a backup, you may need to adjust the owner of the data directory to match the user and group for the MariaDB server, typically
mysqlfor both.For example, to recursively change ownership of the files to the
mysqluser and group:# chown -R mysql:mysql /var/lib/mysql/Start the
mariadbservice:# systemctl start mariadb.service
Additional resources
7.2.5.4. Performing file system backup
To create a file system backup of MariaDB data files, copy the content of the MariaDB data directory to your backup location.
To back up also your current configuration or the log files, use the optional steps of the following procedure.
Procedure
Stop the
mariadbservice:# systemctl stop mariadb.serviceCopy the data files to the required location:
# cp -r /var/lib/mysql /backup-locationOptionally, copy the configuration files to the required location:
# cp -r /etc/my.cnf /etc/my.cnf.d /backup-location/configurationOptionally, copy the log files to the required location:
# cp /var/log/mariadb/* /backup-location/logsStart the
mariadbservice:# systemctl start mariadb.serviceWhen loading the backed up data from the backup location to the
/var/lib/mysqldirectory, ensure thatmysql:mysqlis an owner of all data in/var/lib/mysql:# chown -R mysql:mysql /var/lib/mysql
7.2.5.5. Replication as a backup solution
Replication is an alternative backup solution for source servers. If a source server replicates to a replica server, backups can be run on the replica without any impact on the source. The source can still run while you shut down the replica and back the data up from the replica.
Replication itself is not a sufficient backup solution. Replication protects source servers against hardware failures, but it does not ensure protection against data loss. It is recommended that you use any other backup solution on the replica together with this method.
Additional resources
7.2.6. Migrating to MariaDB 10.3
RHEL 7 contains MariaDB 5.5 as the default implementation of a server from the MySQL databases family. Later versions of the MariaDB database server are available as Software Collections for RHEL 7. RHEL 8 provides MariaDB 10.3, MariaDB 10.5, and MySQL 8.0.
This part describes migration to MariaDB 10.3 from a RHEL 7 or Red Hat Software Collections version of MariaDB. If you want to migrate from MariaDB 10.3 to MariaDB 10.5 within RHEL 8, see Upgrading from MariaDB 10.3 to MariaDB 10.5 instead.
7.2.6.1. Notable differences between the RHEL 7 and RHEL 8 versions of MariaDB
The most important changes between MariaDB 5.5 and MariaDB 10.3 are as follows:
- MariaDB Galera Cluster, a synchronous multi-source cluster, is a standard part of MariaDB since 10.1.
- The ARCHIVE storage engine is no longer enabled by default, and the plug-in needs to be specifically enabled.
- The BLACKHOLE storage engine is no longer enabled by default, and the plug-in needs to be specifically enabled.
InnoDB is used as the default storage engine instead of XtraDB, which was used in MariaDB 10.1 and earlier versions.
For more details, see Why does MariaDB 10.2 use InnoDB instead of XtraDB?.
-
The new
mariadb-connector-cpackages provide a common client library for MySQL and MariaDB. This library is usable with any version of the MySQL and MariaDB database servers. As a result, the user is able to connect one build of an application to any of the MySQL and MariaDB servers distributed with Red Hat Enterprise Linux 8.
To migrate from MariaDB 5.5 to MariaDB 10.3, you need to perform multiple configuration changes as described in Migrating to MariaDB.
7.2.6.2. Configuration changes
The recommended migration path from MariaDB 5.5 to MariaDB 10.3 is to upgrade to MariaDB 10.0 first, and then upgrade by one version successively.
The main advantage of upgrading one minor version at a time is better adaptation of the database, including both data and configuration, to the changes. The upgrade ends on the same major version as is available in RHEL 8 (MariaDB 10.3), which significantly reduces configuration changes or other issues.
For more information about configuration changes when migrating from MariaDB 5.5 to MariaDB 10.0, see Migrating to MariaDB 10.0 in Red Hat Software Collections documentation.
The migration to following successive versions of MariaDB and the required configuration changes is described in these documents:
- Migrating to MariaDB 10.1 in Red Hat Software Collections documentation.
- Migrating to MariaDB 10.2 in Red Hat Software Collections documentation.
- Migrating to MariaDB 10.3 in Red Hat Software Collections documentation.
Migration directly from MariaDB 5.5 to MariaDB 10.3 is also possible, but you must perform all configuration changes that are required by differences described in the migration documents above.
7.2.6.3. In-place upgrade using the mysql_upgrade utility
To migrate the database files to RHEL 8, users of MariaDB on RHEL 7 must perform the in-place upgrade using the mysql_upgrade utility. The mysql_upgrade utility is provided by the mariadb-server-utils subpackage, which is installed as a dependency of the mariadb-server package.
To perform an in-place upgrade, you must copy binary data files to the /var/lib/mysql/ data directory on the RHEL 8 system and use the mysql_upgrade utility.
You can use this method for migrating data from:
- The Red Hat Enterprise Linux 7 version of MariaDB 5.5
The Red Hat Software Collections versions of:
- MariaDB 5.5 (no longer supported)
- MariaDB 10.0 (no longer supported)
- MariaDB 10.1 (no longer supported)
- MariaDB 10.2 (no longer supported)
MariaDB 10.3
Note that it is recommended to upgrade to MariaDB 10.3 by one version successively. See the respective Migration chapters in the Release Notes for Red Hat Software Collections.
If you are upgrading from the RHEL 7 version of MariaDB, the source data is stored in the /var/lib/mysql/ directory. In case of Red Hat Software Collections versions of MariaDB, the source data directory is /var/opt/rh/<collection_name>/lib/mysql/ (with the exception of the mariadb55, which uses the /opt/rh/mariadb55/root/var/lib/mysql/ data directory).
To perform an upgrade using the mysql_upgrade utility, use the following procedure.
Prerequisites
- Before performing the upgrade, back up all your data stored in the MariaDB databases.
Procedure
Ensure that the
mariadb-serverpackage is installed on the RHEL 8 system:# yum install mariadb-serverEnsure that the
mariadbservice is not running on either of the source and target systems at the time of copying data:# systemctl stop mariadb.service-
Copy the data from the source location to the
/var/lib/mysql/directory on the RHEL 8 target system. Set the appropriate permissions and SELinux context for copied files on the target system:
# restorecon -vr /var/lib/mysqlStart the MariaDB server on the target system:
# systemctl start mariadb.serviceRun the
mysql_upgradecommand to check and repair internal tables:$ mysql_upgrade-
When the upgrade is complete, verify that all configuration files within the
/etc/my.cnf.d/directory include only options valid for MariaDB 10.3.
There are certain risks and known problems related to an in-place upgrade. For example, some queries might not work or they will be run in different order than before the upgrade. For more information about these risks and problems, and for general information about an in-place upgrade, see MariaDB 10.3 Release Notes.
7.2.7. Upgrading from MariaDB 10.3 to MariaDB 10.5
This part describes migration from MariaDB 10.3 to MariaDB 10.5 within RHEL 8.
7.2.7.1. Notable differences between MariaDB 10.3 and MariaDB 10.5
Significant changes between MariaDB 10.3 and MariaDB 10.5 include:
-
MariaDB now uses the
unix_socketauthentication plug-in by default. The plug-in enables users to use operating system credentials when connecting to MariaDB through the local UNIX socket file. -
MariaDBaddsmariadb-*named binaries andmysql*symbolic links pointing to themariadb-*binaires. For example, themysqladmin,mysqlaccess, andmysqlshowsymlinks point to themariadb-admin,mariadb-access, andmariadb-showbinaries, respectively. -
The
SUPERprivilege has been split into several privileges to better align with each user role. As a result, certain statements have changed required privileges. -
In parallel replication, the
slave_parallel_modenow defaults tooptimistic. -
In the InnoDB storage engine, defaults of the following variables have been changed:
innodb_adaptive_hash_indextoOFFandinnodb_checksum_algorithmtofull_crc32. MariaDB now uses the
libeditimplementation of the underlying software managing the MariaDB command history (the.mysql_historyfile) instead of the previously usedreadlinelibrary. This change impacts users working directly with the.mysql_historyfile. Note that.mysql_historyis a file managed by the MariaDB or MySQL applications, and users should not work with the file directly. The human-readable appearance is coincidental.NoteTo increase security, you can consider not maintaining a history file. To disable the command history recording:
-
Remove the
.mysql_historyfile if it exists. Use either of the following approaches:
-
Set the
MYSQL_HISTFILEvariable to/dev/nulland include this setting in any of your shell’s startup files. Change the
.mysql_historyfile to a symbolic link to/dev/null:$ ln -s /dev/null $HOME/.mysql_history
-
Set the
-
Remove the
MariaDB Galera Cluster has been upgraded to version 4 with the following notable changes:
- Galera adds a new streaming replication feature, which supports replicating transactions of unlimited size. During an execution of streaming replication, a cluster replicates a transaction in small fragments.
- Galera now fully supports Global Transaction ID (GTID).
-
The default value for the
wsrep_onoption in the/etc/my.cnf.d/galera.cnffile has changed from1to0to prevent end users from startingwsrepreplication without configuring required additional options.
Changes to the PAM plug-in in MariaDB 10.5 include:
-
MariaDB 10.5 adds a new version of the Pluggable Authentication Modules (PAM) plug-in. The PAM plug-in version 2.0 performs PAM authentication using a separate
setuid roothelper binary, which enables MariaDB to use additional PAM modules. -
The helper binary can be executed only by users in the
mysqlgroup. By default, the group contains only themysqluser. Red Hat recommends that administrators do not add more users to themysqlgroup to prevent password-guessing attacks without throttling or logging through this helper utility. -
In MariaDB 10.5, the Pluggable Authentication Modules (PAM) plug-in and its related files have been moved to a new package,
mariadb-pam. As a result, no newsetuid rootbinary is introduced on systems that do not use PAM authentication forMariaDB. -
The
mariadb-pampackage contains both PAM plug-in versions: version 2.0 is the default, and version 1.0 is available as theauth_pam_v1shared object library. -
The
mariadb-pampackage is not installed by default with the MariaDB server. To make the PAM authentication plug-in available in MariaDB 10.5, install themariadb-pampackage manually.
7.2.7.2. Upgrading from a RHEL 8 version of MariaDB 10.3 to MariaDB 10.5
This procedure describes upgrading from the mariadb:10.3 module stream to the mariadb:10.5 module stream using the yum and mariadb-upgrade utilities.
The mariadb-upgrade utility is provided by the mariadb-server-utils subpackage, which is installed as a dependency of the mariadb-server package.
Prerequisites
- Before performing the upgrade, back up all your data stored in the MariaDB databases.
Procedure
Stop the MariaDB server:
# systemctl stop mariadb.serviceExecute the following command to determine if your system is prepared for switching to a later stream:
# yum distro-syncThis command must finish with the message Nothing to do. Complete! For more information, see Switching to a later stream.
Reset the
mariadbmodule on your system:# yum module reset mariadbEnable the new
mariadb:10.5module stream:# yum module enable mariadb:10.5Synchronize installed packages to perform the change between streams:
# yum distro-syncThis will update all installed MariaDB packages.
-
Adjust configuration so that option files located in
/etc/my.cnf.d/include only options valid for MariaDB 10.5. For details, see upstream documentation for MariaDB 10.4 and MariaDB 10.5. Start the MariaDB server.
When upgrading a database running standalone:
# systemctl start mariadb.serviceWhen upgrading a Galera cluster node:
# galera_new_clusterThe
mariadbservice will be started automatically.
Execute the mariadb-upgrade utility to check and repair internal tables.
When upgrading a database running standalone:
# mariadb-upgradeWhen upgrading a Galera cluster node:
# mariadb-upgrade --skip-write-binlog
There are certain risks and known problems related to an in-place upgrade. For example, some queries might not work or they will be run in different order than before the upgrade. For more information about these risks and problems, and for general information about an in-place upgrade, see MariaDB 10.5 Release Notes.
7.2.8. Replicating MariaDB with Galera
This section describes how to replicate a MariaDB database using the Galera solution on Red Hat Enterprise Linux 8.
7.2.8.1. Introduction to MariaDB Galera Cluster
Galera replication is based on the creation of a synchronous multi-source MariaDB Galera Cluster consisting of multiple MariaDB servers. Unlike the traditional primary/replica setup where replicas are usually read-only, nodes in the MariaDB Galera Cluster can be all writable.
The interface between Galera replication and a MariaDB database is defined by the write set replication API (wsrep API).
The main features of MariaDB Galera Cluster are:
- Synchronous replication
- Active-active multi-source topology
- Read and write to any cluster node
- Automatic membership control, failed nodes drop from the cluster
- Automatic node joining
- Parallel replication on row level
- Direct client connections: users can log on to the cluster nodes, and work with the nodes directly while the replication runs
Synchronous replication means that a server replicates a transaction at commit time by broadcasting the write set associated with the transaction to every node in the cluster. The client (user application) connects directly to the Database Management System (DBMS), and experiences behavior that is similar to native MariaDB.
Synchronous replication guarantees that a change that happened on one node in the cluster happens on other nodes in the cluster at the same time.
Therefore, synchronous replication has the following advantages over asynchronous replication:
- No delay in propagation of the changes between particular cluster nodes
- All cluster nodes are always consistent
- The latest changes are not lost if one of the cluster nodes crashes
- Transactions on all cluster nodes are executed in parallel
- Causality across the whole cluster
7.2.8.2. Components to build MariaDB Galera Cluster
To build MariaDB Galera Cluster, you must install the following packages on your system:
-
mariadb-server-galera- contains support files and scripts for MariaDB Galera Cluster. -
mariadb-server- is patched by MariaDB upstream to include the write set replication API (wsrep API). This API provides the interface between Galera replication and MariaDB. galera- is patched by MariaDB upstream to add full support for MariaDB. Thegalerapackage contains the following:- Galera Replication Library provides the whole replication functionality.
- The Galera Arbitrator utility can be used as a cluster member that participates in voting in split-brain scenarios. However, Galera Arbitrator cannot participate in the actual replication.
-
Galera Systemd service and Galera wrapper script which are used for deploying the Galera Arbitrator utility. MariaDB 10.3 and MariaDB 10.5 in RHEL 8 include a Red Hat version of the
garbdsystemd service and a wrapper script for thegalerapackage in the/usr/lib/systemd/system/garbd.serviceand/usr/sbin/garbd-wrapperfiles, respectively. Since RHEL 8.6, MariaDB 10.3 and MariaDB 10.5 now also provide an upstream version of these files located at/usr/share/doc/galera/garb-systemdand/usr/share/doc/galera/garbd.service.
Additional resources
7.2.8.3. Deploying MariaDB Galera Cluster
Prerequisites
Install MariaDB Galera Cluster packages by selecting a stream (version) from the
mariadbmodule and specifying thegaleraprofile. For example:# yum module install mariadb:10.3/galeraAs a result, the following packages are installed:
-
mariadb-server-galera -
mariadb-server galeraThe
mariadb-server-galerapackage pulls themariadb-serverandgalerapackages as its dependency.For more information about which packages you need to install to build MariaDB Galera Cluster, see Components to build MariaDB Cluster.
-
The MariaDB server replication configuration must be updated before the system is added to a cluster for the first time.
The default configuration is distributed in the
/etc/my.cnf.d/galera.cnffile.Before deploying MariaDB Galera Cluster, set the
wsrep_cluster_addressoption in the/etc/my.cnf.d/galera.cnffile on all nodes to start with the following string:gcomm://
For the initial node, it is possible to set
wsrep_cluster_addressas an empty list:wsrep_cluster_address="gcomm://"
For all other nodes, set
wsrep_cluster_addressto include an address to any node which is already a part of the running cluster. For example:wsrep_cluster_address="gcomm://10.0.0.10"
For more information about how to set Galera Cluster address, see Galera Cluster Address.
Procedure
Bootstrap a first node of a new cluster by running the following wrapper on that node:
# galera_new_clusterThis wrapper ensures that the MariaDB server daemon (
mysqld) runs with the--wsrep-new-clusteroption. This option provides the information that there is no existing cluster to connect to. Therefore, the node creates a new UUID to identify the new cluster.NoteThe
mariadbservice supports a systemd method for interacting with multiple MariaDB server processes. Therefore, in cases with multiple running MariaDB servers, you can bootstrap a specific instance by specifying the instance name as a suffix:# galera_new_cluster mariadb@node1Connect other nodes to the cluster by running the following command on each of the nodes:
# systemctl start mariadbAs a result, the node connects to the cluster, and synchronizes itself with the state of the cluster.
Additional resources
7.2.8.4. Adding a new node to MariaDB Galera Cluster
To add a new node to MariaDB Galera Cluster, use the following procedure.
Note that you can also use this procedure to reconnect an already existing node.
Procedure
On the particular node, provide an address to one or more existing cluster members in the
wsrep_cluster_addressoption within the[mariadb]section of the/etc/my.cnf.d/galera.cnfconfiguration file :[mariadb] wsrep_cluster_address="gcomm://192.168.0.1"When a new node connects to one of the existing cluster nodes, it is able to see all nodes in the cluster.
However, preferably list all nodes of the cluster in
wsrep_cluster_address.As a result, any node can join a cluster by connecting to any other cluster node, even if one or more cluster nodes are down. When all members agree on the membership, the cluster’s state is changed. If the new node’s state is different from the state of the cluster, the new node requests either an Incremental State Transfer (IST) or a State Snapshot Transfer (SST) to ensure consistency with the other nodes.
Additional resources
7.2.8.5. Restarting MariaDB Galera Cluster
If you shut down all nodes at the same time, you stop the cluster, and the running cluster no longer exists. However, the cluster’s data still exist.
To restart the cluster, bootstrap a first node as described in Configuring MariaDB Galera Cluster.
If the cluster is not bootstrapped, and mysqld on the first node is started with only the systemctl start mariadb command, the node tries to connect to at least one of the nodes listed in the wsrep_cluster_address option in the /etc/my.cnf.d/galera.cnf file. If no nodes are currently running, the restart fails.
Additional resources
7.2.9. Developing MariaDB client applications
Red Hat recommends developing your MariaDB client applications against the MariaDB client library.
The development files and programs necessary to build applications against the MariaDB client library are provided by the mariadb-connector-c-devel package.
Instead of using a direct library name, use the mariadb_config program, which is distributed in the mariadb-connector-c-devel package. This program ensures that the correct build flags are returned.
7.3. Using MySQL
The MySQL server is an open source fast and robust database server. MySQL is a relational database that converts data into structured information and provides an SQL interface for accessing data. It includes multiple storage engines and plug-ins, as well as geographic information system (GIS) and JavaScript Object Notation (JSON) features.
Learn how to install and configure MySQL on a RHEL system, how to back up MySQL data, how to migrate from an earlier MySQL version, and how to replicate a MySQL.
7.3.1. Installing MySQL
In RHEL 8, the MySQL 8.0 server is available as the mysql:8.0 module stream.
To install MySQL, use the following procedure.
Procedure
Install MySQL server packages by selecting the
8.0stream (version) from themysqlmodule and specifying theserverprofile:# yum module install mysql:8.0/serverStart the
mysqldservice:# systemctl start mysqld.serviceEnable the
mysqldservice to start at boot:# systemctl enable mysqld.serviceRecommended: To improve security when installing MySQL, run the following command:
$ mysql_secure_installationThe command launches a fully interactive script, which prompts for each step in the process. The script enables you to improve security in the following ways:
- Setting a password for root accounts
- Removing anonymous users
- Disallowing remote root logins (outside the local host)
The MySQL and MariaDB database servers cannot be installed in parallel in RHEL 8 due to conflicting RPM packages. Parallel installation of components is possible in Red Hat Software Collections for RHEL 7. In RHEL 8, different versions of database servers can be used in containers.
7.3.2. Configuring MySQL
To configure the MySQL server for networking, use the following procedure.
Procedure
Edit the
[mysqld]section of the/etc/my.cnf.d/mysql-server.cnffile. You can set the following configuration directives:bind-address- is the address on which the server listens. Possible options are:- a host name
- an IPv4 address
- an IPv6 address
skip-networking- controls whether the server listens for TCP/IP connections. Possible values are:- 0 - to listen for all clients
- 1 - to listen for local clients only
-
port- the port on which MySQL listens for TCP/IP connections.
Restart the
mysqldservice:# systemctl restart mysqld.service
7.3.3. Setting up TLS encryption on a MySQL server
By default, MySQL uses unencrypted connections. For secure connections, enable TLS support on the MySQL server and configure your clients to establish encrypted connections.
7.3.3.1. Placing the CA certificate, server certificate, and private key on the MySQL server
Before you can enable TLS encryption on the MySQL server, store the certificate authority (CA) certificate, the server certificate, and the private key on the MySQL server.
Prerequisites
The following files in Privacy Enhanced Mail (PEM) format have been copied to the server:
-
The private key of the server:
server.example.com.key.pem -
The server certificate:
server.example.com.crt.pem -
The Certificate Authority (CA) certificate:
ca.crt.pem
For details about creating a private key and certificate signing request (CSR), as well as about requesting a certificate from a CA, see your CA’s documentation.
-
The private key of the server:
Procedure
Store the CA and server certificates in the
/etc/pki/tls/certs/directory:# mv <path>/server.example.com.crt.pem /etc/pki/tls/certs/ # mv <path>/ca.crt.pem /etc/pki/tls/certs/
Set permissions on the CA and server certificate that enable the MySQL server to read the files:
# chmod 644 /etc/pki/tls/certs/server.example.com.crt.pem /etc/pki/tls/certs/ca.crt.pemBecause certificates are part of the communication before a secure connection is established, any client can retrieve them without authentication. Therefore, you do not need to set strict permissions on the CA and server certificate files.
Store the server’s private key in the
/etc/pki/tls/private/directory:# mv <path>/server.example.com.key.pem /etc/pki/tls/private/Set secure permissions on the server’s private key:
# chmod 640 /etc/pki/tls/private/server.example.com.key.pem # chgrp mysql /etc/pki/tls/private/server.example.com.key.pem
If unauthorized users have access to the private key, connections to the MySQL server are no longer secure.
Restore the SELinux context:
# restorecon -Rv /etc/pki/tls/
7.3.3.2. Configuring TLS on a MySQL server
To improve security, enable TLS support on the MySQL server. As a result, clients can transmit data with the server using TLS encryption.
Prerequisites
- You installed the MySQL server.
-
The
mysqldservice is running. The following files in Privacy Enhanced Mail (PEM) format exist on the server and are readable by the
mysqluser:-
The private key of the server:
/etc/pki/tls/private/server.example.com.key.pem -
The server certificate:
/etc/pki/tls/certs/server.example.com.crt.pem -
The Certificate Authority (CA) certificate
/etc/pki/tls/certs/ca.crt.pem
-
The private key of the server:
- The subject distinguished name (DN) or the subject alternative name (SAN) field in the server certificate matches the server’s host name.
Procedure
Create the
/etc/my.cnf.d/mysql-server-tls.cnffile:Add the following content to configure the paths to the private key, server and CA certificate:
[mysqld] ssl_key = /etc/pki/tls/private/server.example.com.key.pem ssl_cert = /etc/pki/tls/certs/server.example.com.crt.pem ssl_ca = /etc/pki/tls/certs/ca.crt.pem
If you have a Certificate Revocation List (CRL), configure the MySQL server to use it:
ssl_crl = /etc/pki/tls/certs/example.crl.pemOptional: Reject connection attempts without encryption. To enable this feature, append:
require_secure_transport = onOptional: Set the TLS versions the server should support. For example, to support TLS 1.2 and TLS 1.3, append:
tls_version = TLSv1.2,TLSv1.3By default, the server supports TLS 1.1, TLS 1.2, and TLS 1.3.
Restart the
mysqldservice:# systemctl restart mysqld
Verification
To simplify troubleshooting, perform the following steps on the MySQL server before you configure the local client to use TLS encryption:
Verify that MySQL now has TLS encryption enabled:
# mysql -u root -p -h <MySQL_server_hostname> -e "SHOW session status LIKE 'Ssl_cipher';" +---------------+------------------------+ | Variable_name | Value | +---------------+------------------------+ | Ssl_cipher | TLS_AES_256_GCM_SHA384 | +---------------+------------------------+If you configured the MySQL server to only support specific TLS versions, display the
tls_versionvariable:# mysql -u root -p -e "SHOW GLOBAL VARIABLES LIKE 'tls_version';" +---------------+-----------------+ | Variable_name | Value | +---------------+-----------------+ | tls_version | TLSv1.2,TLSv1.3 | +---------------+-----------------+Verify that the server uses the correct CA certificate, server certificate, and private key files:
# mysql -u root -e "SHOW GLOBAL VARIABLES WHERE Variable_name REGEXP '^ssl_ca|^ssl_cert|^ssl_key';" +-----------------+-------------------------------------------------+ | Variable_name | Value | +-----------------+-------------------------------------------------+ | ssl_ca | /etc/pki/tls/certs/ca.crt.pem | | ssl_capath | | | ssl_cert | /etc/pki/tls/certs/server.example.com.crt.pem | | ssl_key | /etc/pki/tls/private/server.example.com.key.pem | +-----------------+-------------------------------------------------+
Additional resources
7.3.3.3. Requiring TLS encrypted connections for specific user accounts
Users that have access to sensitive data should always use a TLS-encrypted connection to avoid sending data unencrypted over the network.
If you cannot configure on the server that a secure transport is required for all connections (require_secure_transport = on), configure individual user accounts to require TLS encryption.
Prerequisites
- The MySQL server has TLS support enabled.
- The user you configure to require secure transport exists.
- The CA certificate is stored on the client.
Procedure
Connect as an administrative user to the MySQL server:
# mysql -u root -p -h server.example.comIf your administrative user has no permissions to access the server remotely, perform the command on the MySQL server and connect to
localhost.Use the
REQUIRE SSLclause to enforce that a user must connect using a TLS-encrypted connection:MySQL [(none)]> ALTER USER 'example'@'%' REQUIRE SSL;
Verification
Connect to the server as the
exampleuser using TLS encryption:# mysql -u example -p -h server.example.com ... MySQL [(none)]>If no error is shown and you have access to the interactive MySQL console, the connection with TLS succeeds.
By default, the client automatically uses TLS encryption if the server provides it. Therefore, the
--ssl-ca=ca.crt.pemand--ssl-mode=VERIFY_IDENTITYoptions are not required, but improve the security because, with these options, the client verifies the identity of the server.Attempt to connect as the
exampleuser with TLS disabled:# mysql -u example -p -h server.example.com --ssl-mode=DISABLED ERROR 1045 (28000): Access denied for user 'example'@'server.example.com' (using password: YES)The server rejected the login attempt because TLS is required for this user but disabled (
--ssl-mode=DISABLED).
Additional resources
7.3.4. Globally enabling TLS encryption with CA certificate validation in MySQL clients
If your MySQL server supports TLS encryption, configure your clients to establish only secure connections and to verify the server certificate. This procedure describes how to enable TLS support for all users on the server.
7.3.4.1. Configuring the MySQL client to use TLS encryption by default
On RHEL, you can globally configure that the MySQL client uses TLS encryption and verifies that the Common Name (CN) in the server certificate matches the hostname the user connects to. This prevents man-in-the-middle attacks.
Prerequisites
- The MySQL server has TLS support enabled.
-
The CA certificate is stored in the
/etc/pki/tls/certs/ca.crt.pemfile on the client.
Procedure
Create the
/etc/my.cnf.d/mysql-client-tls.cnffile with the following content:[client] ssl-mode=VERIFY_IDENTITY ssl-ca=/etc/pki/tls/certs/ca.crt.pem
These settings define that the MySQL client uses TLS encryption and that the client compares the hostname with the CN in the server certificate (
ssl-mode=VERIFY_IDENTITY). Additionally, it specifies the path to the CA certificate (ssl-ca).
Verification
Connect to the server using the hostname, and display the server status:
# mysql -u root -p -h server.example.com -e status ... SSL: Cipher in use is TLS_AES_256_GCM_SHA384If the
SSLentry containsCipher in use is…, the connection is encrypted.Note that the user you use in this command has permissions to authenticate remotely.
If the hostname you connect to does not match the hostname in the TLS certificate of the server, the
ssl-mode=VERIFY_IDENTITYparameter causes the connection to fail. For example, if you connect tolocalhost:# mysql -u root -p -h localhost -e status ERROR 2026 (HY000): SSL connection error: error:0A000086:SSL routines::certificate verify failed
Additional resources
-
The
--ssl*parameter descriptions in themysql(1)man page.
7.3.5. Backing up MySQL data
There are two main ways to back up data from a MySQL database in Red Hat Enterprise Linux 8:
- Logical backup
- Physical backup
Logical backup consists of the SQL statements necessary to restore the data. This type of backup exports information and records in plain text files.
The main advantage of logical backup over physical backup is portability and flexibility. The data can be restored on other hardware configurations, MySQL versions or Database Management System (DBMS), which is not possible with physical backups.
Note that logical backup can be performed if the mysqld.service is running. Logical backup does not include log and configuration files.
Physical backup consists of copies of files and directories that store the content.
Physical backup has the following advantages compared to logical backup:
- Output is more compact.
- Backup is smaller in size.
- Backup and restore are faster.
- Backup includes log and configuration files.
Note that physical backup must be performed when the mysqld.service is not running or all tables in the database are locked to prevent changes during the backup.
You can use one of the following MySQL backup approaches to back up data from a MySQL database:
-
Logical backup with
mysqldump - File system backup
- Replication as a backup solution
7.3.5.1. Performing logical backup with mysqldump
The mysqldump client is a backup utility, which can be used to dump a database or a collection of databases for the purpose of a backup or transfer to another database server. The output of mysqldump typically consists of SQL statements to re-create the server table structure, populate it with data, or both. mysqldump can also generate files in other formats, including XML and delimited text formats, such as CSV.
To perform the mysqldump backup, you can use one of the following options:
- Back up one or more selected databases
- Back up all databases
- Back up a subset of tables from one database
Procedure
To dump a single database, run:
# mysqldump [options] --databases db_name > backup-file.sqlTo dump multiple databases at once, run:
# mysqldump [options] --databases db_name1 [db_name2 ...] > backup-file.sqlTo dump all databases, run:
# mysqldump [options] --all-databases > backup-file.sqlTo load one or more dumped full databases back into a server, run:
# mysql < backup-file.sqlTo load a database to a remote MySQL server, run:
# mysql --host=remote_host < backup-file.sqlTo dump a literal,subset of tables from one database, add a list of the chosen tables at the end of the
mysqldumpcommand:# mysqldump [options] db_name [tbl_name ...] > backup-file.sqlTo load a literal,subset of tables dumped from one database, run:
# mysql db_name < backup-file.sqlNoteThe db_name database must exist at this point.
To see a list of the options that mysqldump supports, run:
$ mysqldump --help
Additional resources
7.3.5.2. Performing file system backup
To create a file system backup of MySQL data files, copy the content of the MySQL data directory to your backup location.
To back up also your current configuration or the log files, use the optional steps of the following procedure.
Procedure
Stop the
mysqldservice:# systemctl stop mysqld.serviceCopy the data files to the required location:
# cp -r /var/lib/mysql /backup-locationOptionally, copy the configuration files to the required location:
# cp -r /etc/my.cnf /etc/my.cnf.d /backup-location/configurationOptionally, copy the log files to the required location:
# cp /var/log/mysql/* /backup-location/logsStart the
mysqldservice:# systemctl start mysqld.serviceWhen loading the backed up data from the backup location to the
/var/lib/mysqldirectory, ensure thatmysql:mysqlis an owner of all data in/var/lib/mysql:# chown -R mysql:mysql /var/lib/mysql
7.3.5.3. Replication as a backup solution
Replication is an alternative backup solution for source servers. If a source server replicates to a replica server, backups can be run on the replica without any impact on the source. The source can still run while you shut down the replica and back the data up from the replica.
For instructions on how to replicate a MySQL database, see Replicating MySQL.
Replication itself is not a sufficient backup solution. Replication protects source servers against hardware failures, but it does not ensure protection against data loss. It is recommended that you use any other backup solution on the replica together with this method.
Additional resources
7.3.6. Migrating to a RHEL 8 version of MySQL 8.0
RHEL 7 contains MariaDB 5.5 as the default implementation of a server from the MySQL databases family. The Red Hat Software Collections offering for RHEL 7 provides MySQL 8.0 and several versions of MariaDB. RHEL 8 provides MySQL 8.0, MariaDB 10.3, and MariaDB 10.5.
This procedure describes migration from a Red Hat Software Collections version of MySQL 8.0 to a RHEL 8 version of MySQL 8.0 using the mysql_upgrade utility. The mysql_upgrade utility is provided by the mysql-server package.
In the Red Hat Software Collections version of MySQL, the source data directory is /var/opt/rh/rh-mysql80/lib/mysql/. In RHEL 8, MySQL data is stored in the /var/lib/mysql/ directory.
Prerequisites
- Before performing the upgrade, back up all your data stored in the MySQL databases.
Procedure
Ensure that the
mysql-serverpackage is installed on the RHEL 8 system:# yum install mysql-serverEnsure that the
mysqldservice is not running on either of the source and target systems at the time of copying data:# systemctl stop mysqld.service-
Copy the data from the
/var/opt/rh/rh-mysql80/lib/mysql/directory on the RHEL 7 source system to the/var/lib/mysql/directory on the RHEL 8 target system. Set the appropriate permissions and SELinux context for copied files on the target system:
# restorecon -vr /var/lib/mysqlEnsure that
mysql:mysqlis an owner of all data in the/var/lib/mysqldirectory:# chown -R mysql:mysql /var/lib/mysqlStart the MySQL server on the target system:
# systemctl start mysqld.serviceNote: In earlier versions of MySQL, the
mysql_upgradecommand was needed to check and repair internal tables. This is now done automatically when you start the server.
7.3.7. Replicating MySQL
MySQL provides various configuration options for replication, ranging from basic to advanced. This section describes a transaction-based way to replicate in MySQL on freshly installed MySQL servers using global transaction identifiers (GTIDs). Using GTIDs simplifies transaction identification and consistency verification.
To set up replication in MySQL, you must:
If you want to use existing MySQL servers for replication, you must first synchronize data. See the upstream documentation for more information.
7.3.7.1. Configuring a MySQL source server
You can set configuration options required for a MySQL source server to properly run and replicate all changes made on the database server.
Prerequisites
- The source server is installed.
Procedure
Include the following options in the
/etc/my.cnf.d/mysql-server.cnffile under the[mysqld]section:bind-address=source_ip_adressThis option is required for connections made from replicas to the source.
server-id=idThe id must be unique.
log_bin=path_to_source_server_logThis option defines a path to the binary log file of the MySQL source server. For example:
log_bin=/var/log/mysql/mysql-bin.log.gtid_mode=ONThis option enables global transaction identifiers (GTIDs) on the server.
enforce-gtid-consistency=ONThe server enforces GTID consistency by allowing execution of only statements that can be safely logged using a GTID.
Optional:
binlog_do_db=db_nameUse this option if you want to replicate only selected databases. To replicate more than one selected database, specify each of the databases separately:
binlog_do_db=db_name1 binlog_do_db=db_name2 binlog_do_db=db_name3
Optional:
binlog_ignore_db=db_nameUse this option to exclude a specific database from replication.
Restart the
mysqldservice:# systemctl restart mysqld.service
7.3.7.2. Configuring a MySQL replica server
You can set configuration options required for a MySQL replica server to ensure a successful replication.
Prerequisites
- The replica server is installed.
Procedure
Include the following options in the
/etc/my.cnf.d/mysql-server.cnffile under the[mysqld]section:server-id=idThe id must be unique.
relay-log=path_to_replica_server_logThe relay log is a set of log files created by the MySQL replica server during replication.
log_bin=path_to_replica_sever_logThis option defines a path to the binary log file of the MySQL replica server. For example:
log_bin=/var/log/mysql/mysql-bin.log.This option is not required in a replica but strongly recommended.
gtid_mode=ONThis option enables global transaction identifiers (GTIDs) on the server.
enforce-gtid-consistency=ONThe server enforces GTID consistency by allowing execution of only statements that can be safely logged using a GTID.
log-replica-updates=ONThis option ensures that updates received from the source server are logged in the replica’s binary log.
skip-replica-start=ONThis option ensures that the replica server does not start the replication threads when the replica server starts.
Optional:
binlog_do_db=db_nameUse this option if you want to replicate only certain databases. To replicate more than one database, specify each of the databases separately:
binlog_do_db=db_name1 binlog_do_db=db_name2 binlog_do_db=db_name3
Optional:
binlog_ignore_db=db_nameUse this option to exclude a specific database from replication.
Restart the
mysqldservice:# systemctl restart mysqld.service
7.3.7.3. Creating a replication user on the MySQL source server
You must create a replication user and grant this user permissions required for replication traffic. This procedure shows how to create a replication user with appropriate permissions. Execute these steps only on the source server.
Prerequisites
- The source server is installed and configured as described in Configuring a MySQL source server.
Procedure
Create a replication user:
mysql> CREATE USER 'replication_user'@'replica_server_ip' IDENTIFIED WITH mysql_native_password BY 'password';Grant the user replication permissions:
mysql> GRANT REPLICATION SLAVE ON *.* TO 'replication_user'@'replica_server_ip';Reload the grant tables in the MySQL database:
mysql> FLUSH PRIVILEGES;Set the source server to read-only state:
mysql> SET @@GLOBAL.read_only = ON;
7.3.7.4. Connecting the replica server to the source server
On the MySQL replica server, you must configure credentials and the address of the source server. Use the following procedure to implement the replica server.
Prerequisites
- The source server is installed and configured as described in Configuring a MySQL source server.
- The replica server is installed and configured as described in Configuring a MySQL replica server.
- You have created a replication user. See Creating a replication user on the MySQL source server.
Procedure
Set the replica server to read-only state:
mysql> SET @@GLOBAL.read_only = ON;Configure the replication source:
mysql> CHANGE REPLICATION SOURCE TO -> SOURCE_HOST='source_ip_address', -> SOURCE_USER='replication_user', -> SOURCE_PASSWORD='password', -> SOURCE_AUTO_POSITION=1;
Start the replica thread in the MySQL replica server:
mysql> START REPLICA;Unset the read-only state on both the source and replica servers:
mysql> SET @@GLOBAL.read_only = OFF;Optional: Inspect the status of the replica server for debugging purposes:
mysql> SHOW REPLICA STATUS\G;NoteIf the replica server fails to start or connect, you can skip a certain number of events following the binary log file position displayed in the output of the
SHOW MASTER STATUScommand. For example, skip the first event from the defined position:mysql> SET GLOBAL SQL_SLAVE_SKIP_COUNTER=1;and try to start the replica server again.
Optional: Stop the replica thread in the replica server:
mysql> STOP REPLICA;
7.3.7.5. Verification steps
Create an example database on the source server:
mysql> CREATE DATABASE test_db_name;-
Verify that the
test_db_namedatabase replicates on the replica server. Display status information about the binary log files of the MySQL server by executing the following command on either of the source or replica servers:
mysql> SHOW MASTER STATUS;The
Executed_Gtid_Setcolumn, which shows a set of GTIDs for transactions executed on the source, must not be empty.NoteThe same set of GTIDs is displayed in the
Executed_Gtid_Setrow when you use theSHOW SLAVE STATUSon the replica server.
7.3.7.6. Additional resources
7.3.8. Developing MySQL client applications
Red Hat recommends developing your MySQL client applications against the MariaDB client library. The communication protocol between client and server is compatible between MariaDB and MySQL. The MariaDB client library works for most common MySQL scenarios, with the exception of a limited number of features specific to the MySQL implementation.
The development files and programs necessary to build applications against the MariaDB client library are provided by the mariadb-connector-c-devel package.
Instead of using a direct library name, use the mariadb_config program, which is distributed in the mariadb-connector-c-devel package. This program ensures that the correct build flags are returned.
7.4. Using PostgreSQL
The PostgreSQL server is an open source robust and highly-extensible database server based on the SQL language. The PostgreSQL server provides an object-relational database system that can manage extensive datasets and a high number of concurrent users. For these reasons, PostgreSQL servers can be used in clusters to manage high amounts of data.
The PostgreSQL server includes features for ensuring data integrity, building fault-tolerant environments and applications. With the PostgreSQL server, you can extend a database with your own data types, custom functions, or code from different programming languages without the need to recompile the database.
Learn how to install and configure PostgreSQL on a RHEL system, how to back up PostgreSQL data, and how to migrate from an earlier PostgreSQL version.
7.4.1. Installing PostgreSQL
In RHEL 8, the PostgreSQL server is available in several versions, each provided by a separate stream:
- PostgreSQL 10 - the default stream
- PostgreSQL 9.6
- PostgreSQL 12 - available since RHEL 8.1.1
- PostgreSQL 13 - available since RHEL 8.4
- PostgreSQL 15 - available since RHEL 8.8
By design, it is impossible to install more than one version (stream) of the same module in parallel. Thus you must choose only one of the available streams from the postgresql module. Parallel installation of components is possible in Red Hat Software Collections for RHEL 7. In RHEL 8, different versions of database servers can be used in containers.
To install PostgreSQL, use the following procedure.
Procedure
Install the PostgreSQL server packages by selecting a stream (version) from the
postgresqlmodule and specifying the server profile. For example:# yum module install postgresql:15/serverThe
postgressuperuser is created automatically.Initialize the database cluster:
# postgresql-setup --initdbRed Hat recommends storing the data in the default
/var/lib/pgsql/datadirectory.Start the
postgresqlservice:# systemctl start postgresql.serviceEnable the
postgresqlservice to start at boot:# systemctl enable postgresql.service
For information about using module streams, see Installing, managing, and removing user-space components.
If you want to upgrade from an earlier postgresql stream within RHEL 8, follow both procedures described in Switching to a later stream and in Section 7.4.6, “Migrating to a RHEL 8 version of PostgreSQL”.
7.4.2. Creating PostgreSQL users
PostgreSQL users are of the following types:
-
The
postgresUNIX system user - should be used only to run the PostgreSQL server and client applications, such aspg_dump. Do not use thepostgressystem user for any interactive work on PostgreSQL administration, such as database creation and user management. -
A database superuser - the default
postgresPostgreSQL superuser is not related to thepostgressystem user. You can limit access of thepostgressuperuser in thepg_hba.conffile, otherwise no other permission limitations exist. You can also create other database superusers. A role with specific database access permissions:
- A database user - has a permission to log in by default
- A group of users - enables managing permissions for the group as a whole
Roles can own database objects (for example, tables and functions) and can assign object privileges to other roles using SQL commands.
Standard database management privileges include SELECT, INSERT, UPDATE, DELETE, TRUNCATE, REFERENCES, TRIGGER, CREATE, CONNECT, TEMPORARY, EXECUTE, and USAGE.
Role attributes are special privileges, such as LOGIN, SUPERUSER, CREATEDB, and CREATEROLE.
Red Hat recommends performing most tasks as a role that is not a superuser. A common practice is to create a role that has the CREATEDB and CREATEROLE privileges and use this role for all routine management of databases and roles.
Prerequisites
- The PostgreSQL server is installed.
- The database cluster is initialized.
Procedure
To create a user, set a password for the user, and assign the user the
CREATEROLEandCREATEDBpermissions:postgres=# CREATE USER mydbuser WITH PASSWORD 'mypasswd' CREATEROLE CREATEDB;Replace mydbuser with the username and mypasswd with the user’s password.
Additional resources
Example 7.1. Initializing, creating, and connecting to a PostgreSQL database
This example demonstrates how to initialize a PostgreSQL database, create a database user with routine database management privileges, and how to create a database that is accessible from any system account through the database user with management privileges.
Install the PosgreSQL server:
# yum module install postgresql:13/serverInitialize the database cluster:
# postgresql-setup --initdb * Initializing database in '/var/lib/pgsql/data' * Initialized, logs are in /var/lib/pgsql/initdb_postgresql.logSet the password hashing algorithm to
scram-sha-256.In the
/var/lib/pgsql/data/postgresql.conffile, change the following line:#password_encryption = md5 # md5 or scram-sha-256
to:
password_encryption = scram-sha-256
In the
/var/lib/pgsql/data/pg_hba.conffile, change the following line for the IPv4 local connections:host all all 127.0.0.1/32 ident
to:
host all all 127.0.0.1/32 scram-sha-256
Start the postgresql service:
# systemctl start postgresql.serviceLog in as the system user named
postgres:# su - postgresStart the PostgreSQL interactive terminal:
$ psql psql (13.7) Type "help" for help. postgres=#Optional: Obtain information about the current database connection:
postgres=# \conninfo You are connected to database "postgres" as user "postgres" via socket in "/var/run/postgresql" at port "5432".Create a user named
mydbuser, set a password formydbuser, and assignmydbusertheCREATEROLEandCREATEDBpermissions:postgres=# CREATE USER mydbuser WITH PASSWORD 'mypasswd' CREATEROLE CREATEDB; CREATE ROLEThe
mydbuseruser now can perform routine database management operations: create databases and manage user indexes.Log out of the interactive terminal by using the
\qmeta command:postgres=# \qLog out of the
postgresuser session:$ logoutLog in to the PostgreSQL terminal as
mydbuser, specify the hostname, and connect to the defaultpostgresdatabase, which was created during initialization:# psql -U mydbuser -h 127.0.0.1 -d postgres Password for user mydbuser: Type the password. psql (13.7) Type "help" for help. postgres=>Create a database named
mydatabase:postgres=> CREATE DATABASE mydatabase; CREATE DATABASE postgres=>Log out of the session:
postgres=# \qConnect to mydatabase as
mydbuser:# psql -U mydbuser -h 127.0.0.1 -d mydatabase Password for user mydbuser: psql (13.7) Type "help" for help. mydatabase=>Optional: Obtain information about the current database connection:
mydatabase=> \conninfo You are connected to database "mydatabase" as user "mydbuser" on host "127.0.0.1" at port "5432".
7.4.3. Configuring PostgreSQL
In a PostgreSQL database, all data and configuration files are stored in a single directory called a database cluster. Red Hat recommends storing all data, including configuration files, in the default /var/lib/pgsql/data/ directory.
PostgreSQL configuration consists of the following files:
-
postgresql.conf- is used for setting the database cluster parameters. -
postgresql.auto.conf- holds basic PostgreSQL settings similarly topostgresql.conf. However, this file is under the server control. It is edited by theALTER SYSTEMqueries, and cannot be edited manually. -
pg_ident.conf- is used for mapping user identities from external authentication mechanisms into the PostgreSQL user identities. -
pg_hba.conf- is used for configuring client authentication for PostgreSQL databases.
To change the PostgreSQL configuration, use the following procedure.
Procedure
-
Edit the respective configuration file, for example,
/var/lib/pgsql/data/postgresql.conf. Restart the
postgresqlservice so that the changes become effective:# systemctl restart postgresql.service
Example 7.2. Configuring PostgreSQL database cluster parameters
This example shows basic settings of the database cluster parameters in the /var/lib/pgsql/data/postgresql.conf file.
# This is a comment log_connections = yes log_destination = 'syslog' search_path = '"$user", public' shared_buffers = 128MB password_encryption = scram-sha-256
Example 7.3. Setting client authentication in PostgreSQL
This example demonstrates how to set client authentication in the /var/lib/pgsql/data/pg_hba.conf file.
# TYPE DATABASE USER ADDRESS METHOD local all all trust host postgres all 192.168.93.0/24 ident host all all .example.com scram-sha-256
7.4.4. Configuring TLS encryption on a PostgreSQL server
By default, PostgreSQL uses unencrypted connections. For more secure connections, you can enable Transport Layer Security (TLS) support on the PostgreSQL server and configure your clients to establish encrypted connections.
Prerequisites
- The PostgreSQL server is installed.
- The database cluster is initialized.
Procedure
Install the OpenSSL library:
# yum install opensslGenerate a TLS certificate and a key:
# openssl req -new -x509 -days 365 -nodes -text -out server.crt \ -keyout server.key -subj "/CN=dbhost.yourdomain.com"
Replace dbhost.yourdomain.com with your database host and domain name.
Copy your signed certificate and your private key to the required locations on the database server:
# cp server.{key,crt} /var/lib/pgsql/data/.Change the owner and group ownership of the signed certificate and your private key to the
postgresuser:# chown postgres:postgres /var/lib/pgsql/data/server.{key,crt}Restrict the permissions for your private key so that it is readable only by the owner:
# chmod 0400 /var/lib/pgsql/data/server.keySet the password hashing algorithm to
scram-sha-256by changing the following line in the/var/lib/pgsql/data/postgresql.conffile:#password_encryption = md5 # md5 or scram-sha-256
to:
password_encryption = scram-sha-256
Configure PostgreSQL to use SSL/TLS by changing the following line in the
/var/lib/pgsql/data/postgresql.conffile:#ssl = off
to:
ssl=on
Restrict access to all databases to accept only connections from clients using TLS by changing the following line for the IPv4 local connections in the
/var/lib/pgsql/data/pg_hba.conffile:host all all 127.0.0.1/32 ident
to:
hostssl all all 127.0.0.1/32 scram-sha-256
Alternatively, you can restrict access for a single database and a user by adding the following new line:
hostssl mydatabase mydbuser 127.0.0.1/32 scram-sha-256
Replace mydatabase with the database name and mydbuser with the username.
Make the changes effective by restarting the
postgresqlservice:# systemctl restart postgresql.service
Verification
To manually verify that the connection is encrypted:
Connect to the PostgreSQL database as the mydbuser user, specify the host name and the database name:
$ psql -U mydbuser -h 127.0.0.1 -d mydatabase Password for user mydbuser:
Replace mydatabase with the database name and mydbuser with the username.
Obtain information about the current database connection:
mydbuser=> \conninfo You are connected to database "mydatabase" as user "mydbuser" on host "127.0.0.1" at port "5432". SSL connection (protocol: TLSv1.3, cipher: TLS_AES_256_GCM_SHA384, bits: 256, compression: off)
You can write a simple application that verifies whether a connection to PostgreSQL is encrypted. This example demonstrates such an application written in C that uses the
libpqclient library, which is provided by thelibpq-develpackage:#include <stdio.h> #include <stdlib.h> #include <libpq-fe.h> int main(int argc, char* argv[]) { //Create connection PGconn* connection = PQconnectdb("hostaddr=127.0.0.1 password=mypassword port=5432 dbname=mydatabase user=mydbuser"); if (PQstatus(connection) ==CONNECTION_BAD) { printf("Connection error\n"); PQfinish(connection); return -1; //Execution of the program will stop here } printf("Connection ok\n"); //Verify TLS if (PQsslInUse(connection)){ printf("TLS in use\n"); printf("%s\n", PQsslAttribute(connection,"protocol")); } //End connection PQfinish(connection); printf("Disconnected\n"); return 0; }Replace mypassword with the password, mydatabase with the database name, and mydbuser with the username.
NoteYou must load the
pqlibraries for compilation by using the-lpqoption. For example, to compile the application by using the GCC compiler:$ gcc source_file.c -lpq -o myapplicationwhere the source_file.c contains the example code above, and myapplication is the name of your application for verifying secured PostgreSQL connection.
Example 7.4. Initializing, creating, and connecting to a PostgreSQL database using TLS encryption
This example demonstrates how to initialize a PostgreSQL database, create a database user and a database, and how to connect to the database using a secured connection.
Install the PosgreSQL server:
# yum module install postgresql:13/serverInitialize the database cluster:
# postgresql-setup --initdb * Initializing database in '/var/lib/pgsql/data' * Initialized, logs are in /var/lib/pgsql/initdb_postgresql.logInstall the OpenSSL library:
# yum install opensslGenerate a TLS certificate and a key:
# openssl req -new -x509 -days 365 -nodes -text -out server.crt \ -keyout server.key -subj "/CN=dbhost.yourdomain.com"
Replace dbhost.yourdomain.com with your database host and domain name.
Copy your signed certificate and your private key to the required locations on the database server:
# cp server.{key,crt} /var/lib/pgsql/data/.Change the owner and group ownership of the signed certificate and your private key to the
postgresuser:# chown postgres:postgres /var/lib/pgsql/data/server.{key,crt}Restrict the permissions for your private key so that it is readable only by the owner:
# chmod 0400 /var/lib/pgsql/data/server.keySet the password hashing algorithm to
scram-sha-256. In the/var/lib/pgsql/data/postgresql.conffile, change the following line:#password_encryption = md5 # md5 or scram-sha-256
to:
password_encryption = scram-sha-256
Configure PostgreSQL to use SSL/TLS. In the
/var/lib/pgsql/data/postgresql.conffile, change the following line:#ssl = off
to:
ssl=on
Start the
postgresqlservice:# systemctl start postgresql.serviceLog in as the system user named
postgres:# su - postgresStart the PostgreSQL interactive terminal as the
postgresuser:$ psql -U postgres psql (13.7) Type "help" for help. postgres=#Create a user named
mydbuserand set a password formydbuser:postgres=# CREATE USER mydbuser WITH PASSWORD 'mypasswd'; CREATE ROLE postgres=#Create a database named
mydatabase:postgres=# CREATE DATABASE mydatabase; CREATE DATABASE postgres=#Grant all permissions to the
mydbuseruser:postgres=# GRANT ALL PRIVILEGES ON DATABASE mydatabase TO mydbuser; GRANT postgres=#Log out of the interactive terminal:
postgres=# \qLog out of the
postgresuser session:$ logoutRestrict access to all databases to accept only connections from clients using TLS by changing the following line for the IPv4 local connections in the
/var/lib/pgsql/data/pg_hba.conffile:host all all 127.0.0.1/32 ident
to:
hostssl all all 127.0.0.1/32 scram-sha-256
Make the changes effective by restarting the
postgresqlservice:# systemctl restart postgresql.serviceConnect to the PostgreSQL database as the
mydbuseruser, specify the host name and the database name:$ psql -U mydbuser -h 127.0.0.1 -d mydatabase Password for user mydbuser: psql (13.7) SSL connection (protocol: TLSv1.3, cipher: TLS_AES_256_GCM_SHA384, bits: 256, compression: off) Type "help" for help. mydatabase=>
7.4.5. Backing up PostgreSQL data
To back up PostgreSQL data, use one of the following approaches:
- SQL dump
- See Backing up with SQL dump.
- File system level backup
- See File system level backup.
- Continuous archiving
- See Continuous archiving.
7.4.5.1. Backing up PostgreSQL data with an SQL dump
The SQL dump method is based on generating a dump file with SQL commands. When a dump is uploaded back to the database server, it recreates the database in the same state as it was at the time of the dump.
The SQL dump is ensured by the following PostgreSQL client applications:
- pg_dump dumps a single database without cluster-wide information about roles or tablespaces
- pg_dumpall dumps each database in a given cluster and preserves cluster-wide data, such as role and tablespace definitions.
By default, the pg_dump and pg_dumpall commands write their results into the standard output. To store the dump in a file, redirect the output to an SQL file. The resulting SQL file can be either in a text format or in other formats that allow for parallelism and for more detailed control of object restoration.
You can perform the SQL dump from any remote host that has access to the database.
7.4.5.1.1. Advantages and disadvantages of an SQL dump
An SQL dump has the following advantages compared to other PostgreSQL backup methods:
- An SQL dump is the only PostgreSQL backup method that is not server version-specific. The output of the pg_dump utility can be reloaded into later versions of PostgreSQL, which is not possible for file system level backups or continuous archiving.
- An SQL dump is the only method that works when transferring a database to a different machine architecture, such as going from a 32-bit to a 64-bit server.
- An SQL dump provides internally consistent dumps. A dump represents a snapshot of the database at the time pg_dump began running.
- The pg_dump utility does not block other operations on the database when it is running.
A disadvantage of an SQL dump is that it takes more time compared to file system level backup.
7.4.5.1.2. Performing an SQL dump using pg_dump
To dump a single database without cluster-wide information, use the pg_dump utility.
Prerequisites
-
You must have read access to all tables that you want to dump. To dump the entire database, you must run the commands as the
postgressuperuser or a user with database administrator privileges.
Procedure
Dump a database without cluster-wide information:
$ pg_dump dbname > dumpfile
To specify which database server pg_dump will contact, use the following command-line options:
The
-hoption to define the host.The default host is either the local host or what is specified by the
PGHOSTenvironment variable.The
-poption to define the port.The default port is indicated by the
PGPORTenvironment variable or the compiled-in default.
7.4.5.1.3. Performing an SQL dump using pg_dumpall
To dump each database in a given database cluster and to preserve cluster-wide data, use the pg_dumpall utility.
Prerequisites
-
You must run the commands as the
postgressuperuser or a user with database administrator privileges.
Procedure
Dump all databases in the database cluster and preserve cluster-wide data:
$ pg_dumpall > dumpfile
To specify which database server pg_dumpall will contact, use the following command-line options:
The
-hoption to define the host.The default host is either the local host or what is specified by the
PGHOSTenvironment variable.The
-poption to define the port.The default port is indicated by the
PGPORTenvironment variable or the compiled-in default.The
-loption to define the default database.This option enables you to choose a default database different from the
postgresdatabase created automatically during initialization.
7.4.5.1.4. Restoring a database dumped using pg_dump
To restore a database from an SQL dump that you dumped using the pg_dump utility, follow the steps below.
Prerequisites
-
You must run the commands as the
postgressuperuser or a user with database administrator privileges.
Procedure
Create a new database:
$ createdb dbname- Verify that all users who own objects or were granted permissions on objects in the dumped database already exist. If such users do not exist, the restore fails to recreate the objects with the original ownership and permissions.
Run the psql utility to restore a text file dump created by the pg_dump utility:
$ psql dbname < dumpfilewhere
dumpfileis the output of thepg_dumpcommand. To restore a non-text file dump, use thepg_restoreutility instead:$ pg_restore non-plain-text-file
7.4.5.1.5. Restoring databases dumped using pg_dumpall
To restore data from a database cluster that you dumped using the pg_dumpall utility, follow the steps below.
Prerequisites
-
You must run the commands as the
postgressuperuser or a user with database administrator privileges.
Procedure
- Ensure that all users who own objects or were granted permissions on objects in the dumped databases already exist. If such users do not exist, the restore fails to recreate the objects with the original ownership and permissions.
Run the psql utility to restore a text file dump created by the pg_dumpall utility:
$ psql < dumpfilewhere
dumpfileis the output of thepg_dumpallcommand.
7.4.5.1.6. Performing an SQL dump of a database on another server
Dumping a database directly from one server to another is possible because pg_dump and psql can write to and read from pipes.
Procedure
To dump a database from one server to another, run:
$ pg_dump -h host1 dbname | psql -h host2 dbname
7.4.5.1.7. Handling SQL errors during restore
By default, psql continues to execute if an SQL error occurs, causing the database to restore only partially.
To change the default behavior, use one of the following approaches when restoring a dump.
Prerequisites
-
You must run the commands as the
postgressuperuser or a user with database administrator privileges.
Procedure
Make psql exit with an exit status of 3 if an SQL error occurs by setting the
ON_ERROR_STOPvariable:$ psql --set ON_ERROR_STOP=on dbname < dumpfileSpecify that the whole dump is restored as a single transaction so that the restore is either fully completed or canceled.
When restoring a text file dump using the
psqlutility:$ psql -1When restoring a non-text file dump using the
pg_restoreutility:$ pg_restore -eNote that when using this approach, even a minor error can cancel a restore operation that has already run for many hours.
7.4.5.1.8. Additional resources
7.4.5.2. Backing up PostgreSQL data with a file system level backup
To create a file system level backup, copy PostgreSQL database files to another location. For example, you can use any of the following approaches:
- Create an archive file using the tar utility.
- Copy the files to a different location using the rsync utility.
- Create a consistent snapshot of the data directory.
7.4.5.2.1. Advantages and limitations of file system backing up
File system level backing up has the following advantage compared to other PostgreSQL backup methods:
- File system level backing up is usually faster than an SQL dump.
File system level backing up has the following limitations compared to other PostgreSQL backup methods:
- This backing up method is not suitable when you want to upgrade from RHEL 7 to RHEL 8 and migrate your data to the upgraded system. File system level backup is specific to an architecture and a RHEL major version. You can restore your data on your RHEL 7 system if the upgrade is not successful but you cannot restore the data on a RHEL 8 system.
- The database server must be shut down before backing up and restoring data.
- Backing up and restoring certain individual files or tables is impossible. Backing up a file system works only for complete backing up and restoring of an entire database cluster.
7.4.5.2.2. Performing file system level backing up
To perform file system level backing up, use the following procedure.
Procedure
Choose the location of a database cluster and initialize this cluster:
# postgresql-setup --initdbStop the postgresql service:
# systemctl stop postgresql.serviceUse any method to create a file system backup, for example a
tararchive:$ tar -cf backup.tar /var/lib/pgsql/dataStart the postgresql service:
# systemctl start postgresql.service
Additional resources
7.4.5.3. Backing up PostgreSQL data by continuous archiving
7.4.5.3.1. Introduction to continuous archiving
PostgreSQL records every change made to the database’s data files into a write ahead log (WAL) file that is available in the pg_wal/ subdirectory of the cluster’s data directory. This log is intended primarily for a crash recovery. After a crash, the log entries made since the last checkpoint can be used for restoring the database to a consistency.
The continuous archiving method, also known as an online backup, combines the WAL files with a copy of the database cluster in the form of a base backup performed on a running server or a file system level backup.
If a database recovery is needed, you can restore the database from the copy of the database cluster and then replay log from the backed up WAL files to bring the system to the current state.
With the continuous archiving method, you must keep a continuous sequence of all archived WAL files that extends at minimum back to the start time of your last base backup. Therefore the ideal frequency of base backups depends on:
- The storage volume available for archived WAL files.
- The maximum possible duration of data recovery in situations when recovery is necessary. In cases with a long period since the last backup, the system replays more WAL segments, and the recovery therefore takes more time.
You cannot use pg_dump and pg_dumpall SQL dumps as a part of a continuous archiving backup solution. SQL dumps produce logical backups and do not contain enough information to be used by a WAL replay.
To perform a database backup and restore using the continuous archiving method, follow these instructions:
- Set up and test your procedure for archiving WAL files - see WAL archiving.
- Perform a base backup - see base backup.
To restore your data, follow instructions in Restoring database with continuous archiving.
7.4.5.3.2. Advantages and disadvantages of continuous archiving
Continuous archiving has the following advantages compared to other PostgreSQL backup methods:
- With the continuous backup method, it is possible to use a base backup that is not entirely consistent because any internal inconsistency in the backup is corrected by the log replay. Therefore you can perform a base backup on a running PostgreSQL server.
-
A file system snapshot is not needed;
taror a similar archiving utility is sufficient. - Continuous backup can be achieved by continuing to archive the WAL files because the sequence of WAL files for the log replay can be indefinitely long. This is particularly valuable for large databases.
- Continuous backup supports point-in-time recovery. It is not necessary to replay the WAL entries to the end. The replay can be stopped at any point and the database can be restored to its state at any time since the base backup was taken.
- If the series of WAL files are continuously available to another machine that has been loaded with the same base backup file, it is possible to restore the other machine with a nearly-current copy of the database at any point.
Continuous archiving has the following disadvantages compared to other PostgreSQL backup methods:
- Continuous backup method supports only restoration of an entire database cluster, not a subset.
- Continuous backup requires extensive archival storage.
7.4.5.3.3. Setting up WAL archiving
A running PostgreSQL server produces a sequence of write ahead log (WAL) records. The server physically divides this sequence into WAL segment files, which are given numeric names that reflect their position in the WAL sequence. Without WAL archiving, the segment files are reused and renamed to higher segment numbers.
When archiving WAL data, the contents of each segment file are captured and saved at a new location before the segment file is reused. You have multiple options where to save the content, such as an NFS-mounted directory on another machine, a tape drive, or a CD.
Note that WAL records do not include changes to configuration files.
To enable WAL archiving, use the following procedure.
Procedure
In the
/var/lib/pgsql/data/postgresql.conffile:-
Set the
wal_levelconfiguration parameter toreplicaor higher. -
Set the
archive_modeparameter toon. -
Specify the shell command in the
archive_commandconfiguration parameter. You can use thecpcommand, another command, or a shell script.
-
Set the
Restart the
postgresqlservice to enable the changes:# systemctl restart postgresql.service- Test your archive command and ensure it does not overwrite an existing file and that it returns a non-zero exit status if it fails.
- To protect your data, ensure that the segment files are archived into a directory that does not have group or world read access.
The archive command is executed only on completed WAL segments. A server that generates little WAL traffic can have a substantial delay between the completion of a transaction and its safe recording in archive storage. To limit how old unarchived data can be, you can:
-
Set the
archive_timeoutparameter to force the server to switch to a new WAL segment file with a given frequency. -
Use the
pg_switch_walparameter to force a segment switch to ensure that a transaction is archived immediately after it finishes.
Example 7.5. Shell command for archiving WAL segments
This example shows a simple shell command you can set in the archive_command configuration parameter.
The following command copies a completed segment file to the required location:
archive_command = 'test ! -f /mnt/server/archivedir/%f && cp %p /mnt/server/archivedir/%f'
where the %p parameter is replaced by the relative path to the file to archive and the %f parameter is replaced by the file name.
This command copies archivable WAL segments to the /mnt/server/archivedir/ directory. After replacing the %p and %f parameters, the executed command looks as follows:
test ! -f /mnt/server/archivedir/00000001000000A900000065 && cp pg_wal/00000001000000A900000065 /mnt/server/archivedir/00000001000000A900000065A similar command is generated for each new file that is archived.
Additional resources
7.4.5.3.4. Making a base backup
You can create a base backup in several ways. The simplest way of performing a base backup is using the pg_basebackup utility on a running PostgreSQL server.
The base backup process creates a backup history file that is stored into the WAL archive area and is named after the first WAL segment file that you need for the base backup.
The backup history file is a small text file containing the starting and ending times, and WAL segments of the backup. If you used the label string to identify the associated dump file, you can use the backup history file to determine which dump file to restore.
Consider keeping several backup sets to be certain that you can recover your data.
To perform a base backup, use the following procedure.
Prerequisites
-
You must run the commands as the
postgressuperuser, a user with database administrator privileges, or another user with at leastREPLICATIONpermissions. - You must keep all the WAL segment files generated during and after the base backup.
Procedure
Use the
pg_basebackuputility to perform the base backup.To create a base backup as individual files (plain format):
$ pg_basebackup -D backup_directory -FpReplace backup_directory with your desired backup location.
If you use tablespaces and perform the base backup on the same host as the server, you must also use the
--tablespace-mappingoption, otherwise the backup will fail upon an attempt to write the backup to the same location.To create a base backup as a
tararchive (tarand compressed format):$ pg_basebackup -D backup_directory -Ft -zReplace backup_directory with your desired backup location.
To restore such data, you must manually extract the files in the correct locations.
- After the base backup process is complete, safely archive the copy of the database cluster and the WAL segment files used during the backup, which are specified in the backup history file.
- Delete WAL segments numerically lower than the WAL segment files used in the base backup because these are older than the base backup and no longer needed for a restore.
To specify which database server pg_basebackup will contact, use the following command-line options:
The
-hoption to define the host.The default host is either the local host or a host specified by the
PGHOSTenvironment variable.The
-poption to define the port.The default port is indicated by the
PGPORTenvironment variable or the compiled-in default.
Additional resources
7.4.5.3.5. Restoring the database using a continuous archive backup
To restore a database using a continuous backup, use the following procedure.
Procedure
Stop the server:
# systemctl stop postgresql.serviceCopy the necessary data to a temporary location.
Preferably, copy the whole cluster data directory and any tablespaces. Note that this requires enough free space on your system to hold two copies of your existing database.
If you do not have enough space, save the contents of the cluster’s
pg_waldirectory, which can contain logs that were not archived before the system went down.- Remove all existing files and subdirectories under the cluster data directory and under the root directories of any tablespaces you are using.
Restore the database files from your base backup.
Ensure that:
-
The files are restored with the correct ownership (the database system user, not
root). - The files are restored with the correct permissions.
-
The symbolic links in the
pg_tblspc/subdirectory are restored correctly.
-
The files are restored with the correct ownership (the database system user, not
Remove any files present in the
pg_wal/subdirectory.These files resulted from the base backup and are therefore obsolete. If you did not archive
pg_wal/, recreate it with proper permissions.-
Copy any unarchived WAL segment files that you saved in step 2 into
pg_wal/. Create the
recovery.confrecovery command file in the cluster data directory and specify the shell command in therestore_commandconfiguration parameter. You can use thecpcommand, another command, or a shell script. For example:restore_command = 'cp /mnt/server/archivedir/%f "%p"'Start the server:
# systemctl start postgresql.serviceThe server will enter the recovery mode and proceed to read through the archived WAL files that it needs.
If the recovery is terminated due to an external error, the server can be restarted and it will continue the recovery. When the recovery process is completed, the server renames
recovery.conftorecovery.done. This prevents the server from accidental re-entering the recovery mode after it starts normal database operations.Check the contents of the database to verify that the database has recovered into the required state.
If the database has not recovered into the required state, return to step 1. If the database has recovered into the required state, allow the users to connect by restoring the client authentication configuration in the
pg_hba.conffile.
For more information about restoring using the continuous backup, see PostgreSQL Documentation.
7.4.5.3.6. Additional resources
7.4.6. Migrating to a RHEL 8 version of PostgreSQL
Red Hat Enterprise Linux 7 contains PostgreSQL 9.2 as the default version of the PostgreSQL server. In addition, several versions of PostgreSQL are provided as Software Collections for RHEL 7.
Red Hat Enterprise Linux 8 provides PostgreSQL 10 as the default postgresql stream, PostgreSQL 9.6, PostgreSQL 12, PostgreSQL 13, and PostgreSQL 15.
Users of PostgreSQL on Red Hat Enterprise Linux can use two migration paths for the database files:
The fast upgrade method is quicker than the dump and restore process. However, in certain cases, the fast upgrade does not work, and you can only use the dump and restore process. Such cases include:
- Cross-architecture upgrades
-
Systems using the
plpythonorplpython2extensions. Note that RHEL 8 AppStream repository includes only thepostgresql-plpython3package, not thepostgresql-plpython2package. - Fast upgrade is not supported for migration from Red Hat Software Collections versions of PostgreSQL.
As a prerequisite for migration to a later version of PostgreSQL, back up all your PostgreSQL databases.
Dumping the databases and performing backup of the SQL files is required for the dump and restore process and recommended for the fast upgrade method.
Before migrating to a later version of PostgreSQL, see the upstream compatibility notes for the version of PostgreSQL to which you want to migrate, as well as for all skipped PostgreSQL versions between the one you are migrating from and the target version.
7.4.6.1. Notable differences between PostgreSQL 13 and PostgreSQL 15
PostgreSQL 15 introduced the following backwards incompatible changes.
Default permissions of the public schema
The default permissions of the public schema have been modified in PostgreSQL 15. Newly created users need to grant permission explicitly by using the GRANT ALL ON SCHEMA public TO myuser; command.
The following example works in PostgreSQL 13 and earlier:
postgres=# CREATE USER mydbuser; postgres=# \c postgres mydbuser postgres=$ CREATE TABLE mytable (id int);
The following example works in PostgreSQL 15:
postgres=# CREATE USER mydbuser; postgres=# GRANT ALL ON SCHEMA public TO mydbuser; postgres=# \c postgres mydbuser postgres=$ CREATE TABLE mytable (id int);
Ensure that the mydbuser acces is configured appropriately in the pg_hba.conf file. See Creating PostgreSQL users for more information.
PQsendQuery() no longer supported in pipeline mode
Since PostgreSQL 15, the libpq PQsendQuery() function is no longer supported in pipeline mode. Modify affected applications to use the PQsendQueryParams() function instead.
7.4.6.2. Fast upgrade using the pg_upgrade utility
During a fast upgrade, you must copy binary data files to the /var/lib/pgsql/data/ directory and use the pg_upgrade utility.
You can use this method for migrating data:
- From the RHEL 7 system version of PostgreSQL 9.2 to the RHEL 8 version of PostgreSQL 10
- From the RHEL 8 version of PostgreSQL 10 to the RHEL 8 version of PostgreSQL 12
- From the RHEL 8 version of PostgreSQL 12 to the RHEL 8 version of PostgreSQL 13
- From the RHEL 8 version of PostgreSQL 13 to the RHEL 8 version of PostgreSQL 15
If you want to upgrade from an earlier postgresql stream within RHEL 8, follow the procedure described in Switching to a later stream and then migrate your PostgreSQL data.
For migrating between other combinations of PostgreSQL versions within RHEL, and for migration from the Red Hat Software Collections versions of PostgreSQL to RHEL, use Dump and restore upgrade.
The following procedure describes migration from the RHEL 7 system version of PostgreSQL 9.2 to a RHEL 8 version of PostgreSQL using the fast upgrade method.
Prerequisites
-
Before performing the upgrade, back up all your data stored in the PostgreSQL databases. By default, all data is stored in the
/var/lib/pgsql/data/directory on both the RHEL 7 and RHEL 8 systems.
Procedure
On the RHEL 8 system, enable the stream (version) to which you want to migrate:
# yum module enable postgresql:streamReplace stream with the selected version of the PostgreSQL server.
You can omit this step if you want to use the default stream, which provides PostgreSQL 10.
On the RHEL 8 system, install the
postgresql-serverandpostgresql-upgradepackages:# yum install postgresql-server postgresql-upgradeOptionally, if you used any PostgreSQL server modules on RHEL 7, install them also on the RHEL 8 system in two versions, compiled both against PostgreSQL 9.2 (installed as the
postgresql-upgradepackage) and the target version of PostgreSQL (installed as thepostgresql-serverpackage). If you need to compile a third-party PostgreSQL server module, build it both against thepostgresql-develandpostgresql-upgrade-develpackages.Check the following items:
-
Basic configuration: On the RHEL 8 system, check whether your server uses the default
/var/lib/pgsql/datadirectory and the database is correctly initialized and enabled. In addition, the data files must be stored in the same path as mentioned in the/usr/lib/systemd/system/postgresql.servicefile. - PostgreSQL servers: Your system can run multiple PostgreSQL servers. Ensure that the data directories for all these servers are handled independently.
-
PostgreSQL server modules: Ensure that the PostgreSQL server modules that you used on RHEL 7 are installed on your RHEL 8 system as well. Note that plug-ins are installed in the
/usr/lib64/pgsql/directory (or in the/usr/lib/pgsql/directory on 32-bit systems).
-
Basic configuration: On the RHEL 8 system, check whether your server uses the default
Ensure that the
postgresqlservice is not running on either of the source and target systems at the time of copying data.# systemctl stop postgresql.service-
Copy the database files from the source location to the
/var/lib/pgsql/data/directory on the RHEL 8 system. Perform the upgrade process by running the following command as the PostgreSQL user:
# postgresql-setup --upgradeThis launches the
pg_upgradeprocess in the background.In case of failure,
postgresql-setupprovides an informative error message.Copy the prior configuration from
/var/lib/pgsql/data-oldto the new cluster.Note that the fast upgrade does not reuse the prior configuration in the newer data stack and the configuration is generated from scratch. If you want to combine the old and new configurations manually, use the *.conf files in the data directories.
Start the new PostgreSQL server:
# systemctl start postgresql.serviceAnalyze the new database cluster.
For PostgreSQL 13 or earlier:
su postgres -c '~/analyze_new_cluster.sh'For PostgreSQL 15:
su postgres -c 'vacuumdb --all --analyze-in-stages'
If you want the new PostgreSQL server to be automatically started on boot, run:
# systemctl enable postgresql.service
7.4.6.3. Dump and restore upgrade
When using the dump and restore upgrade, you must dump all databases contents into an SQL file dump file.
Note that the dump and restore upgrade is slower than the fast upgrade method and it might require some manual fixing in the generated SQL file.
You can use this method for migrating data from:
- The Red Hat Enterprise Linux 7 system version of PostgreSQL 9.2
- Any earlier Red Hat Enterprise Linux 8 version of PostgreSQL
An earlier or equal version of PostgreSQL from Red Hat Software Collections:
- PostgreSQL 9.2 (no longer supported)
- PostgreSQL 9.4 (no longer supported)
- PostgreSQL 9.6 (no longer supported)
- PostgreSQL 10
- PostgreSQL 12
- PostgreSQL 13
On RHEL 7 and RHEL 8 systems, PostgreSQL data is stored in the /var/lib/pgsql/data/ directory by default. In case of Red Hat Software Collections versions of PostgreSQL, the default data directory is /var/opt/rh/collection_name/lib/pgsql/data/ (with the exception of postgresql92, which uses the /opt/rh/postgresql92/root/var/lib/pgsql/data/ directory).
If you want to upgrade from an earlier postgresql stream within RHEL 8, follow the procedure described in Switching to a later stream and then migrate your PostgreSQL data.
To perform the dump and restore upgrade, change the user to root.
The following procedure describes migration from the RHEL 7 system version of PostgreSQL 9.2 to a RHEL 8 version of PostgreSQL.
Procedure
On your RHEL 7 system, start the PostgreSQL 9.2 server:
# systemctl start postgresql.serviceOn the RHEL 7 system, dump all databases contents into the
pgdump_file.sqlfile:su - postgres -c "pg_dumpall > ~/pgdump_file.sql"Verify that the databases were dumped correctly:
su - postgres -c 'less "$HOME/pgdump_file.sql"'As a result, the path to the dumped sql file is displayed:
/var/lib/pgsql/pgdump_file.sql.On the RHEL 8 system, enable the stream (version) to which you wish to migrate:
# yum module enable postgresql:streamReplace stream with the selected version of the PostgreSQL server.
You can omit this step if you want to use the default stream, which provides PostgreSQL 10.
On the RHEL 8 system, install the
postgresql-serverpackage:# yum install postgresql-serverOptionally, if you used any PostgreSQL server modules on RHEL 7, install them also on the RHEL 8 system. If you need to compile a third-party PostgreSQL server module, build it against the
postgresql-develpackage.On the RHEL 8 system, initialize the data directory for the new PostgreSQL server:
# postgresql-setup --initdbOn the RHEL 8 system, copy the
pgdump_file.sqlinto the PostgreSQL home directory, and check that the file was copied correctly:su - postgres -c 'test -e "$HOME/pgdump_file.sql" && echo exists'Copy the configuration files from the RHEL 7 system:
su - postgres -c 'ls -1 $PGDATA/*.conf'The configuration files to be copied are:
-
/var/lib/pgsql/data/pg_hba.conf -
/var/lib/pgsql/data/pg_ident.conf -
/var/lib/pgsql/data/postgresql.conf
-
On the RHEL 8 system, start the new PostgreSQL server:
# systemctl start postgresql.serviceOn the RHEL 8 system, import data from the dumped sql file:
su - postgres -c 'psql -f ~/pgdump_file.sql postgres'
When upgrading from a Red Hat Software Collections version of PostgreSQL, adjust the commands to include scl enable collection_name. For example, to dump data from the rh-postgresql96 Software Collection, use the following command:
su - postgres -c 'scl enable rh-postgresql96 "pg_dumpall > ~/pgdump_file.sql"'Chapter 8. Deploying and configuring a Postfix SMTP server
As a system administrator, you can configure your email infrastructure by using a mail transport agent (MTA), such as Postfix, to transport email messages between hosts using the SMTP protocol. Postfix is a server-side application for routing and delivering mail. You can use Postfix to set up a local mail server, create a null-client mail relay, use a Postfix server as a destination for multiple domains, or choose an LDAP directory instead of files for lookups.
The key features of Postfix:
- Security features to protect against common email related threats
- Customization options, including support for virtual domains and aliases
8.1. Overview of the main Postfix configuration files
The postfix package provides multiple configuration files in the /etc/postfix/ directory.
To configure your email infrastructure, use the following configuration files:
-
main.cf— contains the global configuration of Postfix. -
master.cf— specifies Postfix interaction with various processes to accomplish mail delivery. -
access— specifies access rules, for example hosts that are allowed to connect to Postfix. -
transport— maps email addresses to relay hosts. -
aliases— contains a configurable list required by the mail protocol that describes user ID aliases. Note that you can find this file in the/etc/directory.
8.2. Installing and configuring a Postfix SMTP server
You can configure your Postfix SMTP server to receive, store, and deliver email messages. If the mail server package is not selected during the system installation, Postfix will not be available by default. Perform the following steps to install Postfix:
Prerequisites
- You have the root access.
- Register your system.
Disable and remove Sendmail:
# yum remove sendmail
Procedure
Install Postfix:
# yum install postfixTo configure Postfix, edit the
/etc/postfix/main.cffile and make the following changes:By default, Postfix receives emails only on the
loopbackinterface. To configure Postfix to listen on specific interfaces, update theinet_interfacesparameter to the IP addresses of these interfaces:inet_interfaces = 127.0.0.1/32, [::1]/128, 192.0.2.1, [2001:db8:1::1]
To configure Postfix to listen on all interfaces, set:
inet_interfaces = all
If you want that Postfix uses a different hostname than the fully-qualified domain name (FQDN) that is returned by the
gethostname()function, add themyhostnameparameter:myhostname = <smtp.example.com>For example, Postfix adds this hostname to header of emails it processes.
If the domain name differs from the one in the
myhostnameparameter, add themydomainparameter:mydomain = <example.com>Add the
myoriginparameter and set it to the value ofmydomain:myorigin = $mydomain
With this setting, Postfix uses the domain name as origin for locally posted mails instead of the hostname.
Add the
mynetworksparameter, and define the IP ranges of trusted networks that are allowed to send mails:mynetworks = 127.0.0.1/32, [::1]/128, 192.0.2.1/24, [2001:db8:1::1]/64
If clients from not trustworthy networks, such as the Internet, should be able to send mails through this server, you must configure relay restrictions in a later step.
Verify if the Postfix configuration in the
main.cffile is correct:$ postfix checkEnable the
postfixservice to start at boot and start it:# systemctl enable --now postfixAllow the smtp traffic through firewall and reload the firewall rules:
# firewall-cmd --permanent --add-service smtp # firewall-cmd --reload
Verification
Verify that the
postfixservice is running:# systemctl status postfixOptional: Restart the
postfixservice, if the output is stopped, waiting, or the service is not running:# systemctl restart postfixOptional: Reload the
postfixservice after changing any options in the configuration files in the/etc/postfix/directory to apply those changes:# systemctl reload postfix
Verify the email communication between local users on your system:
# echo "This is a test message" | mail -s <SUBJECT> <user@mydomain.com>Verify that your mail server is not an open relay by sending an email to an email address outside of your domain from a client (server1) to your mail server (server2):
Edit the
/etc/postfix/main.cffile for server1 as follows:relayhost = <ip_address_of_server2>Edit the
/etc/postfix/main.cffile for server2 as follows:mynetworks = <ip_address_of_server2>On server1, send the following mail:
# echo "This is an open relay test message" | mail -s <SUBJECT> <user@example.com>Check the
/var/log/maillogfile:554 Relay access denied - the server is not going to relay. 250 OK or similar - the server is going to relay.
Troubleshooting
-
In case of errors, check the
/var/log/maillogfile.
Additional resources
-
The
/etc/postfix/main.cfconfiguration file -
The
/usr/share/doc/postfix/README_FILESdirectory - Using and configuring firewalld
8.3. Customizing TLS settings of a Postfix server
To make your email traffic encrypted and therefore more secure, you can configure Postfix to use a certificate from a trusted certificate authority (CA) instead of the self-signed certificate and customize the Transport Layer Security (TLS) security settings. In RHEL 8, the TLS encryption protocol is enabled in the Postfix server by default. The basic Postfix TLS configuration contains self-signed certificates for inbound SMTP and the opportunistic TLS for outbound SMTP.
Prerequisites
- You have the root access.
-
You have the
postfixpackage installed on your server. - You have a certificate signed by a trusted certificate authority (CA) and a private key.
You have copied the following files to the Postfix server:
-
The server certificate:
/etc/pki/tls/certs/postfix.pem -
The private key:
/etc/pki/tls/private/postfix.key
-
The server certificate:
Procedure
Set the path to the certificate and private key files on the server where Postfix is running by adding the following lines to the
/etc/postfix/main.cffile:smtpd_tls_cert_file = /etc/pki/tls/certs/postfix.pem smtpd_tls_key_file = /etc/pki/tls/private/postfix.key
Restrict the incoming SMTP connections to authenticated users only by editing the
/etc/postfix/main.cffile:smtpd_tls_auth_only = yes
Reload the
postfixservice to apply the changes:# systemctl reload postfix
Verification
Configure your client to use TLS encryption and send an email.
NoteTo get additional information about Postfix client TLS activity, increase the log level from
0to1by changing the following line in the/etc/postfix/main.cf:smtp_tls_loglevel = 1
8.4. Configuring Postfix to forward all emails to a mail relay
If you want to forward all email to a mail relay, you can configure Postfix server as a null client. In this configuration Postfix only forwards mail to a different mail server and is not capable of receiving mail.
Prerequisites
- You have the root access.
-
You have the
postfixpackage installed on your server. - You have the IP address or hostname of the relay host to which you want to forward emails.
Procedure
To prevent Postfix from accepting any local email delivery and making it a null client, edit the
/etc/postfix/main.cffile and make the following changes:Configure Postfix to forward all email by setting the
mydestinationparameter equal to an empty value:mydestination =
In this configuration the Postfix server is not a destination for any email and acts as a null client.
Specify the mail relay server that receives the email from your null client:
relayhost = <[ip_address_or_hostname]>The relay host is responsible for the mail delivery. Enclose
<ip_address_or_hostname>in square brackets.Configure the Postfix mail server to listen only on the loopback interface for emails to deliver:
inet_interfaces = loopback-only
If you want Postfix to rewrite the sender domain of all outgoing emails to the company domain of your relay mail server, set:
myorigin = <relay.example.com>To disable the local mail delivery, add the following directive at the end of the configuration file:
local_transport = error: local delivery disabled
Add the
mynetworksparameter so that Postfix forwards email from the local system originating from the 127.0.0.0/8 IPv4 network and the [::1]/128 IPv6 network to the mail relay server:mynetworks = 127.0.0.0/8, [::1]/128
Verify if the Postfix configuration in the
main.cffile is correct:$ postfix checkRestart the
postfixservice to apply the changes:# systemctl restart postfix
Verification
Verify that the email communication is forwarded to the mail relay:
# echo "This is a test message" | mail -s <SUBJECT> <user@example.com>
Troubleshooting
-
In case of errors, check the
/var/log/maillogfile.
Additional resources
-
The
/etc/postfix/main.cfconfiguration file
8.5. Configuring Postfix as a destination for multiple domains
You can configure Postfix as a mail server that can receive emails for multiple domains. In this configuration, Postfix acts as the final destination for emails sent to addresses within the specified domains. You can configure the following:
- Set up multiple email addresses that point to the same email destination
- Route incoming email for multiple domains to the same Postfix server
Prerequisites
- You have the root access.
- You have configured a Postfix server.
Procedure
In the
/etc/postfix/virtualvirtual alias file, specify the email addresses for each domain. Add each email address on a new line:<info@example.com> <user22@example.net> <sales@example.com> <user11@example.org>
In this example, Postfix redirects all emails sent to info@example.com to user22@example.net and email sent to sales@example.com to user11@example.org.
Create a hash file for the virtual alias map:
# postmap /etc/postfix/virtualThis command creates the
/etc/postfix/virtual.dbfile. Note that you must always re-run this command after you update the/etc/postfix/virtualfile.In the Postfix
/etc/postfix/main.cfconfiguration file, add thevirtual_alias_mapsparameter and point it to the hash file:virtual_alias_maps = hash:/etc/postfix/virtual
Reload the
postfixservice to apply the changes:# systemctl reload postfix
Verification
- Test the configuration by sending an email to one of the virtual email addresses.
Troubleshooting
-
In case of errors, check the
/var/log/maillogfile.
8.6. Using an LDAP directory as a lookup table
If you use a Lightweight Directory Access Protocol (LDAP) server to store accounts, domains or aliases, you can configure Postfix to use the LDAP server as a lookup table. Using LDAP instead of files for lookups enables you to have a central database.
Prerequisites
- You have the root access.
-
You have the
postfixpackage installed on your server. - You have an LDAP server with the required schema and user credentials.
-
You have the
postfix-ldapplugin installed on the server running Postfix.
Procedure
Configure the LDAP lookup parameters by creating a
/etc/postfix/ldap-aliases.cffile with the following content:Specify the hostname of the LDAP server:
server_host = <ldap.example.com>Specify the base domain name for the LDAP search:
search_base = dc=<example>,dc=<com>
-
Optional: Customize the LDAP search filter and attributes based on your requirements. The filter for searching the directory defaults to
query_filter = mailacceptinggeneralid=%s.
Enable the LDAP source as a lookup table in the
/etc/postfix/main.cfconfiguration file by adding the following content:virtual_alias_maps = ldap:/etc/postfix/ldap-aliases.cf
Verify the LDAP configuration by running the
postmapcommand, which checks for any syntax errors or connectivity issues:# postmap -q @<example.com> ldap:/etc/postfix/ldap-aliases.cfReload the
postfixservice to apply the changes:# systemctl reload postfix
Verification
-
Send a test email to verify that the LDAP lookup works correctly. Check the mail logs in
/var/log/maillogfor any errors.
Additional resources
-
/usr/share/doc/postfix/README_FILES/LDAP_READMEfile -
/usr/share/doc/postfix/README_FILES/DATABASE_READMEfile
8.7. Configuring Postfix as an outgoing mail server to relay for authenticated users
You can configure Postfix to relay mail for authenticated users. In this scenario, you allow users to authenticate themselves and use their email address to send mail through your SMTP server by configuring Postfix as an outgoing mail server with SMTP authentication, TLS encryption, and sender address restrictions.
Prerequisites
- You have the root access.
- You have configured a Postfix server.
Procedure
To configure Postfix as an outgoing mail server, edit the
/etc/postfix/main.cffile and add the following:Enable SMTP authentication:
smtpd_sasl_auth_enable = yes broken_sasl_auth_clients = yes
Disable access without TLS:
smtpd_tls_auth_only = yes
Allow mail relaying only for authenticated users:
smtpd_relay_restrictions = permit_mynetworks permit_sasl_authenticated defer_unauth_destination
Optional: Restrict users to use their own email address only as a sender:
smtpd_sender_restrictions = reject_sender_login_mismatch
Reload the
postfixservice to apply the changes:# systemctl reload postfix
Verification
- Authenticate in your SMTP client that supports TLS and SASL. Send an test email to verify that the SMTP authentication works correctly.
8.8. Delivering email from Postfix to Dovecot running on the same host
You can configure Postfix to deliver incoming mail to Dovecot on the same host using LMTP over a UNIX socket. This socket enables direct communication between Postfix and Dovecot on the local machine.
Prerequisites
- You have the root access.
- You have configured a Postfix server.
- You have configured a Dovecot server, see Configuring and maintaining a Dovecot IMAP and POP3 server.
- You have configured the LMTP socket on your Dovecot server, see Configuring an LMTP socket and LMTPS listener.
Procedure
Configure Postfix to use the LMTP protocol and the UNIX domain socket for delivering mail to Dovecot in the
/etc/postfix/main.cffile:If you want to use virtual mailboxes, add the following content:
virtual_transport = lmtp:unix:/var/run/dovecot/lmtp
If you want to use non-virtual mailboxes, add the following content:
mailbox_transport = lmtp:unix:/var/run/dovecot/lmtp
Reload
postfixto apply the changes:# systemctl reload postfix
Verification
-
Send an test email to verify that the LMTP socket works correctly. Check the mail logs in
/var/log/maillogfor any errors.
8.9. Delivering email from Postfix to Dovecot running on a different host
You can establish a secure connection between Postfix mail server and the Dovecot delivery agent over the network. To do so, configure the LMTP service to use network socket for delivering mail between mail servers. By default, the LMTP protocol is not encrypted. However, if you configured TLS encryption, Dovecot uses the same settings automatically for the LMTP service. SMTP servers can then connect to it using the STARTTLS command over LMTP.
Prerequisites
- You have the root access.
- You have configured a Postfix server.
- You have configured a Dovecot server, see Configuring and maintaining a Dovecot IMAP and POP3 server.
- You have configured the LMTP service on your Dovecot server, see Configuring an LMTP socket and LMTPS listener.
Procedure
Configure Postfix to use the LMTP protocol and the INET domain socket for delivering mail to Dovecot in the
/etc/postfix/main.cffile by adding the following content:mailbox_transport = lmtp:inet:<dovecot_host>:<port>
Replace
<dovecot_host>with the IP address or hostname of the Dovecot server and<port>with the port number of the LMTP service.Reload the
postfixservice to apply the changes:# systemctl reload postfix
Verification
- Send an test email to an address hosted by the remote Dovecot server and check the Dovecot logs to ensure that the mail was successfully delivered.
8.10. Securing the Postfix service
Postfix is a mail transfer agent (MTA) that uses the Simple Mail Transfer Protocol (SMTP) to deliver electronic messages between other MTAs and to email clients or delivery agents. Although MTAs can encrypt traffic between one another, they might not do so by default. You can also mitigate risks to various attacks by changing setting to more secure values.
8.10.2. Postfix configuration options for limiting DoS attacks
An attacker can flood the server with traffic, or send information that triggers a crash, causing a denial of service (DoS) attack. You can configure your system to reduce the risk of such attacks by setting limits in the /etc/postfix/main.cf file. You can change the value of the existing directives or you can add new directives with custom values in the <directive> = <value> format.
Use the following list of directives for limiting a DoS attack:
- smtpd_client_connection_rate_limit
-
This directive limits the maximum number of connection attempts any client can make to this service per time unit. The default value is
0, which means a client can make as many connections per time unit as Postfix can accept. By default, the directive excludes clients in trusted networks. - anvil_rate_time_unit
-
This directive is a time unit to calculate the rate limit. The default value is
60seconds. - smtpd_client_event_limit_exceptions
- This directive excludes clients from the connection and rate limit commands. By default, the directive excludes clients in trusted networks.
- smtpd_client_message_rate_limit
- This directive defines the maximum number of message deliveries from client to request per time unit (regardless of whether or not Postfix actually accepts those messages).
- default_process_limit
-
This directive defines the default maximum number of Postfix child processes that provide a given service. You can ignore this rule for specific services in the
master.cffile. By default, the value is100. - queue_minfree
-
This directive defines the minimum amount of free space required to receive mail in the queue file system. The directive is currently used by the Postfix SMTP server to decide if it accepts any mail at all. By default, the Postfix SMTP server rejects
MAIL FROMcommands when the amount of free space is less than 1.5 times themessage_size_limit. To specify a higher minimum free space limit, specify aqueue_minfreevalue that is at least 1.5 times themessage_size_limit. By default, thequeue_minfreevalue is0. - header_size_limit
-
This directive defines the maximum amount of memory in bytes for storing a message header. If a header is large, it discards the excess header. By default, the value is
102400bytes. - message_size_limit
-
This directive defines the maximum size of a message including the envelope information in bytes. By default, the value is
10240000bytes.
8.10.3. Configuring Postfix to use SASL
Postfix supports Simple Authentication and Security Layer (SASL) based SMTP Authentication (AUTH). SMTP AUTH is an extension of the Simple Mail Transfer Protocol. Currently, the Postfix SMTP server supports the SASL implementations in the following ways:
- Dovecot SASL
- The Postfix SMTP server can communicate with the Dovecot SASL implementation using either a UNIX-domain socket or a TCP socket. Use this method if Postfix and Dovecot applications are running on separate machines.
- Cyrus SASL
- When enabled, SMTP clients must authenticate with the SMTP server using an authentication method supported and accepted by both the server and the client.
Prerequisites
-
The
dovecotpackage is installed on the system
Procedure
Set up Dovecot:
Include the following lines in the
/etc/dovecot/conf.d/10-master.conffile:service auth { unix_listener /var/spool/postfix/private/auth { mode = 0660 user = postfix group = postfix } }The previous example uses UNIX-domain sockets for communication between Postfix and Dovecot. The example also assumes default Postfix SMTP server settings, which include the mail queue located in the
/var/spool/postfix/directory, and the application running under thepostfixuser and group.Optional: Set up Dovecot to listen for Postfix authentication requests through TCP:
service auth { inet_listener { port = port-number } }Specify the method that the email client uses to authenticate with Dovecot by editing the
auth_mechanismsparameter in/etc/dovecot/conf.d/10-auth.conffile:auth_mechanisms = plain login
The
auth_mechanismsparameter supports different plaintext and non-plaintext authentication methods.
Set up Postfix by modifying the
/etc/postfix/main.cffile:Enable SMTP Authentication on the Postfix SMTP server:
smtpd_sasl_auth_enable = yes
Enable the use of Dovecot SASL implementation for SMTP Authentication:
smtpd_sasl_type = dovecot
Provide the authentication path relative to the Postfix queue directory. Note that the use of a relative path ensures that the configuration works regardless of whether the Postfix server runs in
chrootor not:smtpd_sasl_path = private/auth
This step uses UNIX-domain sockets for communication between Postfix and Dovecot.
To configure Postfix to look for Dovecot on a different machine in case you use TCP sockets for communication, use configuration values similar to the following:
smtpd_sasl_path = inet: ip-address : port-number
In the previous example, replace the ip-address with the IP address of the Dovecot machine and port-number with the port number specified in Dovecot’s
/etc/dovecot/conf.d/10-master.conffile.Specify SASL mechanisms that the Postfix SMTP server makes available to clients. Note that you can specify different mechanisms for encrypted and unencrypted sessions.
smtpd_sasl_security_options = noanonymous, noplaintext smtpd_sasl_tls_security_options = noanonymous
The previous directives specify that during unencrypted sessions, no anonymous authentication is allowed and no mechanisms that transmit unencrypted user names or passwords are allowed. For encrypted sessions that use TLS, only non-anonymous authentication mechanisms are allowed.
Chapter 9. Configuring and maintaining a Dovecot IMAP and POP3 server
Dovecot is a high-performance mail delivery agent (MDA) with a focus on security. You can use IMAP or POP3-compatible email clients to connect to a Dovecot server and read or download emails.
Key features of Dovecot:
- The design and implementation focuses on security
- Two-way replication support for high availability to improve the performance in large environments
-
Supports the high-performance
dboxmailbox format, but alsomboxandMaildirfor compatibility reasons - Self-healing features, such as fixing broken index files
- Compliance with the IMAP standards
- Workaround support to bypass bugs in IMAP and POP3 clients
9.1. Setting up a Dovecot server with PAM authentication
Dovecot supports the Name Service Switch (NSS) interface as a user database and the Pluggable Authentication Modules (PAM) framework as an authentication backend. With this configuration, Dovecot can provide services to users who are available locally on the server through NSS.
Use PAM authentication if accounts:
-
Are defined locally in the
/etc/passwdfile - Are stored in a remote database but they are available locally through the System Security Services Daemon (SSSD) or other NSS plugins.
9.1.1. Installing Dovecot
The dovecot package provides:
-
The
dovecotservice and the utilities to maintain it - Services that Dovecot starts on demand, such as for authentication
- Plugins, such as server-side mail filtering
-
Configuration files in the
/etc/dovecot/directory -
Documentation in the
/usr/share/doc/dovecot/directory
Procedure
Install the
dovecotpackage:# yum install dovecotNoteIf Dovecot is already installed and you require clean configuration files, rename or remove the
/etc/dovecot/directory. Afterwards, reinstall the package. Without removing the configuration files, theyum reinstall dovecotcommand does not reset the configuration files in/etc/dovecot/.
9.1.2. Configuring TLS encryption on a Dovecot server
Dovecot provides a secure default configuration. For example, TLS is enabled by default to transmit credentials and data encrypted over networks. To configure TLS on a Dovecot server, you only need to set the paths to the certificate and private key files. Additionally, you can increase the security of TLS connections by generating and using Diffie-Hellman parameters to provide perfect forward secrecy (PFS).
Prerequisites
- Dovecot is installed.
The following files have been copied to the listed locations on the server:
-
The server certificate:
/etc/pki/dovecot/certs/server.example.com.crt -
The private key:
/etc/pki/dovecot/private/server.example.com.key -
The Certificate Authority (CA) certificate:
/etc/pki/dovecot/certs/ca.crt
-
The server certificate:
-
The hostname in the
Subject DNfield of the server certificate matches the server’s Fully-qualified Domain Name (FQDN).
Procedure
Set secure permissions on the private key file:
# chown root:root /etc/pki/dovecot/private/server.example.com.key # chmod 600 /etc/pki/dovecot/private/server.example.com.key
Generate a file with Diffie-Hellman parameters:
# openssl dhparam -out /etc/dovecot/dh.pem 4096Depending on the hardware and entropy on the server, generating Diffie-Hellman parameters with 4096 bits can take several minutes.
Set the paths to the certificate and private key files in the
/etc/dovecot/conf.d/10-ssl.conffile:Update the
ssl_certandssl_keyparameters, and set them to use the paths of the server’s certificate and private key:ssl_cert = </etc/pki/dovecot/certs/server.example.com.crt ssl_key = </etc/pki/dovecot/private/server.example.com.key
Uncomment the
ssl_caparameter, and set it to use the path to the CA certificate:ssl_ca = </etc/pki/dovecot/certs/ca.crtUncomment the
ssl_dhparameter, and set it to use the path to the Diffie-Hellman parameters file:ssl_dh = </etc/dovecot/dh.pem
ImportantTo ensure that Dovecot reads the value of a parameter from a file, the path must start with a leading
<character.
Next step
Additional resources
-
/usr/share/doc/dovecot/wiki/SSL.DovecotConfiguration.txt
9.1.3. Preparing Dovecot to use virtual users
By default, Dovecot performs many actions on the file system as the user who uses the service. However, configuring the Dovecot back end to use one local user to perform these actions has several benefits:
- Dovecot performs file system actions as a specific local user instead of using the user’s ID (UID).
- Users do not need to be available locally on the server.
- You can store all mailboxes and user-specific files in one root directory.
- Users do not require a UID and group ID (GID), which reduces administration efforts.
- Users who have access to the file system on the server cannot compromise their mailboxes or indexes because they cannot access these files.
- Setting up replication is easier.
Prerequisites
- Dovecot is installed.
Procedure
Create the
vmailuser:# useradd --home-dir /var/mail/ --shell /usr/sbin/nologin vmailDovecot will later use this user to manage the mailboxes. For security reasons, do not use the
dovecotordovenullsystem users for this purpose.If you use a different path than
/var/mail/, set themail_spool_tSELinux context on it, for example:# semanage fcontext -a -t mail_spool_t "<path>(/.*)?" # restorecon -Rv <path>
Grant write permissions on
/var/mail/only to thevmailuser:# chown vmail:vmail /var/mail/ # chmod 700 /var/mail/
Uncomment the
mail_locationparameter in the/etc/dovecot/conf.d/10-mail.conffile, and set it to the mailbox format and location:mail_location = sdbox:/var/mail/%n/With this setting:
-
Dovecot uses the high-performant
dboxmailbox format insinglemode. In this mode, the service stores each mail in a separate file, similar to themaildirformat. -
Dovecot resolves the
%nvariable in the path to the username. This is required to ensure that each user has a separate directory for its mailbox.
-
Dovecot uses the high-performant
Additional resources
-
/usr/share/doc/dovecot/wiki/VirtualUsers.txt -
/usr/share/doc/dovecot/wiki/MailLocation.txt -
/usr/share/doc/dovecot/wiki/MailboxFormat.dbox.txt -
/usr/share/doc/dovecot/wiki/Variables.txt
9.1.4. Using PAM as the Dovecot authentication backend
By default, Dovecot uses the Name Service Switch (NSS) interface as the user database and the Pluggable Authentication Modules (PAM) framework as the authentication backend.
Customize the settings to adapt Dovecot to your environment and to simplify administration by using the virtual users feature.
Prerequisites
- Dovecot is installed.
- The virtual users feature is configured.
Procedure
Update the
first_valid_uidparameter in the/etc/dovecot/conf.d/10-mail.conffile to define the lowest user ID (UID) that can authenticate to Dovecot:first_valid_uid = 1000By default, users with a UID greater than or equal to
1000can authenticate. If required, you can also set thelast_valid_uidparameter to define the highest UID that Dovecot allows to log in.In the
/etc/dovecot/conf.d/auth-system.conf.extfile, add theoverride_fieldsparameter to theuserdbsection as follows:userdb { driver = passwd override_fields = uid=vmail gid=vmail home=/var/mail/%n/ }Due to the fixed values, Dovecot does not query these settings from the
/etc/passwdfile. As a result, the home directory defined in/etc/passwddoes not need to exist.
Next step
Additional resources
-
/usr/share/doc/dovecot/wiki/PasswordDatabase.PAM.txt -
/usr/share/doc/dovecot/wiki/VirtualUsers.Home.txt
9.1.5. Completing the Dovecot configuration
Once you have installed and configured Dovecot, open the required ports in the firewalld service, and enable and start the service. Afterwards, you can test the server.
Prerequisites
The following has been configured in Dovecot:
- TLS encryption
- An authentication backend
- Clients trust the Certificate Authority (CA) certificate.
Procedure
If you want to provide only an IMAP or POP3 service to users, uncomment the
protocolsparameter in the/etc/dovecot/dovecot.conffile, and set it to the required protocols. For example, if you do not require POP3, set:protocols = imap lmtpBy default, the
imap,pop3, andlmtpprotocols are enabled.Open the ports in the local firewall. For example, to open the ports for the IMAPS, IMAP, POP3S, and POP3 protocols, enter:
# firewall-cmd --permanent --add-service=imaps --add-service=imap --add-service=pop3s --add-service=pop3 # firewall-cmd --reload
Enable and start the
dovecotservice:# systemctl enable --now dovecot
Verification
Use a mail client, such as Mozilla Thunderbird, to connect to Dovecot and read emails. The settings for the mail client depend on the protocol you want to use:
Table 9.1. Connection settings to the Dovecot server
Note that this table does not list settings for unencrypted connections because, by default, Dovecot does not accept plain text authentication on connections without TLS.
Display configuration settings with non-default values:
# doveconf -n
Additional resources
-
firewall-cmd(1)man page
9.2. Setting up a Dovecot server with LDAP authentication
If your infrastructure uses an LDAP server to store accounts, you can authenticate Dovecot users against it. In this case, you manage accounts centrally in the directory and, users do not required local access to the file system on the Dovecot server.
Centrally-managed accounts are also a benefit if you plan to set up multiple Dovecot servers with replication to make your mailboxes high available.
9.2.1. Installing Dovecot
The dovecot package provides:
-
The
dovecotservice and the utilities to maintain it - Services that Dovecot starts on demand, such as for authentication
- Plugins, such as server-side mail filtering
-
Configuration files in the
/etc/dovecot/directory -
Documentation in the
/usr/share/doc/dovecot/directory
Procedure
Install the
dovecotpackage:# yum install dovecotNoteIf Dovecot is already installed and you require clean configuration files, rename or remove the
/etc/dovecot/directory. Afterwards, reinstall the package. Without removing the configuration files, theyum reinstall dovecotcommand does not reset the configuration files in/etc/dovecot/.
9.2.2. Configuring TLS encryption on a Dovecot server
Dovecot provides a secure default configuration. For example, TLS is enabled by default to transmit credentials and data encrypted over networks. To configure TLS on a Dovecot server, you only need to set the paths to the certificate and private key files. Additionally, you can increase the security of TLS connections by generating and using Diffie-Hellman parameters to provide perfect forward secrecy (PFS).
Prerequisites
- Dovecot is installed.
The following files have been copied to the listed locations on the server:
-
The server certificate:
/etc/pki/dovecot/certs/server.example.com.crt -
The private key:
/etc/pki/dovecot/private/server.example.com.key -
The Certificate Authority (CA) certificate:
/etc/pki/dovecot/certs/ca.crt
-
The server certificate:
-
The hostname in the
Subject DNfield of the server certificate matches the server’s Fully-qualified Domain Name (FQDN).
Procedure
Set secure permissions on the private key file:
# chown root:root /etc/pki/dovecot/private/server.example.com.key # chmod 600 /etc/pki/dovecot/private/server.example.com.key
Generate a file with Diffie-Hellman parameters:
# openssl dhparam -out /etc/dovecot/dh.pem 4096Depending on the hardware and entropy on the server, generating Diffie-Hellman parameters with 4096 bits can take several minutes.
Set the paths to the certificate and private key files in the
/etc/dovecot/conf.d/10-ssl.conffile:Update the
ssl_certandssl_keyparameters, and set them to use the paths of the server’s certificate and private key:ssl_cert = </etc/pki/dovecot/certs/server.example.com.crt ssl_key = </etc/pki/dovecot/private/server.example.com.key
Uncomment the
ssl_caparameter, and set it to use the path to the CA certificate:ssl_ca = </etc/pki/dovecot/certs/ca.crtUncomment the
ssl_dhparameter, and set it to use the path to the Diffie-Hellman parameters file:ssl_dh = </etc/dovecot/dh.pem
ImportantTo ensure that Dovecot reads the value of a parameter from a file, the path must start with a leading
<character.
Next step
Additional resources
-
/usr/share/doc/dovecot/wiki/SSL.DovecotConfiguration.txt
9.2.3. Preparing Dovecot to use virtual users
By default, Dovecot performs many actions on the file system as the user who uses the service. However, configuring the Dovecot back end to use one local user to perform these actions has several benefits:
- Dovecot performs file system actions as a specific local user instead of using the user’s ID (UID).
- Users do not need to be available locally on the server.
- You can store all mailboxes and user-specific files in one root directory.
- Users do not require a UID and group ID (GID), which reduces administration efforts.
- Users who have access to the file system on the server cannot compromise their mailboxes or indexes because they cannot access these files.
- Setting up replication is easier.
Prerequisites
- Dovecot is installed.
Procedure
Create the
vmailuser:# useradd --home-dir /var/mail/ --shell /usr/sbin/nologin vmailDovecot will later use this user to manage the mailboxes. For security reasons, do not use the
dovecotordovenullsystem users for this purpose.If you use a different path than
/var/mail/, set themail_spool_tSELinux context on it, for example:# semanage fcontext -a -t mail_spool_t "<path>(/.*)?" # restorecon -Rv <path>
Grant write permissions on
/var/mail/only to thevmailuser:# chown vmail:vmail /var/mail/ # chmod 700 /var/mail/
Uncomment the
mail_locationparameter in the/etc/dovecot/conf.d/10-mail.conffile, and set it to the mailbox format and location:mail_location = sdbox:/var/mail/%n/With this setting:
-
Dovecot uses the high-performant
dboxmailbox format insinglemode. In this mode, the service stores each mail in a separate file, similar to themaildirformat. -
Dovecot resolves the
%nvariable in the path to the username. This is required to ensure that each user has a separate directory for its mailbox.
-
Dovecot uses the high-performant
Additional resources
-
/usr/share/doc/dovecot/wiki/VirtualUsers.txt -
/usr/share/doc/dovecot/wiki/MailLocation.txt -
/usr/share/doc/dovecot/wiki/MailboxFormat.dbox.txt -
/usr/share/doc/dovecot/wiki/Variables.txt
9.2.4. Using LDAP as the Dovecot authentication backend
Users in an LDAP directory can usually authenticate themselves to the directory service. Dovecot can use this to authenticate users when they log in to the IMAP and POP3 services. This authentication method has a number of benefits, such as:
- Administrators can manage users centrally in the directory.
- The LDAP accounts do not require any special attributes. They only need to be able to authenticate to the LDAP server. Consequently, this method is independent from the password storage scheme used on the LDAP server.
- Users do not need to be available locally on the server through the Name Service Switch (NSS) interface and the Pluggable Authentication Modules (PAM) framework.
Prerequisites
- Dovecot is installed.
- The virtual users feature is configured.
- Connections to the LDAP server support TLS encryption.
- RHEL on the Dovecot server trusts the Certificate Authority (CA) certificate of the LDAP server.
- If users are stored in different trees in the LDAP directory, a dedicated LDAP account for Dovecot exists to search the directory. This account requires permissions to search for Distinguished Names (DNs) of other users.
Procedure
Configure the authentication backends in the
/etc/dovecot/conf.d/10-auth.conffile:Comment out
includestatements forauth-*.conf.extauthentication backend configuration files that you do not require, for example:#!include auth-system.conf.extEnable LDAP authentication by uncommenting the following line:
!include auth-ldap.conf.ext
Edit the
/etc/dovecot/conf.d/auth-ldap.conf.extfile, and add theoverride_fieldsparameter as follows to theuserdbsection:userdb { driver = ldap args = /etc/dovecot/dovecot-ldap.conf.ext override_fields = uid=vmail gid=vmail home=/var/mail/%n/ }Due to the fixed values, Dovecot does not query these settings from the LDAP server. Consequently, these attributes also do not have to be present.
Create the
/etc/dovecot/dovecot-ldap.conf.extfile with the following settings:Depending on the LDAP structure, configure one of the following:
If users are stored in different trees in the LDAP directory, configure dynamic DN lookups:
dn = cn=dovecot_LDAP,dc=example,dc=com dnpass = password pass_filter = (&(objectClass=posixAccount)(uid=%n))
Dovecot uses the specified DN, password, and filter to search the DN of the authenticating user in the directory. In this search, Dovecot replaces
%nin the filter with the username. Note that the LDAP search must return only one result.If all users are stored under a specific entry, configure a DN template:
auth_bind_userdn = cn=%n,ou=People,dc=example,dc=com
Enable authentication binds to the LDAP server to verify Dovecot users:
auth_bind = yesSet the URL to the LDAP server:
uris = ldaps://LDAP-srv.example.comFor security reasons, only use encrypted connections using LDAPS or the
STARTTLScommand over the LDAP protocol. For the latter, additionally addtls = yesto the settings.For a working certificate validation, the hostname of the LDAP server must match the hostname used in its TLS certificate.
Enable the verification of the LDAP server’s TLS certificate:
tls_require_cert = hardSet the base DN to the DN where to start searching for users:
base = ou=People,dc=example,dc=comSet the search scope:
scope = onelevelDovecot searches with the
onelevelscope only in the specified base DN and with thesubtreescope also in subtrees.
Set secure permissions on the
/etc/dovecot/dovecot-ldap.conf.extfile:# chown root:root /etc/dovecot/dovecot-ldap.conf.ext # chmod 600 /etc/dovecot/dovecot-ldap.conf.ext
Next step
Additional resources
-
/usr/share/doc/dovecot/example-config/dovecot-ldap.conf.ext -
/usr/share/doc/dovecot/wiki/UserDatabase.Static.txt -
/usr/share/doc/dovecot/wiki/AuthDatabase.LDAP.txt -
/usr/share/doc/dovecot/wiki/AuthDatabase.LDAP.AuthBinds.txt -
/usr/share/doc/dovecot/wiki/AuthDatabase.LDAP.PasswordLookups.txt
9.2.5. Completing the Dovecot configuration
Once you have installed and configured Dovecot, open the required ports in the firewalld service, and enable and start the service. Afterwards, you can test the server.
Prerequisites
The following has been configured in Dovecot:
- TLS encryption
- An authentication backend
- Clients trust the Certificate Authority (CA) certificate.
Procedure
If you want to provide only an IMAP or POP3 service to users, uncomment the
protocolsparameter in the/etc/dovecot/dovecot.conffile, and set it to the required protocols. For example, if you do not require POP3, set:protocols = imap lmtpBy default, the
imap,pop3, andlmtpprotocols are enabled.Open the ports in the local firewall. For example, to open the ports for the IMAPS, IMAP, POP3S, and POP3 protocols, enter:
# firewall-cmd --permanent --add-service=imaps --add-service=imap --add-service=pop3s --add-service=pop3 # firewall-cmd --reload
Enable and start the
dovecotservice:# systemctl enable --now dovecot
Verification
Use a mail client, such as Mozilla Thunderbird, to connect to Dovecot and read emails. The settings for the mail client depend on the protocol you want to use:
Table 9.2. Connection settings to the Dovecot server
Note that this table does not list settings for unencrypted connections because, by default, Dovecot does not accept plain text authentication on connections without TLS.
Display configuration settings with non-default values:
# doveconf -n
Additional resources
-
firewall-cmd(1)man page
9.3. Setting up a Dovecot server with MariaDB SQL authentication
If you store users and passwords in a MariaDB SQL server, you can configure Dovecot to use it as the user database and authentication backend. With this configuration, you manage accounts centrally in a database, and users have no local access to the file system on the Dovecot server.
Centrally managed accounts are also a benefit if you plan to set up multiple Dovecot servers with replication to make your mailboxes highly available.
9.3.1. Installing Dovecot
The dovecot package provides:
-
The
dovecotservice and the utilities to maintain it - Services that Dovecot starts on demand, such as for authentication
- Plugins, such as server-side mail filtering
-
Configuration files in the
/etc/dovecot/directory -
Documentation in the
/usr/share/doc/dovecot/directory
Procedure
Install the
dovecotpackage:# yum install dovecotNoteIf Dovecot is already installed and you require clean configuration files, rename or remove the
/etc/dovecot/directory. Afterwards, reinstall the package. Without removing the configuration files, theyum reinstall dovecotcommand does not reset the configuration files in/etc/dovecot/.
9.3.2. Configuring TLS encryption on a Dovecot server
Dovecot provides a secure default configuration. For example, TLS is enabled by default to transmit credentials and data encrypted over networks. To configure TLS on a Dovecot server, you only need to set the paths to the certificate and private key files. Additionally, you can increase the security of TLS connections by generating and using Diffie-Hellman parameters to provide perfect forward secrecy (PFS).
Prerequisites
- Dovecot is installed.
The following files have been copied to the listed locations on the server:
-
The server certificate:
/etc/pki/dovecot/certs/server.example.com.crt -
The private key:
/etc/pki/dovecot/private/server.example.com.key -
The Certificate Authority (CA) certificate:
/etc/pki/dovecot/certs/ca.crt
-
The server certificate:
-
The hostname in the
Subject DNfield of the server certificate matches the server’s Fully-qualified Domain Name (FQDN).
Procedure
Set secure permissions on the private key file:
# chown root:root /etc/pki/dovecot/private/server.example.com.key # chmod 600 /etc/pki/dovecot/private/server.example.com.key
Generate a file with Diffie-Hellman parameters:
# openssl dhparam -out /etc/dovecot/dh.pem 4096Depending on the hardware and entropy on the server, generating Diffie-Hellman parameters with 4096 bits can take several minutes.
Set the paths to the certificate and private key files in the
/etc/dovecot/conf.d/10-ssl.conffile:Update the
ssl_certandssl_keyparameters, and set them to use the paths of the server’s certificate and private key:ssl_cert = </etc/pki/dovecot/certs/server.example.com.crt ssl_key = </etc/pki/dovecot/private/server.example.com.key
Uncomment the
ssl_caparameter, and set it to use the path to the CA certificate:ssl_ca = </etc/pki/dovecot/certs/ca.crtUncomment the
ssl_dhparameter, and set it to use the path to the Diffie-Hellman parameters file:ssl_dh = </etc/dovecot/dh.pem
ImportantTo ensure that Dovecot reads the value of a parameter from a file, the path must start with a leading
<character.
Next step
Additional resources
-
/usr/share/doc/dovecot/wiki/SSL.DovecotConfiguration.txt
9.3.3. Preparing Dovecot to use virtual users
By default, Dovecot performs many actions on the file system as the user who uses the service. However, configuring the Dovecot back end to use one local user to perform these actions has several benefits:
- Dovecot performs file system actions as a specific local user instead of using the user’s ID (UID).
- Users do not need to be available locally on the server.
- You can store all mailboxes and user-specific files in one root directory.
- Users do not require a UID and group ID (GID), which reduces administration efforts.
- Users who have access to the file system on the server cannot compromise their mailboxes or indexes because they cannot access these files.
- Setting up replication is easier.
Prerequisites
- Dovecot is installed.
Procedure
Create the
vmailuser:# useradd --home-dir /var/mail/ --shell /usr/sbin/nologin vmailDovecot will later use this user to manage the mailboxes. For security reasons, do not use the
dovecotordovenullsystem users for this purpose.If you use a different path than
/var/mail/, set themail_spool_tSELinux context on it, for example:# semanage fcontext -a -t mail_spool_t "<path>(/.*)?" # restorecon -Rv <path>
Grant write permissions on
/var/mail/only to thevmailuser:# chown vmail:vmail /var/mail/ # chmod 700 /var/mail/
Uncomment the
mail_locationparameter in the/etc/dovecot/conf.d/10-mail.conffile, and set it to the mailbox format and location:mail_location = sdbox:/var/mail/%n/With this setting:
-
Dovecot uses the high-performant
dboxmailbox format insinglemode. In this mode, the service stores each mail in a separate file, similar to themaildirformat. -
Dovecot resolves the
%nvariable in the path to the username. This is required to ensure that each user has a separate directory for its mailbox.
-
Dovecot uses the high-performant
Additional resources
-
/usr/share/doc/dovecot/wiki/VirtualUsers.txt -
/usr/share/doc/dovecot/wiki/MailLocation.txt -
/usr/share/doc/dovecot/wiki/MailboxFormat.dbox.txt -
/usr/share/doc/dovecot/wiki/Variables.txt
9.3.4. Using a MariaDB SQL database as the Dovecot authentication backend
Dovecot can read accounts and passwords from a MariaDB database and use it to authenticate users when they log in to the IMAP or POP3 service. The benefits of this authentication method include:
- Administrators can manage users centrally in a database.
- Users have no access locally on the server.
Prerequisites
- Dovecot is installed.
- The virtual users feature is configured.
- Connections to the MariaDB server support TLS encryption.
-
The
dovecotDBdatabase exists in MariaDB, and theuserstable contains at least ausernameandpasswordcolumn. -
The
passwordcolumn contains passwords encrypted with a scheme that Dovecot supports. -
The passwords either use the same scheme or have a
{pw-storage-scheme}prefix. -
The
dovecotMariaDB user has read permission on theuserstable in thedovecotDBdatabase. -
The certificate of the Certificate Authority (CA) that issued the MariaDB server’s TLS certificate is stored on the Dovecot server in the
/etc/pki/tls/certs/ca.crtfile.
Procedure
Install the
dovecot-mysqlpackage:# yum install dovecot-mysqlConfigure the authentication backends in the
/etc/dovecot/conf.d/10-auth.conffile:Comment out
includestatements forauth-*.conf.extauthentication backend configuration files that you do not require, for example:#!include auth-system.conf.extEnable SQL authentication by uncommenting the following line:
!include auth-sql.conf.ext
Edit the
/etc/dovecot/conf.d/auth-sql.conf.extfile, and add theoverride_fieldsparameter to theuserdbsection as follows:userdb { driver = sql args = /etc/dovecot/dovecot-sql.conf.ext override_fields = uid=vmail gid=vmail home=/var/mail/%n/ }Due to the fixed values, Dovecot does not query these settings from the SQL server.
Create the
/etc/dovecot/dovecot-sql.conf.extfile with the following settings:driver = mysql connect = host=mariadb_srv.example.com dbname=dovecotDB user=dovecot password=dovecotPW ssl_ca=/etc/pki/tls/certs/ca.crt default_pass_scheme = SHA512-CRYPT user_query = SELECT username FROM users WHERE username='%u'; password_query = SELECT username AS user, password FROM users WHERE username='%u'; iterate_query = SELECT username FROM users;
To use TLS encryption to the database server, set the
ssl_caoption to the path of the certificate of the CA that issued the MariaDB server certificate. For a working certificate validation, the hostname of the MariaDB server must match the hostname used in its TLS certificate.If the password values in the database contain a
{pw-storage-scheme}prefix, you can omit thedefault_pass_schemesetting.The queries in the file must be set as follows:
-
For the
user_queryparameter, the query must return the username of the Dovecot user. The query must also return only one result. -
For the
password_queryparameter, the query must return the username and the password, and Dovecot must use these values in theuserandpasswordvariables. Therefore, if the database uses different column names, use theASSQL command to rename a column in the result. -
For the
iterate_queryparameter, the query must return a list of all users.
-
For the
Set secure permissions on the
/etc/dovecot/dovecot-sql.conf.extfile:# chown root:root /etc/dovecot/dovecot-sql.conf.ext # chmod 600 /etc/dovecot/dovecot-sql.conf.ext
Next step
Additional resources
-
/usr/share/doc/dovecot/example-config/dovecot-sql.conf.ext -
/usr/share/doc/dovecot/wiki/Authentication.PasswordSchemes.txt
9.3.5. Completing the Dovecot configuration
Once you have installed and configured Dovecot, open the required ports in the firewalld service, and enable and start the service. Afterwards, you can test the server.
Prerequisites
The following has been configured in Dovecot:
- TLS encryption
- An authentication backend
- Clients trust the Certificate Authority (CA) certificate.
Procedure
If you want to provide only an IMAP or POP3 service to users, uncomment the
protocolsparameter in the/etc/dovecot/dovecot.conffile, and set it to the required protocols. For example, if you do not require POP3, set:protocols = imap lmtpBy default, the
imap,pop3, andlmtpprotocols are enabled.Open the ports in the local firewall. For example, to open the ports for the IMAPS, IMAP, POP3S, and POP3 protocols, enter:
# firewall-cmd --permanent --add-service=imaps --add-service=imap --add-service=pop3s --add-service=pop3 # firewall-cmd --reload
Enable and start the
dovecotservice:# systemctl enable --now dovecot
Verification
Use a mail client, such as Mozilla Thunderbird, to connect to Dovecot and read emails. The settings for the mail client depend on the protocol you want to use:
Table 9.3. Connection settings to the Dovecot server
Note that this table does not list settings for unencrypted connections because, by default, Dovecot does not accept plain text authentication on connections without TLS.
Display configuration settings with non-default values:
# doveconf -n
Additional resources
-
firewall-cmd(1)man page
9.4. Configuring replication between two Dovecot servers
With two-way replication, you can make your Dovecot server high-available, and IMAP and POP3 clients can access a mailbox on both servers. Dovecot keeps track of changes in the index logs of each mailbox and solves conflicts in a safe way.
Perform this procedure on both replication partners.
Replication works only between server pairs. Consequently, in a large cluster, you need multiple independent backend pairs.
Prerequisites
- Both servers use the same authentication backend. Preferably, use LDAP or SQL to maintain accounts centrally.
-
The Dovecot user database configuration supports user listing. Use the
doveadm user '*'command to verify this. -
Dovecot accesses mailboxes on the file system as the
vmailuser instead of the user’s ID (UID).
Procedure
Create the
/etc/dovecot/conf.d/10-replication.conffile and perform the following steps in it:Enable the
notifyandreplicationplug-ins:mail_plugins = $mail_plugins notify replicationAdd a
service replicatorsection:service replicator { process_min_avail = 1 unix_listener replicator-doveadm { mode = 0600 user = vmail } }
With these settings, Dovecot starts at least one replicator process when the
dovecotservice starts. Additionally, this section defines the settings on thereplicator-doveadmsocket.Add a
service aggregatorsection to configure thereplication-notify-fifopipe andreplication-notifysocket:service aggregator { fifo_listener replication-notify-fifo { user = vmail } unix_listener replication-notify { user = vmail } }
Add a
service doveadmsection to define the port of the replication service:service doveadm { inet_listener { port = 12345 } }
Set the password of the
doveadmreplication service:doveadm_password = replication_passwordThe password must be the same on both servers.
Configure the replication partner:
plugin { mail_replica = tcp:server2.example.com:12345 }
Optional: Define the maximum number of parallel
dsyncprocesses:replication_max_conns = 20The default value of
replication_max_connsis10.
Set secure permissions on the
/etc/dovecot/conf.d/10-replication.conffile:# chown root:root /etc/dovecot/conf.d/10-replication.conf # chmod 600 /etc/dovecot/conf.d/10-replication.conf
Enable the
nis_enabledSELinux Boolean to allow Dovecot to open thedoveadmreplication port:setsebool -P nis_enabled onConfigure
firewalldrules to allow only the replication partner to access the replication port, for example:# firewall-cmd --permanent --zone=public --add-rich-rule="rule family="ipv4" source address="192.0.2.1/32" port protocol="tcp" port="12345" accept" # firewall-cmd --permanent --zone=public --add-rich-rule="rule family="ipv6" source address="2001:db8:2::1/128" port protocol="tcp" port="12345" accept" # firewall-cmd --reload
The subnet masks
/32for the IPv4 and/128for the IPv6 address limit the access to the specified addresses.- Perform this procedure also on the other replication partner.
Reload Dovecot:
# systemctl reload dovecot
Verification
- Perform an action in a mailbox on one server and then verify if Dovecot has replicated the change to the other server.
Display the replicator status:
# doveadm replicator status Queued 'sync' requests 0 Queued 'high' requests 0 Queued 'low' requests 0 Queued 'failed' requests 0 Queued 'full resync' requests 30 Waiting 'failed' requests 0 Total number of known users 75Display the replicator status of a specific user:
# doveadm replicator status example_user username priority fast sync full sync success sync failed example_user none 02:05:28 04:19:07 02:05:28 -
Additional resources
-
dsync(1)man page -
/usr/share/doc/dovecot/wiki/Replication.txt
9.5. Automatically subscribing users to IMAP mailboxes
Typically, IMAP server administrators want Dovecot to automatically create certain mailboxes, such as Sent and Trash, and subscribe the users to them. You can set this in the configuration files.
Additionally, you can define special-use mailboxes. IMAP clients often support defining mailboxes for special purposes, such as for sent emails. To avoid that the user has to manually select and set the correct mailboxes, IMAP servers can send a special-use attribute in the IMAP LIST command. Clients can then use this attribute to identify and set, for example, the mailbox for sent emails.
Prerequisites
- Dovecot is configured.
Procedure
Update the
inboxnamespace section in the/etc/dovecot/conf.d/15-mailboxes.conffile:Add the
auto = subscribesetting to each special-use mailbox that should be available to users, for example:namespace inbox { ... mailbox Drafts { special_use = \Drafts auto = subscribe } mailbox Junk { special_use = \Junk auto = subscribe } mailbox Trash { special_use = \Trash auto = subscribe } mailbox Sent { special_use = \Sent auto = subscribe } ... }If your mail clients support more special-use mailboxes, you can add similar entries. The
special_useparameter defines the value that Dovecot sends in thespecial-useattribute to the clients.Optional: If you want to define other mailboxes that have no special purpose, add
mailboxsections for them in the user’s inbox, for example:namespace inbox { ... mailbox "Important Emails" { auto = <value> } ... }You can set the
autoparameter to one of the following values:-
subscribe: Automatically creates the mailbox and subscribes the user to it. -
create: Automatically creates the mailbox without subscribing the user to it. -
no(default): Dovecot neither creates the mailbox nor does it subscribe the user to it.
-
Reload Dovecot:
# systemctl reload dovecot
Verification
Use an IMAP client and access your mailbox.
Mailboxes with the setting
auto = subscribeare automatically visible. If the client supports special-use mailboxes and the defined purposes, the client automatically uses them.
Additional resources
- RFC 6154: IMAP LIST Extension for Special-Use Mailboxes
-
/usr/share/doc/dovecot/wiki/MailboxSettings.txt
9.6. Configuring an LMTP socket and LMTPS listener
SMTP servers, such as Postfix, use the Local Mail Transfer Protocol (LMTP) to deliver emails to Dovecot. If the SMTP server runs:
- On the same host as Dovecot, use an LMTP socket
On a different host, use an LMTP service
By default, the LMTP protocol is not encrypted. However, if you configured TLS encryption, Dovecot uses the same settings automatically for the LMTP service. SMTP servers can then connect to it using the LMTPS protocol or the
STARTTLScommand over LMTP.
Prerequisites
- Dovecot is installed.
- If you want to configure an LMTP service, TLS encryption is configured in Dovecot.
Procedure
Verify that the LMTP protocol is enabled:
# doveconf -a | egrep "^protocols" protocols = imap pop3 lmtpThe protocol is enabled, if the output contains
lmtp.If the
lmtpprotocol is disabled, edit the/etc/dovecot/dovecot.conffile, and appendlmtpto the values in theprotocolsparameter:protocols = ... lmtpDepending on whether you need an LMTP socket or service, make the following changes in the
service lmtpsection in the/etc/dovecot/conf.d/10-master.conffile:LMTP socket: By default, Dovecot automatically creates the
/var/run/dovecot/lmtpsocket.Optional: Customize the ownership and permissions:
service lmtp { ... unix_listener lmtp { mode = 0600 user = postfix group = postfix } ... }LMTP service: Add a
inet_listenersub-section:service lmtp { ... inet_listener lmtp { port = 24 } ... }
Configure
firewalldrules to allow only the SMTP server to access the LMTP port, for example:# firewall-cmd --permanent --zone=public --add-rich-rule="rule family="ipv4" source address="192.0.2.1/32" port protocol="tcp" port="24" accept" # firewall-cmd --permanent --zone=public --add-rich-rule="rule family="ipv6" source address="2001:db8:2::1/128" port protocol="tcp" port="24" accept" # firewall-cmd --reload
The subnet masks
/32for the IPv4 and/128for the IPv6 address limit the access to the specified addresses.Reload Dovecot:
# systemctl reload dovecot
Verification
If you configured the LMTP socket, verify that Dovecot has created the socket and that the permissions are correct:
# ls -l /var/run/dovecot/lmtp srw-------. 1 postfix postfix 0 Nov 22 17:17 /var/run/dovecot/lmtp
Configure the SMTP server to submit emails to Dovecot using the LMTP socket or service.
When you use the LMTP service, ensure that the SMTP server uses the LMTPS protocol or sends the
STARTTLScommand to use an encrypted connection.
Additional resources
-
/usr/share/doc/dovecot/wiki/LMTP.txt
9.7. Disabling the IMAP or POP3 service in Dovecot
By default, Dovecot provides IMAP and POP3 services. If you require only one of them, you can disable the other to reduce the surface for attack.
Prerequisites
- Dovecot is installed.
Procedure
Uncomment the
protocolsparameter in the/etc/dovecot/dovecot.conffile, and set it to use the required protocols. For example, if you do not require POP3, set:protocols = imap lmtpBy default, the
imap,pop3, andlmtpprotocols are enabled.Reload Dovecot:
# systemctl reload dovecotClose the ports that are no longer required in the local firewall. For example, to close the ports for the POP3S and POP3 protocols, enter:
# firewall-cmd --remove-service=pop3s --remove-service=pop3 # firewall-cmd --reload
Verification
Display all ports in
LISTENmode opened by thedovecotprocess:# ss -tulp | grep dovecot tcp LISTEN 0 100 0.0.0.0:993 0.0.0.0:* users:(("dovecot",pid=1405,fd=44)) tcp LISTEN 0 100 0.0.0.0:143 0.0.0.0:* users:(("dovecot",pid=1405,fd=42)) tcp LISTEN 0 100 [::]:993 [::]:* users:(("dovecot",pid=1405,fd=45)) tcp LISTEN 0 100 [::]:143 [::]:* users:(("dovecot",pid=1405,fd=43))
In this example, Dovecot listens only on the TCP ports
993(IMAPS) and143(IMAP).Note that Dovecot only opens a port for the LMTP protocol if you configure the service to listen on a port instead of using a socket.
Additional resources
-
firewall-cmd(1)man page
9.8. Enabling server-side email filtering using Sieve on a Dovecot IMAP server
You can upload Sieve scripts to a server using the ManageSieve protocol. Sieve scripts define rules and actions that a server should validate and perform on incoming emails. For example, users can use Sieve to forward emails from a specific sender, and administrators can create a global filter to move mails flagged by a spam filter into a separate IMAP folder.
The ManageSieve plugin adds support for Sieve scripts and the ManageSieve protocol to a Dovecot IMAP server.
Use only clients that support using the ManageSieve protocol over TLS connections. Disabling TLS for this protocol causes clients to send credentials in plain text over the network.
Prerequisites
- Dovecot is configured and provides IMAP mailboxes.
- TLS encryption is configured in Dovecot.
- The mail clients support the ManageSieve protocol over TLS connections.
Procedure
Install the
dovecot-pigeonholepackage:# yum install dovecot-pigeonholeUncomment the following line in
/etc/dovecot/conf.d/20-managesieve.confto enable thesieveprotocol:protocols = $protocols sieveThis setting activates Sieve in addition to the other protocols that are already enabled.
Open the ManageSieve port in
firewalld:# firewall-cmd --permanent --add-service=managesieve # firewall-cmd --reload
Reload Dovecot:
# systemctl reload dovecot
Verification
Use a client and upload a Sieve script. Use the following connection settings:
- Port: 4190
- Connection security: SSL/TLS
- Authentication method: PLAIN
- Send an email to the user who has the Sieve script uploaded. If the email matches the rules in the script, verify that the server performs the defined actions.
Additional resources
-
/usr/share/doc/dovecot/wiki/Pigeonhole.Sieve.Plugins.IMAPSieve.txt -
/usr/share/doc/dovecot/wiki/Pigeonhole.Sieve.Troubleshooting.txt -
firewall-cmd(1)man page
9.9. How Dovecot processes configuration files
The dovecot package provides the main configuration file /etc/dovecot/dovecot.conf and multiple configuration files in the /etc/dovecot/conf.d/ directory. Dovecot combines the files to build the configuration when you start the service.
The main benefit of multiple config files is to group settings and increase readability. If you prefer a single configuration file, you can instead maintain all settings in /etc/dovecot/dovecot.conf and remove all include and include_try statements from that file.
Additional resources
-
/usr/share/doc/dovecot/wiki/ConfigFile.txt -
/usr/share/doc/dovecot/wiki/Variables.txt
Chapter 10. Configuring printing
The Common UNIX Printing System (CUPS) manages printing on Red Hat Enterprise Linux. Users configure printers in CUPS on their host to print. Additionally, you can share printers in CUPS to use the host as a print server.
CUPS supports printing to:
- AirPrint™ and IPP Everywhere™ printers
- Network and local USB printers with legacy PostScript Printer Description (PPD)-based drivers
10.1. Installing and configuring CUPS
You can use CUPS to print from a local host. You can also use this host to share printers in the network and act as a print server.
Procedure
Install the
cupspackage:# yum install cupsIf you configure a CUPS as a print server, edit the
/etc/cups/cupsd.conffile, and make the following changes:If you want to remotely configure CUPS or use this host as a print server, configure on which IP addresses and ports the service listens:
Listen 192.0.2.1:631 Listen [2001:db8:1::1]:631
By default, CUPS listens only on
localhostinterfaces (127.0.0.1and::1). Specify IPv6 addresses in square brackets.ImportantDo not configure CUPS to listen on interfaces that allow access from untrustworthy networks, such as the internet.
Configure which IP ranges can access the service by allowing the respective IP ranges in the
<Location />directive:<Location /> Allow from 192.0.2.0/24 Allow from [2001:db8:1::1]/32 Order allow,deny </Location>
In the
<Location /admin>directive, configure which IP addresses and ranges can access the CUPS administration services:<Location /admin> Allow from 192.0.2.15/32 Allow from [2001:db8:1::22]/128 Order allow,deny </Location>
With these settings, only the hosts with the IP addresses
192.0.2.15and2001:db8:1::22can access the administration services.Optional: Configure IP addresses and ranges that are allowed to access the configuration and log files in the web interface:
<Location /admin/conf> Allow from 192.0.2.15/32 Allow from [2001:db8:1::22]/128 ... </Location> <Location /admin/log> Allow from 192.0.2.15/32 Allow from [2001:db8:1::22]/128 ... </Location>
If you run the
firewalldservice and want to configure remote access to CUPS, open the CUPS port infirewalld:# firewall-cmd --permanent --add-port=631/tcp # firewall-cmd --reload
If you run CUPS on a host with multiple interfaces, consider limiting the access to the required networks.
Enable and start the
cupsservice:# systemctl enable --now cups
Verification
Use a browser, and access
http://<hostname>:631. If you can connect to the web interface, CUPS works.Note that certain features, such as the
Administrationtab, require authentication and an HTTPS connection. By default, CUPS uses a self-signed certificate for HTTPS access and, consequently, the connection is not secure when you authenticate.
10.2. Configuring TLS encryption on a CUPS server
CUPS supports TLS-encrypted connections and, by default, the service enforces encrypted connections for all requests that require authentication. If no certificates are configured, CUPS creates a private key and a self-signed certificate. This is only sufficient if you access CUPS from the local host itself. For a secure connection over the network, use a server certificate that is signed by a certificate authority (CA).
Without encryption or with a self-signed certificates, a man-in-the-middle (MITM) attack can disclose, for example:
- Credentials of administrators when configuring CUPS using the web interface
- Confidential data when sending print jobs over the network
Prerequisites
- CUPS is configured.
- You created a private key, and a CA issued a server certificate for it.
- If an intermediate certificate is required to validate the server certificate, attach the intermediate certificate to the server certificate.
- The private key is not protected by a password because CUPS provides no option to enter the password when the service reads the key.
The Canonical Name (
CN) or Subject Alternative Name (SAN) field in the certificate matches one of the following:- The fully-qualified domain name (FQDN) of the CUPS server
- An alias that the DNS resolves to the server’s IP address
- The private key and server certificate files use the Privacy Enhanced Mail (PEM) format.
- Clients trust the CA certificate.
Procedure
Edit the
/etc/cups/cups-files.conffile, and add the following setting to disable the automatic creation of self-signed certificates:CreateSelfSignedCerts noRemove the self-signed certificate and private key:
# rm /etc/cups/ssl/<hostname>.crt /etc/cups/ssl/<hostname>.keyOptional: Display the FQDN of the server:
# hostname -f server.example.comOptional: Display the
CNand SAN fields of the certificate:# openssl x509 -text -in /etc/cups/ssl/server.example.com.crt Certificate: Data: ... Subject: CN = server.example.com ... X509v3 extensions: ... X509v3 Subject Alternative Name: DNS:server.example.com ...If the
CNor SAN fields in the server certificate contains an alias that is different from the server’s FQDN, add theServerAliasparameter to the/etc/cups/cupsd.conffile:ServerAlias alternative_name.example.comIn this case, use the alternative name instead of the FQDN in the rest of the procedure.
Store the private key and server certificate in the
/etc/cups/ssl/directory, for example:# mv /root/server.key /etc/cups/ssl/server.example.com.key # mv /root/server.crt /etc/cups/ssl/server.example.com.crt
ImportantCUPS requires that you name the private key
<fqdn>.keyand the server certificate file<fqdn>.crt. If you use an alias, you must name the files<alias>.keyand<alias>.crt.Set secure permissions on the private key that enable only the
rootuser to read this file:# chown root:root /etc/cups/ssl/server.example.com.key # chmod 600 /etc/cups/ssl/server.example.com.key
Because certificates are part of the communication between a client and the server before they establish a secure connection, any client can retrieve the certificates without authentication. Therefore, you do not need to set strict permissions on the server certificate file.
Restore the SELinux context:
# restorecon -Rv /etc/cups/ssl/By default, CUPS enforces encrypted connections only if a task requires authentication, for example when performing administrative tasks on the
/adminpage in the web interface.To enforce encryption for the entire CUPS server, add
Encryption Requiredto all<Location>directives in the/etc/cups/cupsd.conffile, for example:<Location /> ... Encryption Required </Location>Restart CUPS:
# systemctl restart cups
Verification
-
Use a browser, and access
https://<hostname>:631/admin/. If the connection succeeds, you configured TLS encryption in CUPS correctly. -
If you configured that encryption is required for the entire server, access
http://<hostname>:631/. CUPS returns anUpgrade Requirederror in this case.
Troubleshooting
Display the
systemdjournal entries of thecupsservice:# journalctl -u cupsIf the journal contains an
Unable to encrypt connection: Error while reading fileerror after you failed to connect to the web interface by using the HTTPS protocol, verify the name of the private key and server certificate file.
Additional resources
10.3. Granting administration permissions to manage a CUPS server in the web interface
By default, members of the sys, root, and wheel groups can perform administration tasks in the web interface. However, certain other services use these groups as well. For example, members of the wheel groups can, by default, execute commands with root permissions by using sudo. To avoid that CUPS administrators gain unexpected permissions in other services, use a dedicated group for CUPS administrators.
Prerequisites
- CUPS is configured.
- The IP address of the client you want to use has permissions to access the administration area in the web interface.
Procedure
Create a group for CUPS administrators:
# groupadd cups-adminsAdd the users who should manage the service in the web interface to the
cups-adminsgroup:# usermod -a -G cups-admins <username>Update the value of the
SystemGroupparameter in the/etc/cups/cups-files.conffile, and append thecups-admingroup:SystemGroup sys root wheel cups-adminsIf only the
cups-admingroup should have administrative access, remove the other group names from the parameter.Restart CUPS:
# systemctl restart cups
Verification
Use a browser, and access
https://<hostname_or_ip_address>:631/admin/.NoteYou can access the administration area in the web UI only if you use the HTTPS protocol.
-
Start performing an administrative task. For example, click
Add printer. The web interface prompts for a username and password. To proceed, authenticate by using credentials of a user who is a member of the
cups-adminsgroup.If authentication succeeds, this user can perform administrative tasks.
10.4. Overview of packages with printer drivers
Red Hat Enterprise Linux (RHEL) provides different packages with printer drivers for CUPS. The following is a general overview of these packages and for which vendors they contain drivers:
Table 10.1. Driver package list
| Package name | Drivers for printers |
|---|---|
|
| Zebra, Dymo |
|
| Kodak |
|
| Brother, Canon, Epson, Gestetner, HP, Infotec, Kyocera, Lanier, Lexmark, NRG, Ricoh, Samsung, Savin, Sharp, Toshiba, Xerox, and others |
|
| Brother, Canon, Epson, Fujitsu, HP, Infotec, Kyocera, Lanier, NRG, Oki, Minolta, Ricoh, Samsung, Savin, Xerox, and others |
|
| HP |
|
| HP |
|
| Samsung, Xerox, and others |
Note that some packages can contain drivers for the same printer vendor or model but with different functionality.
After installing the required package, you can display the list of drivers in the CUPS web interface or by using the lpinfo -m command.
10.5. Determining whether a printer supports driverless printing
CUPS supports driverless printing, which means that you can print without providing any hardware-specific software for the printer model. For this, the printer must inform the client about its capabilities and use one of the following standards:
- AirPrint™
- IPP Everywhere™
- Mopria®
- Wi-Fi Direct Print Services
You can use the ipptool utility to find out whether a printer supports driverless printing.
Prerequisites
- The printer or remote print server supports the Internet Printing Protocol (IPP).
- The host can connect to the IPP port of the printer or remote print server. The default IPP port is 631.
Procedure
Query the
ipp-versions-supportedanddocument-format-supportedattributes, and ensure thatget-printer-attributestest passes:For a remote printer, enter:
# ipptool -tv ipp://<ip_address_or_hostname>:631/ipp/print get-printer-attributes.test | grep -E "ipp-versions-supported|document-format-supported|get-printer-attributes" Get printer attributes using get-printer-attributes [PASS] ipp-versions-supported (1setOf keyword) = ... document-format-supported (1setOf mimeMediaType) = ...For a queue on a remote print server, enter:
# ipptool -tv ipp://<ip_address_or_hostname>:631/printers/<queue_name> get-printer-attributes.test | grep -E "ipp-versions-supported|document-format-supported|get-printer-attributes" Get printer attributes using get-printer-attributes [PASS] ipp-versions-supported (1setOf keyword) = ... document-format-supported (1setOf mimeMediaType) = ...
To ensure that driverless printing works, verify in the output:
-
The
get-printer-attributestest returnsPASS. - The IPP version that the printer supports is 2.0 or higher.
The list of formats contains one of the following:
-
application/pdf -
image/urf -
image/pwg-raster
-
-
For color printers, the output contains one of the mentioned formats and, additionally,
image/jpeg.
10.6. Adding a printer to CUPS by using the web interface
Before users can print through CUPS, you must add printers. You can use both network printers and printers that are directly attached to the CUPS host, for example over USB.
You can add printers by using the CUPS driverless feature or by using a PostScript Printer Description (PPD) file.
CUPS prefers driverless printing, and using drivers is deprecated.
Red Hat Enterprise Linux (RHEL) does not provide the name service switch multicast DNS plug-in (nss-mdns), which resolves requests by querying an mDNS responder. Consequently, automatic discovery and installation for local driverless printers by using mDNS is not available in RHEL. To work around this problem, install single printers manually or use cups-browsed to automatically install a high amount of print queues that are available on a remote print server.
Prerequisites
- CUPS is configured.
- You have permissions in CUPS to manage printers.
- If you use CUPS as a print server, you configured TLS encryption to securely transmit data over the network.
- The printer supports driverless printing, if you want to use this feature.
Procedure
Use a browser, and access
https://<hostname>:631/admin/.You must connect to the web interface by using the HTTPS protocol. Otherwise, CUPS prevents you from authenticating in a later step for security reasons.
- Click .
- If you are not already authenticated, CUPS prompts for credentials of an administrative user. Enter the username and password of an authorized user.
- If you decide to not use driverless printing and the printer you want to add is detected automatically, select it, and click .
If the printer was not detected:
Select the protocol that the printer supports.

If your printer supports driverless printing and you want to use this feature, select the
ipporippsprotocol.- Click .
Enter the URL to the printer or to the queue on a remote print server.
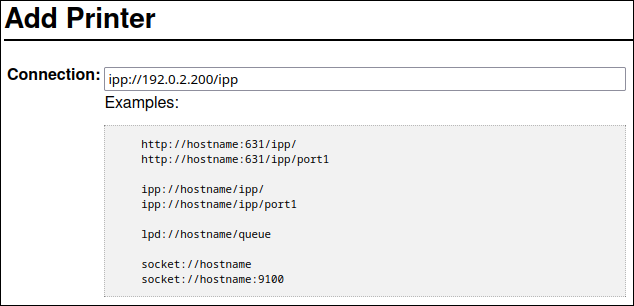
- Click .
Enter a name and, optionally, a description and location. If you use CUPS as a print server, and other clients should be able to print through CUPS on this printer, select also Share this printer.

Select the printer manufacturer in the Make list. If the printer manufacturer is not on the list, select Generic or upload a PPD file for the printer.
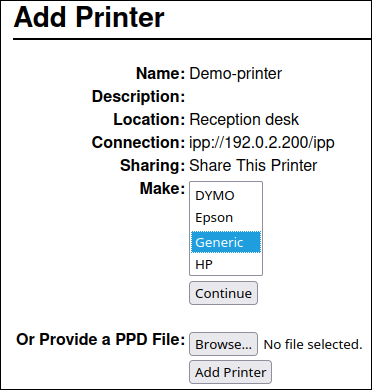
- Click .
Select the printer model:
- If the printer supports driverless printing, select IPP Everywhere. Note that, if you previously installed printer-specific drivers locally, it is possible that the list also contains entries such as <printer_name> - IPP Everywhere.
- If the printer does not support driverless printing, select the model or upload the PPD file for the printer.
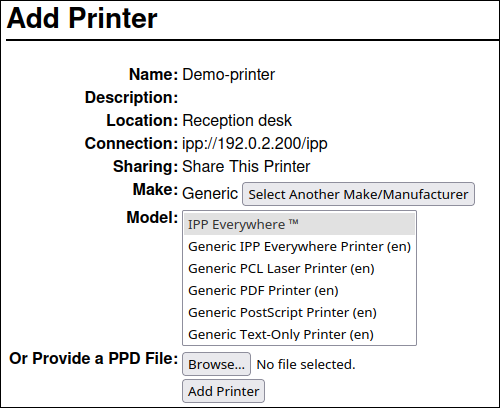
- Click
The settings and tabs on the Set printer options page depend on the driver and the features the printer supports. Use this page to set default options, such as for the paper size.
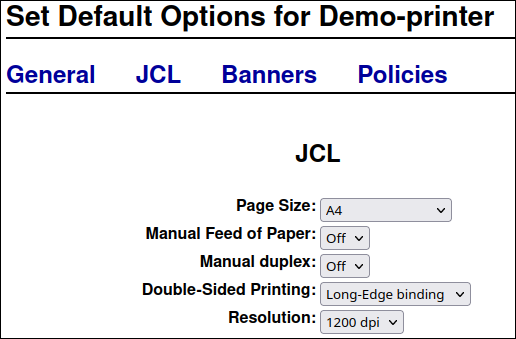
- Click .
Verification
- Open the Printers tab in the web interface.
- Click on the printer’s name.
In the Maintenance list, select Print test page.

Troubleshooting
-
If you use driverless printing, and printing does not work, use the
lpadminutility to add the printer on the command line. For details, see Adding a printer to CUPS by using the lpadmin utility.
10.7. Adding a printer to CUPS by using the lpadmin utility
Before users can print through CUPS, you must add printers. You can use both network printers and printers that are directly attached to the CUPS host, for example over USB.
You can add printers by using the CUPS driverless feature or by using a PostScript Printer Description (PPD) file.
CUPS prefers driverless printing, and using drivers is deprecated.
Red Hat Enterprise Linux (RHEL) does not provide the name service switch multicast DNS plug-in (nss-mdns), which resolves requests by querying an mDNS responder. Consequently, automatic discovery and installation for local driverless printers by using mDNS is not available in RHEL. To work around this problem, install single printers manually or use cups-browsed to automatically install a high amount of print queues that are available on a remote print server.
Prerequisites
- CUPS is configured.
- The printer supports driverless printing, if you want to use this feature.
- The printer accepts data on port 631 (IPP), 9100 (socket), or 515 (LPD). The port depends on the method you use to connect to the printer.
Procedure
Add the printer to CUPS:
To add a printer with driverless support, enter:
# lpadmin -p Demo-printer -E -v ipp://192.0.2.200/ipp/print -m everywhereIf the
-m everywhereoption does not work for your printer, try-m driverless:<uri>, for example:-m driverless:ipp://192.0.2.200/ipp/print.To add a queue from a remote print server with driverless support, enter:
# lpadmin -p Demo-printer -E -v ipp://192.0.2.201/printers/example-queue -m everywhereIf the
-m everywhereoption does not work for your printer, try-m driverless:<uri>, for example:-m driverless:ipp://192.0.2.200/printers/example-queue.To add a printer with a driver in file, enter:
# lpadmin -p Demo-printer -E -v socket://192.0.2.200/ -P /root/example.ppdTo add a queue from a remote print server with a driver in a file, enter:
# lpadmin -p Demo-printer -E -v ipp://192.0.2.201/printers/example-queue -P /root/example.ppdTo add a printer with a driver in the local driver database:
List the drivers in the database:
# lpinfo -m ... drv:///sample.drv/generpcl.ppd Generic PCL Laser Printer ...Add the printer with the URI to the driver in the database:
# lpadmin -p Demo-printer -E -v socket://192.0.2.200/ -m drv:///sample.drv/generpcl.ppd
These commands uses the following options:
-
-p <printer_name>: Sets the name of the printer in CUPS. -
-E: Enables the printer and CUPS accepts jobs for it. Note that you must specify this option after-p. See the option’s description in the man page for further details. -
-v <uri>: Sets the URI to the printer or remote print server queue. -
-m <driver_uri>: Sets the PPD file based on the provided driver URI obtained from the local driver database. -
-P <PPD_file>: Sets the path to the PPD file.
Verification
Display the available printers:
# lpstat -p printer Demo-printer is idle. enabled since Fri 23 Jun 2023 09:36:40 AM CEST
Print a test page:
# lp -d Demo-printer /usr/share/cups/data/default-testpage.pdf
10.8. Performing maintenance and administration tasks on CUPS printers by using the web interface
Printer administrators sometimes need to perform different tasks on a print server. For example:
- Maintenance tasks, such as temporary pausing a printer while a technician repairs a printer
- Administrative tasks, such as changing a printer’s default settings
You can perform these tasks by using the CUPS web interface.
Prerequisites
- CUPS is configured.
- You have permissions in CUPS to manage printers.
- If you use CUPS as a print server, you configured TLS encryption to not send credentials in plain text over the network.
- The printer already exists in CUPS.
Procedure
Use a browser, and access
https://<hostname>:631/printers/.You must connect to the web interface by using the HTTPS protocol. Otherwise, CUPS prevents you from authenticating in a later step for security reasons.
- Click on the name of the printer that you want to configure.
Depending on whether you want to perform a maintenance or administration task, select the required action from the corresponding list:
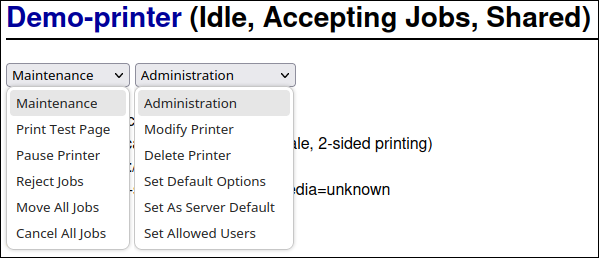
- If you are not already authenticated, CUPS prompts for credentials of an administrative user. Enter the username and password of an authorized user.
- Perform the task.
10.9. Using Samba to print to a Windows print server with Kerberos authentication
With the samba-krb5-printing wrapper, Active Directory (AD) users who are logged in to Red Hat Enterprise Linux (RHEL) can authenticate to Active Directory (AD) by using Kerberos and then print to a local CUPS print server that forwards the print job to a Windows print server.
The benefit of this configuration is that the administrator of CUPS on RHEL does not need to store a fixed user name and password in the configuration. CUPS authenticates to AD with the Kerberos ticket of the user that sends the print job.
Red Hat supports only submitting print jobs to CUPS from your local system, and not to re-share a printer on a Samba print server.
Prerequisites
- The printer that you want to add to the local CUPS instance is shared on an AD print server.
- You joined the RHEL host as a member to the AD.
-
CUPS is installed on RHEL, and the
cupsservice is running. -
The PostScript Printer Description (PPD) file for the printer is stored in the
/usr/share/cups/model/directory.
Procedure
Install the
samba-krb5-printing,samba-client, andkrb5-workstationpackages:# yum install samba-krb5-printing samba-client krb5-workstationOptional: Authenticate as a domain administrator and display the list of printers that are shared on the Windows print server:
# smbclient -L win_print_srv.ad.example.com -U administrator@AD_KERBEROS_REALM --use-kerberos=required Sharename Type Comment --------- ---- ------- ... Example Printer Example ...Optional: Display the list of CUPS models to identify the PPD name of your printer:
lpinfo -m ... samsung.ppd Samsung M267x 287x Series PXL ...
You require the name of the PPD file when you add the printer in the next step.
Add the printer to CUPS:
# lpadmin -p "example_printer" -v smb://win_print_srv.ad.example.com/Example -m samsung.ppd -o auth-info-required=negotiate -EThe command uses the following options:
-
-p printer_namesets the name of the printer in CUPS. -
-v URI_to_Windows_printersets the URI to the Windows printer. Use the following format:smb://host_name/printer_share_name. -
-m PPD_filesets the PPD file the printer uses. -
-o auth-info-required=negotiateconfigures CUPS to use Kerberos authentication when it forwards print jobs to the remote server. -
-Eenables the printer and CUPS accepts jobs for the printer.
-
Verification
- Log into the RHEL host as an AD domain user.
Authenticate as an AD domain user:
# kinit domain_user_name@AD_KERBEROS_REALMPrint a file to the printer you added to the local CUPS print server:
# lp -d example_printer file
10.10. Using cups-browsed to locally integrate printers from a remote print server
The cups-browsed service uses DNS service discovery (DNS-SD) and CUPS browsing to make all or a filtered subset of shared remote printers automatically available in a local CUPS service.
For example, administrators can use this feature on workstations to make only printers from a trusted print server available in a print dialog of applications. It is also possible to configure cups-browsed to filter the browsed printers by certain criteria to reduce the number of listed printers if a print server shares a large number of printers.
If the print dialog in an application uses other mechanisms than, for example DNS-SD, to list remote printers, cups-browsed has no influence. The cups-browsed service also does not prevent users from manually accessing non-listed printers.
Prerequisites
- The CUPS service is configured on the local host.
A remote CUPS print server exists, and the following conditions apply to this server:
- The server listens on an interface that is accessible from the client.
-
The
Allow fromparameter in the server’s<Location />directive in the/etc/cups/cups.conffile allows access from the client’s IP address. - The server shares printers.
- Firewall rules allow access from the client to the CUPS port on the server.
Procedure
Edit the
/etc/cups/cups-browsed.conffile, and make the following changes:Add
BrowsePollparameters for each remote CUPS server you want to poll:BrowsePoll remote_cups_server.example.com BrowsePoll 192.0.2.100:1631
Append
:<port>to the hostname or IP address if the remote CUPS server listens on a port different from 631.Optional: Configure a filter to limit which printers are shown in the local CUPS service. For example, to filter for queues whose name contain
sales_, add:BrowseFilter name sales_You can filter by different field names, negate the filter, and match the exact values. For further details, see the parameter description and examples in the
cups-browsed.conf(5)man page.Optional: Change the polling interval and timeout to limit the number of browsing cycles:
BrowseInterval 1200 BrowseTimeout 6000
Increase both
BrowseIntervalandBrowseTimeoutin the same ratio to avoid situations in which printers disappear from the browsing list. This mean, multiply the value ofBrowseIntervalby 5 or a higher integer, and use this result value forBrowseTimeout.By default,
cups-browsedpolls remote servers every 60 seconds and the timeout is 300 seconds. However, on print servers with many queues, these default values can cost many resources.
Enable and start the
cups-browsedservice:# systemctl enable --now cups-browsed
Verification
List the available printers:
# lpstat -v device for Demo-printer: implicitclass://Demo-printer/ ...
If the output for a printer contains
implicitclass,cups-browsedmanages the printer in CUPS.
Additional resources
-
cups-browsed.conf(5)man page
10.11. Accessing the CUPS logs in the systemd journal
By default, CUPS stores log messages in the systemd journal. This includes:
- Error messages
- Access log entries
- Page log entries
Prerequisites
Procedure
Display the log entries:
To display all log entries, enter:
# journalctl -u cupsTo display the log entries for a specific print job, enter:
# journalctl -u cups JID=<print_job_id>To display log entries within a specific time frame, enter:
# journalectl -u cups --since=<YYYY-MM-DD> --until=<YYYY-MM-DD>Replace
YYYYwith the year,MMwith the month, andDDwith the day.
Additional resources
-
journalctl(1)man page
10.12. Configuring CUPS to store logs in files instead of the systemd journal
By default, CUPS stores log messages in the systemd journal. Alternatively, you can configure CUPS to store log messages in files.
Prerequisites
Procedure
Edit the
/etc/cups/cups-files.conffile, and set theAccessLog,ErrorLog, andPageLogparameters to the paths where you want to store these log files:AccessLog /var/log/cups/access_log ErrorLog /var/log/cups/error_log PageLog /var/log/cups/page_log
If you configure CUPS to store the logs in a directory other than
/var/log/cups/, set thecupsd_log_tSELinux context on this directory, for example:# semanage fcontext -a -t cupsd_log_t "/var/log/printing(/.*)?" # restorecon -Rv /var/log/printing/
Restart the
cupsservice:# systemctl restart cups
Verification
Display the log files:
# cat /var/log/cups/access_log # cat /var/log/cups/error_log # cat /var/log/cups/page_log
If you configured CUPS to store the logs in a directory other than
/var/log/cups/, verify that the SELinux context on the log directory iscupsd_log_t:# ls -ldZ /var/log/printing/ drwxr-xr-x. 2 lp sys unconfined_u:object_r:cupsd_log_t:s0 6 Jun 20 15:55 /var/log/printing/
10.13. Accessing the CUPS documentation
CUPS provides browser-based access to the service’s documentation that is installed on the CUPS server. This documentation includes:
- Administration documentation, such as for command-line printer administration and accounting
- Man pages
- Programming documentation, such as the administration API
- References
- Specifications
Prerequisites
- CUPS is installed and running.
- The IP address of the client you want to use has permissions to access the web interface.
Procedure
Use a browser, and access
http://<hostname_or_ip_address>:631/help/: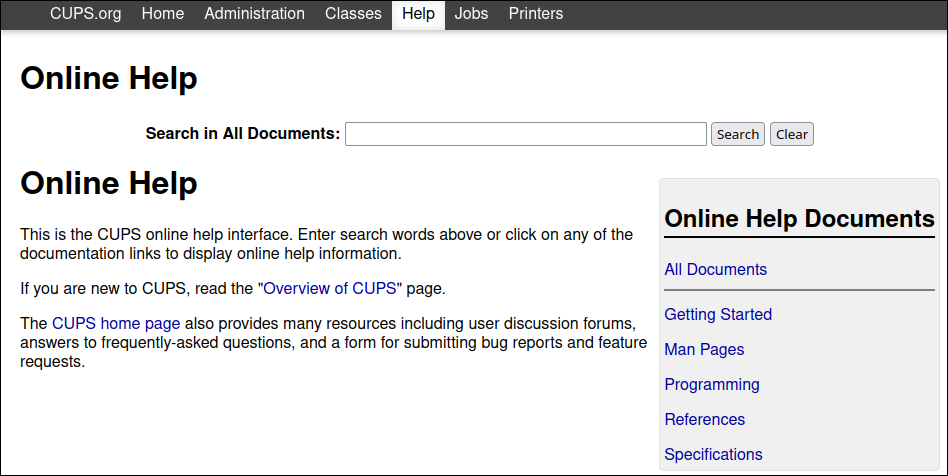
-
Expand the entries in
Online Help Documents, and select the documentation you want to read.