
Configuring InfiniBand and RDMA networks
Configuring and managing high-speed network protocols and RDMA hardware
Abstract
Making open source more inclusive
Red Hat is committed to replacing problematic language in our code, documentation, and web properties. We are beginning with these four terms: master, slave, blacklist, and whitelist. Because of the enormity of this endeavor, these changes will be implemented gradually over several upcoming releases. For more details, see our CTO Chris Wright’s message.
Providing feedback on Red Hat documentation
We appreciate your feedback on our documentation. Let us know how we can improve it.
Submitting feedback through Jira (account required)
- Log in to the Jira website.
- Click Create in the top navigation bar.
- Enter a descriptive title in the Summary field.
- Enter your suggestion for improvement in the Description field. Include links to the relevant parts of the documentation.
- Click Create at the bottom of the dialogue.
Chapter 1. Understanding InfiniBand and RDMA
InfiniBand refers to two distinct things:
- The physical link-layer protocol for InfiniBand networks
- The InfiniBand Verbs API, an implementation of the remote direct memory access (RDMA) technology
RDMA provides access between the main memory of two computers without involving an operating system, cache, or storage. Using RDMA, data transfers with high-throughput, low-latency, and low CPU utilization.
In a typical IP data transfer, when an application on one machine sends data to an application on another machine, the following actions happen on the receiving end:
- The kernel must receive the data.
- The kernel must determine that the data belongs to the application.
- The kernel wakes up the application.
- The kernel waits for the application to perform a system call into the kernel.
- The application copies the data from the internal memory space of the kernel into the buffer provided by the application.
This process means that most network traffic is copied across the main memory of the system if the host adapter uses direct memory access (DMA) or otherwise at least twice. Additionally, the computer executes some context switches to switch between the kernel and application. These context switches can cause a higher CPU load with high traffic rates while slowing down the other tasks.
Unlike traditional IP communication, RDMA communication bypasses the kernel intervention in the communication process. This reduces the CPU overhead. The RDMA protocol enables the host adapter to decide after a packet enters the network which application should receive it and where to store it in the memory space of that application. Instead of sending the packet for processing to the kernel and copying it into the memory of the user application, the host adapter directly places the packet contents in the application buffer. This process requires a separate API, the InfiniBand Verbs API, and applications need to implement the InfiniBand Verbs API to use RDMA.
Red Hat Enterprise Linux supports both the InfiniBand hardware and the InfiniBand Verbs API. Additionally, it supports the following technologies to use the InfiniBand Verbs API on non-InfiniBand hardware:
- Internet Wide Area RDMA Protocol (iWARP): A network protocol that implements RDMA over IP networks
- RDMA over Converged Ethernet (RoCE), which is also known as InfiniBand over Ethernet (IBoE): A network protocol that implements RDMA over Ethernet networks
Additional resources
Chapter 2. Configuring RoCE
Remote Direct Memory Access (RDMA) provides remote execution for Direct Memory Access (DMA). RDMA over Converged Ethernet (RoCE) is a network protocol that utilizes RDMA over an Ethernet network. For configuration, RoCE requires specific hardware and some of the hardware vendors are Mellanox, Broadcom, and QLogic.
2.1. Overview of RoCE protocol versions
RoCE is a network protocol that enables remote direct memory access (RDMA) over Ethernet.
The following are the different RoCE versions:
- RoCE v1
-
The RoCE version 1 protocol is an Ethernet link layer protocol with ethertype
0x8915that enables the communication between any two hosts in the same Ethernet broadcast domain. - RoCE v2
-
The RoCE version 2 protocol exists on the top of either the UDP over IPv4 or the UDP over IPv6 protocol. For RoCE v2, the UDP destination port number is
4791.
The RDMA_CM sets up a reliable connection between a client and a server for transferring data. RDMA_CM provides an RDMA transport-neutral interface for establishing connections. The communication uses a specific RDMA device and message-based data transfers.
Using different versions like RoCE v2 on the client and RoCE v1 on the server is not supported. In such a case, configure both the server and client to communicate over RoCE v1.
Additional resources
2.2. Temporarily changing the default RoCE version
Using the RoCE v2 protocol on the client and RoCE v1 on the server is not supported. If the hardware in your server supports RoCE v1 only, configure your clients for RoCE v1 to communicate with the server. For example, you can configure a client that uses the mlx5_0 driver for the Mellanox ConnectX-5 InfiniBand device that only supports RoCE v1.
Changes described here will remain effective until you reboot the host.
Prerequisites
- The client uses an InfiniBand device with RoCE v2 protocol.
- The server uses an InfiniBand device that only supports RoCE v1.
Procedure
Create the
/sys/kernel/config/rdma_cm/mlx5_0/directory:# mkdir /sys/kernel/config/rdma_cm/mlx5_0/Display the default RoCE mode:
# cat /sys/kernel/config/rdma_cm/mlx5_0/ports/1/default_roce_mode

RoCE v2
Change the default RoCE mode to version 1:
# echo "IB/RoCE v1" > /sys/kernel/config/rdma_cm/mlx5_0/ports/1/default_roce_mode
2.3. Configuring Soft-RoCE
Soft-RoCE is a software implementation of remote direct memory access (RDMA) over Ethernet, which is also called RXE. Use Soft-RoCE on hosts without RoCE host channel adapters (HCA).
The Soft-RoCE feature is provided as a Technology Preview only. Technology Preview features are not supported with Red Hat production Service Level Agreements (SLAs), might not be functionally complete, and Red Hat does not recommend using them for production. These previews provide early access to upcoming product features, enabling customers to test functionality and provide feedback during the development process.
See Technology Preview Features Support Scope on the Red Hat Customer Portal for information about the support scope for Technology Preview features.
Prerequisites
- An Ethernet adapter is installed
Procedure
Install the
iproute,libibverbs,libibverbs-utils, andinfiniband-diagspackages:#yuminstall iproute libibverbs libibverbs-utils infiniband-diagsDisplay the RDMA links:
# rdma link showLoad the
rdma_rxekernel module and add a newrxedevice namedrxe0that uses theenp0s1interface:# rdma link add rxe0 type rxe netdev enp1s0
Verification
View the state of all RDMA links:
# rdma link show

link rxe0/1 state ACTIVE physical_state LINK_UP netdev enp1s0
List the available RDMA devices:
# ibv_devices

    device          	   node GUID
    ------          	----------------
    rxe0            	505400fffed5e0fb
You can use the
ibstatutility to display a detailed status:# ibstat rxe0 CA 'rxe0' CA type: Number of ports: 1 Firmware version: Hardware version: Node GUID: 0x505400fffed5e0fb System image GUID: 0x0000000000000000 Port 1: State: Active Physical state: LinkUp Rate: 100 Base lid: 0 LMC: 0 SM lid: 0 Capability mask: 0x00890000 Port GUID: 0x505400fffed5e0fb Link layer: Ethernet
Chapter 3. Configuring Soft-iWARP
Remote Direct Memory Access (RDMA) uses several libraries and protocols over an Ethernet such as iWARP, Soft-iWARP for performance improvement and aided programming interface.
3.1. Overview of iWARP and Soft-iWARP
Remote direct memory access (RDMA) uses the Internet Wide-area RDMA Protocol (iWARP) over Ethernet for converged and low latency data transmission over TCP. Using standard Ethernet switches and the TCP/IP stack, iWARP routes traffic across the IP subnets. This provides flexibility to efficiently use the existing infrastructure. In Red Hat Enterprise Linux, multiple providers implement iWARP in their hardware network interface cards. For example, cxgb4, irdma, qedr, and so on.
Soft-iWARP (siw) is a software-based iWARP kernel driver and user library for Linux. It is a software-based RDMA device that provides a programming interface to RDMA hardware when attached to network interface cards. It provides an easy way to test and validate the RDMA environment.
3.2. Configuring Soft-iWARP
Soft-iWARP (siw) implements the Internet Wide-area RDMA Protocol (iWARP) Remote direct memory access (RDMA) transport over the Linux TCP/IP network stack. It enables a system with a standard Ethernet adapter to interoperate with an iWARP adapter or with another system running the Soft-iWARP driver or a host with the hardware that supports iWARP.
The Soft-iWARP feature is provided as a Technology Preview only. Technology Preview features are not supported with Red Hat production Service Level Agreements (SLAs), might not be functionally complete, and Red Hat does not recommend using them for production. These previews provide early access to upcoming product features, enabling customers to test functionality and provide feedback during the development process.
See Technology Preview Features Support Scope on the Red Hat Customer Portal for information about the support scope for Technology Preview features.
To configure Soft-iWARP, you can use this procedure in a script to run automatically when the system boots.
Prerequisites
- An Ethernet adapter is installed
Procedure
Install the
iproute,libibverbs,libibverbs-utils, andinfiniband-diagspackages:#yuminstall iproute libibverbs libibverbs-utils infiniband-diagsDisplay the RDMA links:
# rdma link showLoad the
siwkernel module:# modprobe siwAdd a new
siwdevice namedsiw0that uses theenp0s1interface:# rdma link add siw0 type siw netdev enp0s1
Verification
View the state of all RDMA links:
# rdma link show

link siw0/1 state ACTIVE physical_state LINK_UP netdev enp0s1
List the available RDMA devices:
# ibv_devices

 device                 node GUID
 ------              ----------------
 siw0                0250b6fffea19d61
You can use the
ibv_devinfoutility to display a detailed status:# ibv_devinfo siw0 hca_id: siw0 transport: iWARP (1) fw_ver: 0.0.0 node_guid: 0250:b6ff:fea1:9d61 sys_image_guid: 0250:b6ff:fea1:9d61 vendor_id: 0x626d74 vendor_part_id: 1 hw_ver: 0x0 phys_port_cnt: 1 port: 1 state: PORT_ACTIVE (4) max_mtu: 1024 (3) active_mtu: 1024 (3) sm_lid: 0 port_lid: 0 port_lmc: 0x00 link_layer: Ethernet
Chapter 4. Configuring the core RDMA subsystem
The rdma service configuration manages the network protocols and communication standards such as InfiniBand, iWARP, and RoCE.
4.1. Renaming IPoIB devices
By default, the kernel names Internet Protocol over InfiniBand (IPoIB) devices, for example, ib0, ib1, and so on. To avoid conflicts, Red Hat recommends creating a rule in the udev device manager to create persistent and meaningful names such as mlx4_ib0.
Prerequisites
- You have installed an InfiniBand device.
Procedure
Display the hardware address of the device
ib0:# ip link show ib0 8: ib0: >BROADCAST,MULTICAST,UP,LOWER_UP< mtu 65520 qdisc pfifo_fast state UP mode DEFAULT qlen 256 link/infiniband 80:00:02:00:fe:80:00:00:00:00:00:00:00:02:c9:03:00:31:78:f2 brd 00:ff:ff:ff:ff:12:40:1b:ff:ff:00:00:00:00:00:00:ff:ff:ff:ff
The last eight bytes of the address are required to create a
udevrule in the next step.To configure a rule that renames the device with the
00:02:c9:03:00:31:78:f2hardware address tomlx4_ib0, edit the/etc/udev/rules.d/70-persistent-ipoib.rulesfile and add anACTIONrule:ACTION=="add", SUBSYSTEM=="net", DRIVERS=="?*", ATTR{type}=="32", ATTR{address}=="?*00:02:c9:03:00:31:78:f2", NAME="mlx4_ib0"Reboot the host:
# reboot
Additional resources
-
udev(7)man page - Understanding IPoIB hardware addresses
4.2. Increasing the amount of memory that users are allowed to pin in the system
Remote direct memory access (RDMA) operations require the pinning of physical memory. As a consequence, the kernel is not allowed to write memory into the swap space. If a user pins too much memory, the system can run out of memory, and the kernel terminates processes to free up more memory. Therefore, memory pinning is a privileged operation.
If non-root users need to run large RDMA applications, it is necessary to increase the amount of memory to maintain pages in primary memory pinned all the time.
Procedure
As the
rootuser, create the file/etc/security/limits.confwith the following contents:@rdma soft memlock unlimited @rdma hard memlock unlimited
Verification
Log in as a member of the
rdmagroup after editing the/etc/security/limits.conffile.Note that Red Hat Enterprise Linux applies updated
ulimitsettings when the user logs in.Use the
ulimit -lcommand to display the limit:$ ulimit -l unlimitedIf the command returns
unlimited, the user can pin an unlimited amount of memory.
Additional resources
-
limits.conf(5)man page
4.3. Configuring the rdma service
With the Remote Direct Memory Access (RDMA) protocol, you can transfer data between the RDMA enabled systems over the network by using the main memory. The RDMA protocol provides low latency and high throughput. To manage supported network protocols and communication standards, you need to configure the rdma service. This configuration includes high speed network protocols such as RoCE and iWARP, and communication standards such as Soft-RoCE and Soft-iWARP. When Red Hat Enterprise Linux detects InfiniBand, iWARP, or RoCE devices and their configuration files residing at the /etc/rdma/modules/* directory, the udev device manager instructs systemd to start the rdma service. Configuration of modules in the /etc/rdma/modules/rdma.conf file remains persistent after reboot. You need to restart the rdma-load-modules@rdma.service configuration service to apply changes.
Procedure
Edit the
/etc/rdma/modules/rdma.conffile and uncomment the modules that you want to enable:# These modules are loaded by the system if any RDMA devices is installed # iSCSI over RDMA client support ib_iser # iSCSI over RDMA target support ib_isert # SCSI RDMA Protocol target driver ib_srpt # User access to RDMA verbs (supports libibverbs) ib_uverbs # User access to RDMA connection management (supports librdmacm) rdma_ucm # RDS over RDMA support # rds_rdma # NFS over RDMA client support xprtrdma # NFS over RDMA server support svcrdma
Restart the service to make the changes effective:
# systemctl restart <rdma-load-modules@rdma.service>
Verification
After a reboot, check the service status:
# systemctl status <rdma-load-modules@rdma.service>
4.4. Enabling NFS over RDMA on an NFS server
Remote Direct Memory Access (RDMA) is a protocol that enables a client system to directly transfer data from the memory of a storage server into its own memory. This enhances storage throughput, decreases latency in data transfer between the server and client, and reduces CPU load on both ends. If both the NFS server and clients are connected over RDMA, clients can use NFSoRDMA to mount an exported directory.
Prerequisites
- The NFS service is running and configured
- An InfiniBand or RDMA over Converged Ethernet (RoCE) device is installed on the server.
- IP over InfiniBand (IPoIB) is configured on the server, and the InfiniBand device has an IP address assigned.
Procedure
Install the
rdma-corepackage:# dnf install rdma-coreIf the package was already installed, verify that the
xprtrdmaandsvcrdmamodules in the/etc/rdma/modules/rdma.conffile are uncommented:# NFS over RDMA client support xprtrdma # NFS over RDMA server support svcrdma
Optional. By default, NFS over RDMA uses port 20049. If you want to use a different port, set the
rdma-portsetting in the[nfsd]section of the/etc/nfs.conffile:rdma-port=_<port>_
Open the NFSoRDMA port in
firewalld:# firewall-cmd --permanent --add-port={20049/tcp,20049/udp} # firewall-cmd --reload
Adjust the port numbers if you set a different port than 20049.
Restart the
nfs-serverservice:# systemctl restart nfs-server
Verification
On a client with InfiniBand hardware, perform the following steps:
Install the following packages:
# dnf install nfs-utils rdma-coreMount an exported NFS share over RDMA:
# mount -o rdma server.example.com:/nfs/projects/ /mnt/If you set a port number other than the default (20049), pass
port=<port_number>to the command:# mount -o rdma,port=<port_number> server.example.com:/nfs/projects/ /mnt/Verify that the share was mounted with the
rdmaoption:# mount | grep "/mnt" server.example.com:/nfs/projects/ on /mnt type nfs (...,proto=rdma,...)
Additional resources
Chapter 5. Configuring an InfiniBand subnet manager
All InfiniBand networks must have a subnet manager running for the network to function. This is true even if two machines are connected directly with no switch involved.
It is possible to have more than one subnet manager. In that case, one acts as a master and another subnet manager acts as a slave that will take over in case the master subnet manager fails.
Most InfiniBand switches contain an embedded subnet manager. However, if you need a more up-to-date subnet manager or if you require more control, use the OpenSM subnet manager provided by Red Hat Enterprise Linux.
5.1. Installing the OpenSM subnet manager
OpenSM is a subnet manager and administrator that follows the InfiniBand specifications to initialize InfiniBand hardware where at least one instance of OpenSM service always runs.
Procedure
Install the
opensmpackage:#yuminstall opensmConfigure OpenSM in case the default installation does not match your environment.
With only one InfiniBand port, the host acts as the master subnet manager that does not require any custom changes. The default configuration works without any modification.
Enable and start the
opensmservice:# systemctl enable --now opensm
Additional resources
-
opensm(8)man page
5.2. Configuring OpenSM using the simple method
OpenSM is an InfiniBand specification-based subnet manager and administrator that configures the InfiniBand fabric, a network topology to interconnect the InfiniBand nodes.
Prerequisites
- One or more InfiniBand ports are installed on the server
Procedure
Obtain the GUIDs for the ports using the
ibstatutility:# ibstat -d mlx4_0 CA 'mlx4_0' CA type: MT4099 Number of ports: 2 Firmware version: 2.42.5000 Hardware version: 1 Node GUID: 0xf4521403007be130 System image GUID: 0xf4521403007be133 Port 1: State: Active Physical state: LinkUp Rate: 56 Base lid: 3 LMC: 0 SM lid: 1 Capability mask: 0x02594868 Port GUID: 0xf4521403007be131 Link layer: InfiniBand Port 2: State: Down Physical state: Disabled Rate: 10 Base lid: 0 LMC: 0 SM lid: 0 Capability mask: 0x04010000 Port GUID: 0xf65214fffe7be132 Link layer: EthernetNoteSome InfiniBand adapters use the same GUID for the node, system, and port.
Edit the
/etc/sysconfig/opensmfile and set the GUIDs in theGUIDSparameter:GUIDS="GUID_1 GUID_2"
You can set the
PRIORITYparameter if multiple subnet managers are available in your subnet. For example:PRIORITY=15
Additional resources
-
/etc/sysconfig/opensm
5.3. Configuring OpenSM by editing the opensm.conf file
OpenSM performance depends on the number of available InfiniBand ports on the device. You can customize it by editing /etc/rdma/opensm.conf file.
Prerequisites
- Only one InfiniBand port is installed on the server.
Procedure
Edit the
/etc/rdma/opensm.conffile and customize the settings to match your environment.After updating an
opensmpackage, theyumutility overrides the/etc/rdma/opensm.confand creates a copy which is the new OpenSM configuration file/etc/rdma/opensm.conf.rpmnew. So, you can compare the previous and new files to identify changes and incorporate them manually in fileopensm.conf.Restart the
opensmservice:# systemctl restart opensm
5.4. Configuring multiple OpenSM instances
OpenSM is an InfiniBand constrained subnet manager and administrator. To provide high performance, OpenSM uses switched fabric network topology that interconnects with InfiniBand network nodes.
Prerequisites
- One or more InfiniBand ports are installed on the server.
Procedure
Copy the
/etc/rdma/opensm.conffile to/etc/rdma/opensm.conf.origfile:# cp /etc/rdma/opensm.conf /etc/rdma/opensm.conf.origWhen you install an updated
opensmpackage, theyumutility overrides the/etc/rdma/opensm.conf. With the copy created in this step, compare the previous and new files to identify changes and incorporate them manually in the instance-specificopensm.conffiles.Create a copy of the
/etc/rdma/opensm.conffile:# cp /etc/rdma/opensm.conf /etc/rdma/opensm.conf.1For each instance, create and append a unique and continuous number to a copy of the configuration file.
After updating the
opensmpackage, theyumutility stores the new OpenSM configuration file as/etc/rdma/opensm.conf.rpmnew. Compare this file with your customized/etc/rdma/opensm.conf.\*files, and manually incorporate the changes.-
Edit the copy you created in the previous step, and customize the settings for the instance to match your environment. For example, set the
guid,subnet_prefix, andlogdirparameters. -
Optionally, create a
partitions.conffile with a unique name specifically for this subnet and reference that file in thepartition_config_fileparameter in the corresponding copy of theopensm.conffile. - Repeat the previous steps for each instance you want to create.
Start the
opensmservice:# systemctl start opensmThe
opensmservice automatically starts a unique instance for eachopensm.conf.*file in the/etc/rdma/directory. If multipleopensm.conf.*files exist, the service ignores settings in the/etc/sysconfig/opensmfile as well as in the base/etc/rdma/opensm.conffile.
5.5. Creating a partition configuration
Partitions enable administrators to create subnets on InfiniBand similar to Ethernet VLANs.
If you define a partition with a specific speed such as 40 Gbps, all hosts within this partition must support this speed minimum. If a host does not meet the speed requirements, it cannot join the partition. Therefore, set the speed of a partition to the lowest speed supported by any host with permission to join the partition.
Prerequisites
- One or more InfiniBand ports are installed on the server
Procedure
Edit the
/etc/rdma/partitions.conffile to configure the partitions as follows:NoteAll fabrics must contain the
0x7fffpartition, and all switches and all hosts must belong to that fabric.Add the following content to the file to create the
0x7fffdefault partition at a reduced speed of10Gbps, and a partition0x0002with a speed of40Gbps:# For reference: # IPv4 IANA reserved multicast addresses: # http://www.iana.org/assignments/multicast-addresses/multicast-addresses.txt # IPv6 IANA reserved multicast addresses: # http://www.iana.org/assignments/ipv6-multicast-addresses/ipv6-multicast-addresses.xml # # mtu = # 1 = 256 # 2 = 512 # 3 = 1024 # 4 = 2048 # 5 = 4096 # # rate = # 2 = 2.5 GBit/s # 3 = 10 GBit/s # 4 = 30 GBit/s # 5 = 5 GBit/s # 6 = 20 GBit/s # 7 = 40 GBit/s # 8 = 60 GBit/s # 9 = 80 GBit/s # 10 = 120 GBit/s Default=0x7fff, rate=3, mtu=4, scope=2, defmember=full: ALL, ALL_SWITCHES=full; Default=0x7fff, ipoib, rate=3, mtu=4, scope=2: mgid=ff12:401b::ffff:ffff # IPv4 Broadcast address mgid=ff12:401b::1 # IPv4 All Hosts group mgid=ff12:401b::2 # IPv4 All Routers group mgid=ff12:401b::16 # IPv4 IGMP group mgid=ff12:401b::fb # IPv4 mDNS group mgid=ff12:401b::fc # IPv4 Multicast Link Local Name Resolution group mgid=ff12:401b::101 # IPv4 NTP group mgid=ff12:401b::202 # IPv4 Sun RPC mgid=ff12:601b::1 # IPv6 All Hosts group mgid=ff12:601b::2 # IPv6 All Routers group mgid=ff12:601b::16 # IPv6 MLDv2-capable Routers group mgid=ff12:601b::fb # IPv6 mDNS group mgid=ff12:601b::101 # IPv6 NTP group mgid=ff12:601b::202 # IPv6 Sun RPC group mgid=ff12:601b::1:3 # IPv6 Multicast Link Local Name Resolution group ALL=full, ALL_SWITCHES=full; ib0_2=0x0002, rate=7, mtu=4, scope=2, defmember=full: ALL, ALL_SWITCHES=full; ib0_2=0x0002, ipoib, rate=7, mtu=4, scope=2: mgid=ff12:401b::ffff:ffff # IPv4 Broadcast address mgid=ff12:401b::1 # IPv4 All Hosts group mgid=ff12:401b::2 # IPv4 All Routers group mgid=ff12:401b::16 # IPv4 IGMP group mgid=ff12:401b::fb # IPv4 mDNS group mgid=ff12:401b::fc # IPv4 Multicast Link Local Name Resolution group mgid=ff12:401b::101 # IPv4 NTP group mgid=ff12:401b::202 # IPv4 Sun RPC mgid=ff12:601b::1 # IPv6 All Hosts group mgid=ff12:601b::2 # IPv6 All Routers group mgid=ff12:601b::16 # IPv6 MLDv2-capable Routers group mgid=ff12:601b::fb # IPv6 mDNS group mgid=ff12:601b::101 # IPv6 NTP group mgid=ff12:601b::202 # IPv6 Sun RPC group mgid=ff12:601b::1:3 # IPv6 Multicast Link Local Name Resolution group ALL=full, ALL_SWITCHES=full;
Chapter 6. Configuring IPoIB
By default, InfiniBand does not use the internet protocol (IP) for communication. However, IP over InfiniBand (IPoIB) provides an IP network emulation layer on top of InfiniBand remote direct memory access (RDMA) networks. This allows existing unmodified applications to transmit data over InfiniBand networks, but the performance is lower than if the application would use RDMA natively.
The Mellanox devices, starting from ConnectX-4 and above, on RHEL 8 and later use Enhanced IPoIB mode by default (datagram only). Connected mode is not supported on these devices.
6.1. The IPoIB communication modes
An IPoIB device is configurable in either Datagram or Connected mode. The difference is the type of queue pair the IPoIB layer attempts to open with the machine at the other end of the communication:
In the
Datagrammode, the system opens an unreliable, disconnected queue pair.This mode does not support packages larger than Maximum Transmission Unit (MTU) of the InfiniBand link layer. During transmission of data, the IPoIB layer adds a 4-byte IPoIB header on top of the IP packet. As a result, the IPoIB MTU is 4 bytes less than the InfiniBand link-layer MTU. As
2048is a common InfiniBand link-layer MTU, the common IPoIB device MTU inDatagrammode is2044.In the
Connectedmode, the system opens a reliable, connected queue pair.This mode allows messages larger than the InfiniBand link-layer MTU. The host adapter handles packet segmentation and reassembly. As a result, in the
Connectedmode, the messages sent from Infiniband adapters have no size limits. However, there are limited IP packets due to thedatafield and TCP/IPheaderfield. For this reason, the IPoIB MTU in theConnectedmode is65520bytes.The
Connectedmode has a higher performance but consumes more kernel memory.
Though a system is configured to use the Connected mode, a system still sends multicast traffic using the Datagram mode because InfiniBand switches and fabric cannot pass multicast traffic in the Connected mode. Also, when the host is not configured to use the Connected mode, the system falls back to the Datagram mode.
While running an application that sends multicast data up to MTU on the interface, configures the interface in Datagram mode or configure the application to cap the send size of a packet that will fit in datagram-sized packets.
6.2. Understanding IPoIB hardware addresses
IPoIB devices have a 20 byte hardware address that consists of the following parts:
- The first 4 bytes are flags and queue pair numbers
The next 8 bytes are the subnet prefix
The default subnet prefix is
0xfe:80:00:00:00:00:00:00. After the device connects to the subnet manager, the device changes this prefix to match with the configured subnet manager.- The last 8 bytes are the Globally Unique Identifier (GUID) of the InfiniBand port that attaches to the IPoIB device
As the first 12 bytes can change, do not use them in the udev device manager rules.
6.3. Configuring an IPoIB connection using nmcli commands
The nmcli command-line utility controls the NetworkManager and reports network status using CLI.
Prerequisites
- An InfiniBand device is installed on the server
- The corresponding kernel module is loaded
Procedure
Create the InfiniBand connection to use the
mlx4_ib0interface in theConnectedtransport mode and the maximum MTU of65520bytes:# nmcli connection add type infiniband con-name mlx4_ib0 ifname mlx4_ib0 transport-mode Connected mtu 65520You can also set
0x8002as aP_Keyinterface of themlx4_ib0connection:# nmcli connection modify mlx4_ib0 infiniband.p-key 0x8002To configure the IPv4 settings set a static IPv4 address, network mask, default gateway, and DNS server of the
mlx4_ib0connection:# nmcli connection modify mlx4_ib0 ipv4.addresses 192.0.2.1/24 # nmcli connection modify mlx4_ib0 ipv4.gateway 192.0.2.254 # nmcli connection modify mlx4_ib0 ipv4.dns 192.0.2.253 # nmcli connection modify mlx4_ib0 ipv4.method manual
To configure the IPv6 settings set a static IPv6 address, network mask, default gateway, and DNS server of the
mlx4_ib0connection:# nmcli connection modify mlx4_ib0 ipv6.addresses 2001:db8:1::1/32 # nmcli connection modify mlx4_ib0 ipv6.gateway 2001:db8:1::fffe # nmcli connection modify mlx4_ib0 ipv6.dns 2001:db8:1::fffd # nmcli connection modify mlx4_ib0 ipv6.method manual
To activate the
mlx4_ib0connection:# nmcli connection up mlx4_ib0
6.4. Configuring an IPoIB connection by using the network RHEL System Role
You can use the network RHEL System Role to remotely create NetworkManager connection profiles for IP over InfiniBand (IPoIB) devices. For example, remotely add an InfiniBand connection for the mlx4_ib0 interface with the following settings by running an Ansible Playbook:
-
An IPoIB device -
mlx4_ib0.8002 -
A partition key
p_key-0x8002 -
A static
IPv4address -192.0.2.1with a/24subnet mask -
A static
IPv6address -2001:db8:1::1with a/64subnet mask
Perform this procedure on the Ansible control node.
Prerequisites
- You have prepared the control node and the managed nodes
- You logged in to the control node as a user who can run playbooks on the managed nodes.
-
The account you use to connect to the managed nodes has
sudopermissions on them. - The managed nodes or groups of managed nodes on which you want to run this playbook are listed in the Ansible inventory file.
-
An InfiniBand device named
mlx4_ib0is installed in the managed nodes. - The managed nodes use NetworkManager to configure the network.
Procedure
Create a playbook file, for example
~/IPoIB.yml, with the following content:--- - name: Configure the network hosts: managed-node-01.example.com tasks: - name: Configure IPoIB include_role: name: rhel-system-roles.network vars: network_connections: # InfiniBand connection mlx4_ib0 - name: mlx4_ib0 interface_name: mlx4_ib0 type: infiniband # IPoIB device mlx4_ib0.8002 on top of mlx4_ib0 - name: mlx4_ib0.8002 type: infiniband autoconnect: yes infiniband: p_key: 0x8002 transport_mode: datagram parent: mlx4_ib0 ip: address: - 192.0.2.1/24 - 2001:db8:1::1/64 state: upIf you set a
p_keyparameter as in this example, do not set aninterface_nameparameter on the IPoIB device.Validate the playbook syntax:
# ansible-playbook ~/IPoIB.yml --syntax-checkNote that this command only validates the syntax and does not protect against a wrong but valid configuration.
Run the playbook:
# ansible-playbook ~/IPoIB.yml
Verification
On the
managed-node-01.example.comhost, display the IP settings of themlx4_ib0.8002device:# ip address show mlx4_ib0.8002 ... inet 192.0.2.1/24 brd 192.0.2.255 scope global noprefixroute ib0.8002 valid_lft forever preferred_lft forever inet6 2001:db8:1::1/64 scope link tentative noprefixroute valid_lft forever preferred_lft forever
Display the partition key (P_Key) of the
mlx4_ib0.8002device:# cat /sys/class/net/mlx4_ib0.8002/pkey 0x8002Display the mode of the
mlx4_ib0.8002device:# cat /sys/class/net/mlx4_ib0.8002/mode datagram
Additional resources
-
/usr/share/ansible/roles/rhel-system-roles.network/README.mdfile
6.5. Configuring an IPoIB connection using nm-connection-editor
The nmcli-connection-editor application configures and manages network connections stored by NetworkManager using the management console.
Prerequisites
- An InfiniBand device is installed on the server.
- Corresponding kernel module is loaded
-
The
nm-connection-editorpackage is installed.
Procedure
Enter the command:
$ nm-connection-editor- Click the + button to add a new connection.
-
Select the
InfiniBandconnection type and click . On the
InfiniBandtab:- Change the connection name if you want to.
- Select the transport mode.
- Select the device.
- Set an MTU if needed.
-
On the
IPv4 Settingstab, configure the IPv4 settings. For example, set a static IPv4 address, network mask, default gateway, and DNS server: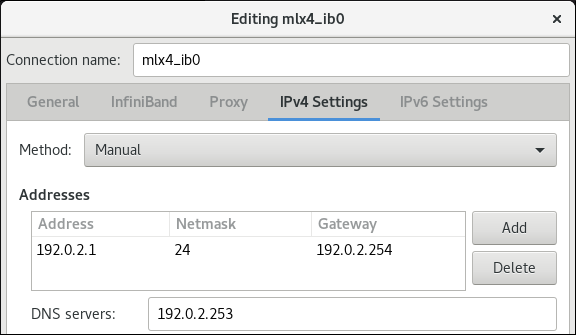
-
On the
IPv6 Settingstab, configure the IPv6 settings. For example, set a static IPv6 address, network mask, default gateway, and DNS server:
- Click to save the team connection.
-
Close
nm-connection-editor. You can set a
P_Keyinterface. As this setting is not available innm-connection-editor, you must set this parameter on the command line.For example, to set
0x8002asP_Keyinterface of themlx4_ib0connection:# nmcli connection modify mlx4_ib0 infiniband.p-key 0x8002
Chapter 7. Testing InfiniBand networks
7.1. Testing early InfiniBand RDMA operations
InfiniBand provides low latency and high performance for Remote Direct Memory Access (RDMA).
Apart from InfiniBand, if you use IP-based devices such as Internet Wide-area Remote Protocol(iWARP) or RDMA over Converged Ethernet (RoCE) or InfiniBand over Ethernet (IBoE) devices, see:
Prerequisites
-
You have configured the
rdmaservice. -
You have installed the
libibverbs-utilsandinfiniband-diagspackages.
Procedure
List the available InfiniBand devices:
# ibv_devices

    device                 node GUID
    ------              ----------------
    mlx4_0              0002c903003178f0
    mlx4_1              f4521403007bcba0
Display the information of the
mlx4_1device:# ibv_devinfo -d mlx4_1 hca_id: mlx4_1 transport: InfiniBand (0) fw_ver: 2.30.8000 node_guid: f452:1403:007b:cba0 sys_image_guid: f452:1403:007b:cba3 vendor_id: 0x02c9 vendor_part_id: 4099 hw_ver: 0x0 board_id: MT_1090120019 phys_port_cnt: 2 port: 1 state: PORT_ACTIVE (4) max_mtu: 4096 (5) active_mtu: 2048 (4) sm_lid: 2 port_lid: 2 port_lmc: 0x01 link_layer: InfiniBand port: 2 state: PORT_ACTIVE (4) max_mtu: 4096 (5) active_mtu: 4096 (5) sm_lid: 0 port_lid: 0 port_lmc: 0x00 link_layer: EthernetDisplay the status of the
mlx4_1device:# ibstat mlx4_1 CA 'mlx4_1' CA type: MT4099 Number of ports: 2 Firmware version: 2.30.8000 Hardware version: 0 Node GUID: 0xf4521403007bcba0 System image GUID: 0xf4521403007bcba3 Port 1: State: Active Physical state: LinkUp Rate: 56 Base lid: 2 LMC: 1 SM lid: 2 Capability mask: 0x0251486a Port GUID: 0xf4521403007bcba1 Link layer: InfiniBand Port 2: State: Active Physical state: LinkUp Rate: 40 Base lid: 0 LMC: 0 SM lid: 0 Capability mask: 0x04010000 Port GUID: 0xf65214fffe7bcba2 Link layer: EthernetThe
ibpingutility pings an InfiniBand address and runs as a client/server.To start server mode on a host, use the
-Sparameter on port number-Pwith-CInfiniBand certificate authority (CA) name:# ibping -S -C mlx4_1 -P 1To start client mode on another host, send some packets
-con port number-Pusing-CInfiniBand certificate authority (CA) name with-LLocal Identifier (LID):# ibping -c 50 -C mlx4_0 -P 1 -L 2
Additional resources
-
ibping(8)man page
7.2. Testing an IPoIB using the ping utility
After you configured IP over InfiniBand (IPoIB), use the ping utility to send ICMP packets to test the IPoIB connection.
Prerequisites
- The two RDMA hosts are connected in the same InfiniBand fabric with RDMA ports
- The IPoIB interfaces in both hosts are configured with IP addresses within the same subnet
Procedure
Use the
pingutility to send five ICMP packets to the remote host’s InfiniBand adapter:# ping -c5 192.0.2.1
7.3. Testing an RDMA network using qperf after IPoIB is configured
The qperf utility measures RDMA and IP performance between two nodes in terms of bandwidth, latency, and CPU utilization.
Prerequisites
-
You have installed the
qperfpackage on both hosts. - IPoIB is configured on both hosts.
Procedure
Start
qperfon one of the hosts without any options to act as a server:# qperfUse the following commands on the client. The commands use port
1of themlx4_0host channel adapter in the client to connect to IP address192.0.2.1assigned to the InfiniBand adapter in the server.Display the configuration of the host channel adapter:
# qperf -v -i mlx4_0:1 192.0.2.1 conf

conf:
    loc_node   =  rdma-dev-01.lab.bos.redhat.com
    loc_cpu    =  12 Cores: Mixed CPUs
    loc_os     =  Linux 4.18.0-187.el8.x86_64
    loc_qperf  =  0.4.11
    rem_node   =  rdma-dev-00.lab.bos.redhat.com
    rem_cpu    =  12 Cores: Mixed CPUs
    rem_os     =  Linux 4.18.0-187.el8.x86_64
    rem_qperf  =  0.4.11
Display the Reliable Connection (RC) streaming two-way bandwidth:
# qperf -v -i mlx4_0:1 192.0.2.1 rc_bi_bw

rc_bi_bw:
    bw             =  10.7 GB/sec
    msg_rate       =   163 K/sec
    loc_id         =  mlx4_0
    rem_id         =  mlx4_0:1
    loc_cpus_used  =    65 % cpus
    rem_cpus_used  =    62 % cpus
Display the RC streaming one-way bandwidth:
# qperf -v -i mlx4_0:1 192.0.2.1 rc_bw

rc_bw:
    bw              =  6.19 GB/sec
    msg_rate        =  94.4 K/sec
    loc_id          =  mlx4_0
    rem_id          =  mlx4_0:1
    send_cost       =  63.5 ms/GB
    recv_cost       =    63 ms/GB
    send_cpus_used  =  39.5 % cpus
    recv_cpus_used  =    39 % cpus
Additional resources
-
qperf(1)man page