
Red Hat Training
A Red Hat training course is available for Red Hat Enterprise Linux
Chapter 12. OpenSSH
SSH (Secure Shell) is a protocol which facilitates secure communications between two systems using a client-server architecture and allows users to log in to server host systems remotely. Unlike other remote communication protocols, such as FTP or Telnet, SSH encrypts the login session, rendering the connection difficult for intruders to collect unencrypted passwords.
The ssh program is designed to replace older, less secure terminal applications used to log in to remote hosts, such as telnet or rsh. A related program called scp replaces older programs designed to copy files between hosts, such as rcp. Because these older applications do not encrypt passwords transmitted between the client and the server, avoid them whenever possible. Using secure methods to log in to remote systems decreases the risks for both the client system and the remote host.
Red Hat Enterprise Linux includes the general OpenSSH package, openssh, as well as the OpenSSH server, openssh-server, and client, openssh-clients, packages. Note, the OpenSSH packages require the OpenSSL package openssl-libs, which installs several important cryptographic libraries, enabling OpenSSH to provide encrypted communications.
12.1. The SSH Protocol
12.1.1. Why Use SSH?
Potential intruders have a variety of tools at their disposal enabling them to disrupt, intercept, and re-route network traffic in an effort to gain access to a system. In general terms, these threats can be categorized as follows:
- Interception of communication between two systems
The attacker can be somewhere on the network between the communicating parties, copying any information passed between them. He may intercept and keep the information, or alter the information and send it on to the intended recipient.
This attack is usually performed using a packet sniffer, a rather common network utility that captures each packet flowing through the network, and analyzes its content.
- Impersonation of a particular host
Attacker’s system is configured to pose as the intended recipient of a transmission. If this strategy works, the user’s system remains unaware that it is communicating with the wrong host.
This attack can be performed using a technique known as DNS poisoning, or via so-called IP spoofing. In the first case, the intruder uses a cracked DNS server to point client systems to a maliciously duplicated host. In the second case, the intruder sends falsified network packets that appear to be from a trusted host.
Both techniques intercept potentially sensitive information and, if the interception is made for hostile reasons, the results can be disastrous. If SSH is used for remote shell login and file copying, these security threats can be greatly diminished. This is because the SSH client and server use digital signatures to verify their identity. Additionally, all communication between the client and server systems is encrypted. Attempts to spoof the identity of either side of a communication does not work, since each packet is encrypted using a key known only by the local and remote systems.
12.1.2. Main Features
The SSH protocol provides the following safeguards:
- No one can pose as the intended server
- After an initial connection, the client can verify that it is connecting to the same server it had connected to previously.
- No one can capture the authentication information
- The client transmits its authentication information to the server using strong, 128-bit encryption.
- No one can intercept the communication
- All data sent and received during a session is transferred using 128-bit encryption, making intercepted transmissions extremely difficult to decrypt and read.
Additionally, it also offers the following options:
- It provides secure means to use graphical applications over a network
- Using a technique called X11 forwarding, the client can forward X11 (X Window System) applications from the server.
- It provides a way to secure otherwise insecure protocols
- The SSH protocol encrypts everything it sends and receives. Using a technique called port forwarding, an SSH server can become a conduit to securing otherwise insecure protocols, like POP, and increasing overall system and data security.
- It can be used to create a secure channel
- The OpenSSH server and client can be configured to create a tunnel similar to a virtual private network for traffic between server and client machines.
- It supports the Kerberos authentication
- OpenSSH servers and clients can be configured to authenticate using the GSSAPI (Generic Security Services Application Program Interface) implementation of the Kerberos network authentication protocol.
12.1.3. Protocol Versions
Two varieties of SSH currently exist: version 1, and newer version 2. The OpenSSH suite under Red Hat Enterprise Linux 7 uses SSH version 2, which has an enhanced key exchange algorithm not vulnerable to the known exploit in version 1. In Red Hat Enterprise Linux 7, the OpenSSH suite does not support version 1 connections.
12.1.4. Event Sequence of an SSH Connection
The following series of events help protect the integrity of SSH communication between two hosts.
- A cryptographic handshake is made so that the client can verify that it is communicating with the correct server.
- The transport layer of the connection between the client and remote host is encrypted using a symmetric cipher.
- The client authenticates itself to the server.
- The client interacts with the remote host over the encrypted connection.
12.1.4.1. Transport Layer
The primary role of the transport layer is to facilitate safe and secure communication between the two hosts at the time of authentication and during subsequent communication. The transport layer accomplishes this by handling the encryption and decryption of data, and by providing integrity protection of data packets as they are sent and received. The transport layer also provides compression, speeding the transfer of information.
Once an SSH client contacts a server, key information is exchanged so that the two systems can correctly construct the transport layer. The following steps occur during this exchange:
- Keys are exchanged
- The public key encryption algorithm is determined
- The symmetric encryption algorithm is determined
- The message authentication algorithm is determined
- The hash algorithm is determined
During the key exchange, the server identifies itself to the client with a unique host key. If the client has never communicated with this particular server before, the server’s host key is unknown to the client and it does not connect. OpenSSH gets around this problem by accepting the server’s host key. This is done after the user is notified and has both accepted and verified the new host key. In subsequent connections, the server’s host key is checked against the saved version on the client, providing confidence that the client is indeed communicating with the intended server. If, in the future, the host key no longer matches, the user must remove the client’s saved version before a connection can occur.
It is possible for an attacker to masquerade as an SSH server during the initial contact since the local system does not know the difference between the intended server and a false one set up by an attacker. To help prevent this, verify the integrity of a new SSH server by contacting the server administrator before connecting for the first time or in the event of a host key mismatch.
SSH is designed to work with almost any kind of public key algorithm or encoding format. After an initial key exchange creates a hash value used for exchanges and a shared secret value, the two systems immediately begin calculating new keys and algorithms to protect authentication and future data sent over the connection.
After a certain amount of data has been transmitted using a given key and algorithm (the exact amount depends on the SSH implementation), another key exchange occurs, generating another set of hash values and a new shared secret value. Even if an attacker is able to determine the hash and shared secret value, this information is only useful for a limited period of time.
12.1.4.2. Authentication
Once the transport layer has constructed a secure tunnel to pass information between the two systems, the server tells the client the different authentication methods supported, such as using a private key-encoded signature or typing a password. The client then tries to authenticate itself to the server using one of these supported methods.
SSH servers and clients can be configured to allow different types of authentication, which gives each side the optimal amount of control. The server can decide which encryption methods it supports based on its security model, and the client can choose the order of authentication methods to attempt from the available options.
12.1.4.3. Channels
After a successful authentication over the SSH transport layer, multiple channels are opened via a technique called multiplexing[1]. Each of these channels handles communication for different terminal sessions and for forwarded X11 sessions.
Both clients and servers can create a new channel. Each channel is then assigned a different number on each end of the connection. When the client attempts to open a new channel, the clients sends the channel number along with the request. This information is stored by the server and is used to direct communication to that channel. This is done so that different types of sessions do not affect one another and so that when a given session ends, its channel can be closed without disrupting the primary SSH connection.
Channels also support flow-control, which allows them to send and receive data in an orderly fashion. In this way, data is not sent over the channel until the client receives a message that the channel is open.
The client and server negotiate the characteristics of each channel automatically, depending on the type of service the client requests and the way the user is connected to the network. This allows great flexibility in handling different types of remote connections without having to change the basic infrastructure of the protocol.
12.2. Configuring OpenSSH
12.2.1. Configuration Files
There are two different sets of configuration files: those for client programs (that is, ssh, scp, and sftp), and those for the server (the sshd daemon).
System-wide SSH configuration information is stored in the /etc/ssh/ directory as described in Table 12.1, “System-wide configuration files”. User-specific SSH configuration information is stored in ~/.ssh/ within the user’s home directory as described in Table 12.2, “User-specific configuration files”.
Table 12.1. System-wide configuration files
| File | Description |
|---|---|
|
| Contains Diffie-Hellman groups used for the Diffie-Hellman key exchange which is critical for constructing a secure transport layer. When keys are exchanged at the beginning of an SSH session, a shared, secret value is created which cannot be determined by either party alone. This value is then used to provide host authentication. |
|
|
The default SSH client configuration file. Note that it is overridden by |
|
|
The configuration file for the |
|
|
The ECDSA private key used by the |
|
|
The ECDSA public key used by the |
|
|
The RSA private key used by the |
|
|
The RSA public key used by the |
|
|
The PAM configuration file for the |
|
|
Configuration file for the |
Table 12.2. User-specific configuration files
| File | Description |
|---|---|
|
| Holds a list of authorized public keys for servers. When the client connects to a server, the server authenticates the client by checking its signed public key stored within this file. |
|
| Contains the ECDSA private key of the user. |
|
| The ECDSA public key of the user. |
|
|
The RSA private key used by |
|
|
The RSA public key used by |
|
| Contains host keys of SSH servers accessed by the user. This file is very important for ensuring that the SSH client is connecting to the correct SSH server. |
If setting up an SSH server, do not turn off the Privilege Separation feature by using the UsePrivilegeSeparation no directive in the /etc/ssh/sshd_config file. Turning off Privilege Separation disables many security features and exposes the server to potential security vulnerabilities and targeted attacks. For more information about UsePrivilegeSeparation, see the sshd_config(5) manual page or the What is the significance of UsePrivilegeSeparation directive in /etc/ssh/sshd_config file and how to test it ? Red Hat Knowledgebase article.
For information concerning various directives that can be used in the SSH configuration files, see the ssh_config(5) and sshd_config(5) manual pages.
12.2.2. Starting an OpenSSH Server
In order to run an OpenSSH server, you must have the openssh-server package installed. For more information on how to install new packages, see Section 9.2.4, “Installing Packages”.
To start the sshd daemon in the current session, type the following at a shell prompt as root:
~]# systemctl start sshd.service
To stop the running sshd daemon in the current session, use the following command as root:
~]# systemctl stop sshd.service
If you want the daemon to start automatically at boot time, type as root:
~]# systemctl enable sshd.service
Created symlink from /etc/systemd/system/multi-user.target.wants/sshd.service to /usr/lib/systemd/system/sshd.service.
The sshd daemon depends on the network.target target unit, which is sufficient for static configured network interfaces and for default ListenAddress 0.0.0.0 options. To specify different addresses in the ListenAddress directive and to use a slower dynamic network configuration, add dependency on the network-online.target target unit to the sshd.service unit file. To achieve this, create the /etc/systemd/system/sshd.service.d/local.conf file with the following options:
[Unit] Wants=network-online.targetAfter=network-online.target
After this, reload the systemd manager configuration using the following command:
~]# systemctl daemon-reload
For more information on how to manage system services in Red Hat Enterprise Linux, see Chapter 10, Managing Services with systemd.
Note that if you reinstall the system, a new set of identification keys will be created. As a result, clients who had connected to the system with any of the OpenSSH tools before the reinstall will see the following message:
@@@@@@@@@@@@@@@@@@@@@@@@@@@@@@@@@@@@@@@@@@@@@@@@@@@@@@@@@@@
@: REMOTE HOST IDENTIFICATION HAS CHANGED!   @
@@@@@@@@@@@@@@@@@@@@@@@@@@@@@@@@@@@@@@@@@@@@@@@@@@@@@@@@@@@
IT IS POSSIBLE THAT SOMEONE IS DOING SOMETHING NASTY!
Someone could be eavesdropping on you right now (man-in-the-middle attack)!
It is also possible that the RSA host key has just been changed.
To prevent this, you can backup the relevant files from the /etc/ssh/ directory. See Table 12.1, “System-wide configuration files” for a complete list, and restore the files whenever you reinstall the system.
12.2.3. Requiring SSH for Remote Connections
For SSH to be truly effective, using insecure connection protocols should be prohibited. Otherwise, a user’s password may be protected using SSH for one session, only to be captured later while logging in using Telnet. Some services to disable include telnet, rsh, rlogin, and vsftpd.
For information on how to configure the vsftpd service, see Section 16.2, “FTP”. To learn how to manage system services in Red Hat Enterprise Linux 7, read Chapter 10, Managing Services with systemd.
12.2.4. Using Key-based Authentication
To improve the system security even further, generate SSH key pairs and then enforce key-based authentication by disabling password authentication. To do so, open the /etc/ssh/sshd_config configuration file in a text editor such as vi or nano, and change the PasswordAuthentication option as follows:
PasswordAuthentication no
If you are working on a system other than a new default installation, check that PubkeyAuthentication no has not been set. If connected remotely, not using console or out-of-band access, testing the key-based log in process before disabling password authentication is advised.
To be able to use ssh, scp, or sftp to connect to the server from a client machine, generate an authorization key pair by following the steps below. Note that keys must be generated for each user separately.
To use key-based authentication with NFS-mounted home directories, enable the use_nfs_home_dirs SELinux boolean first:
~]# setsebool -P use_nfs_home_dirs 1
Red Hat Enterprise Linux 7 uses SSH Protocol 2 and RSA keys by default (see Section 12.1.3, “Protocol Versions” for more information).
If you complete the steps as root, only root will be able to use the keys.
If you reinstall your system and want to keep previously generated key pairs, backup the ~/.ssh/ directory. After reinstalling, copy it back to your home directory. This process can be done for all users on your system, including root.
12.2.4.1. Generating Key Pairs
To generate an RSA key pair for version 2 of the SSH protocol, follow these steps:
Generate an RSA key pair by typing the following at a shell prompt:
~]$ ssh-keygen -t rsa
Generating public/private rsa key pair.
Enter file in which to save the key (/home/USER/.ssh/id_rsa):
-
Press Enter to confirm the default location,
~/.ssh/id_rsa, for the newly created key. Enter a passphrase, and confirm it by entering it again when prompted to do so. For security reasons, avoid using the same password as you use to log in to your account.
After this, you will be presented with a message similar to this:
Your identification has been saved in /home/USER/.ssh/id_rsa.
Your public key has been saved in /home/USER/.ssh/id_rsa.pub.
The key fingerprint is:
SHA256:UNIgIT4wfhdQH/K7yqmjsbZnnyGDKiDviv492U5z78Y USER@penguin.example.com
The key's randomart image is:
+---[RSA 2048]----+
|o ..==o+.    |
|.+ . .=oo    |
| .o. ..o     |
| ... ..    |
|    .S    |
|o .   .    |
|o+ o .o+ ..   |
|+.++=o*.o .E   |
|BBBo+Bo. oo   |
+----[SHA256]-----+
NoteTo get an MD5 key fingerprint, which was the default fingerprint in previous versions, use the
ssh-keygencommand with the-E md5option.By default, the permissions of the
~/.ssh/directory are set torwx------or700expressed in octal notation. This is to ensure that only the USER can view the contents. If required, this can be confirmed with the following command:~]$
ls -ld ~/.sshdrwx------. 2 USER USER 54 Nov 25 16:56 /home/USER/.ssh/To copy the public key to a remote machine, issue a command in the following format:
ssh-copy-id user@hostnameThis will copy the most recently modified
~/.ssh/id*.pubpublic key if it is not yet installed. Alternatively, specify the public key’s file name as follows:ssh-copy-id -i ~/.ssh/id_rsa.pub user@hostname
This will copy the content of
~/.ssh/id_rsa.pubinto the~/.ssh/authorized_keysfile on the machine to which you want to connect. If the file already exists, the keys are appended to its end.
To generate an ECDSA key pair for version 2 of the SSH protocol, follow these steps:
Generate an ECDSA key pair by typing the following at a shell prompt:
~]$ ssh-keygen -t ecdsa
Generating public/private ecdsa key pair.
Enter file in which to save the key (/home/USER/.ssh/id_ecdsa):
-
Press Enter to confirm the default location,
~/.ssh/id_ecdsa, for the newly created key. Enter a passphrase, and confirm it by entering it again when prompted to do so. For security reasons, avoid using the same password as you use to log in to your account.
After this, you will be presented with a message similar to this:
Your identification has been saved in /home/USER/.ssh/id_ecdsa.
Your public key has been saved in /home/USER/.ssh/id_ecdsa.pub.
The key fingerprint is:
SHA256:8BhZageKrLXM99z5f/AM9aPo/KAUd8ZZFPcPFWqK6+M USER@penguin.example.com
The key's randomart image is:
+---[ECDSA 256]---+
|   . .   +=|
| . . . =   o.o|
| + . * .  o...|
| = . . * . + +..|
|. + . . So o * ..|
|  . o . .+ = ..|
|   o oo ..=. .|
|    ooo...+ |
|    .E++oo  |
+----[SHA256]-----+
By default, the permissions of the
~/.ssh/directory are set torwx------or700expressed in octal notation. This is to ensure that only the USER can view the contents. If required, this can be confirmed with the following command:~]$
ls -ld ~/.ssh~]$ ls -ld ~/.ssh/ drwx------. 2 USER USER 54 Nov 25 16:56 /home/USER/.ssh/To copy the public key to a remote machine, issue a command in the following format:
ssh-copy-id USER@hostnameThis will copy the most recently modified
~/.ssh/id*.pubpublic key if it is not yet installed. Alternatively, specify the public key’s file name as follows:ssh-copy-id -i ~/.ssh/id_ecdsa.pub USER@hostname
This will copy the content of
~/.ssh/id_ecdsa.pubinto the~/.ssh/authorized_keyson the machine to which you want to connect. If the file already exists, the keys are appended to its end.
See Section 12.2.4.2, “Configuring ssh-agent” for information on how to set up your system to remember the passphrase.
The private key is for your personal use only, and it is important that you never give it to anyone.
12.2.4.2. Configuring ssh-agent
To store your passphrase so that you do not have to enter it each time you initiate a connection with a remote machine, you can use the ssh-agent authentication agent. If you are running GNOME, you can configure it to prompt you for your passphrase whenever you log in and remember it during the whole session. Otherwise you can store the passphrase for a certain shell prompt.
To save your passphrase during your GNOME session, follow these steps:
- Make sure you have the openssh-askpass package installed. If not, see Section 9.2.4, “Installing Packages” for more information on how to install new packages in Red Hat Enterprise Linux.
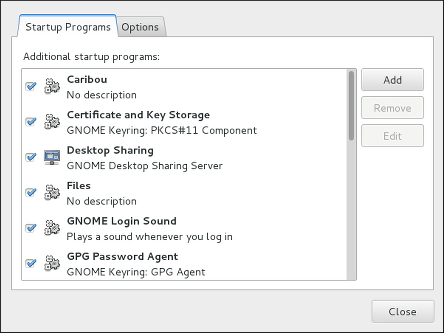
Press the Super key to enter the Activities Overview, type
Startup Applicationsand then press Enter. The Startup Applications Preferences tool appears. The tab containing a list of available startup programs will be shown by default. The Super key appears in a variety of guises, depending on the keyboard and other hardware, but often as either the Windows or Command key, and typically to the left of the Space bar.Figure 12.1. Startup Applications Preferences
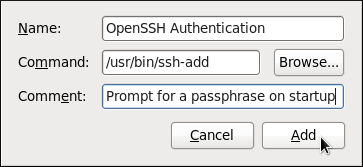
Click the button on the right, and enter
/usr/bin/ssh-addin theCommandfield.Figure 12.2. Adding new application
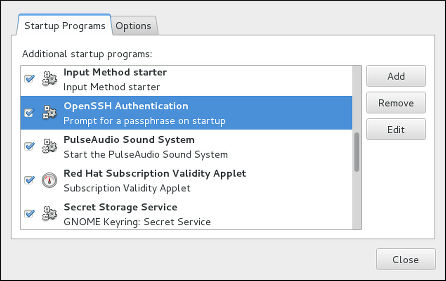
Click and make sure the checkbox next to the newly added item is selected.
Figure 12.3. Enabling the application
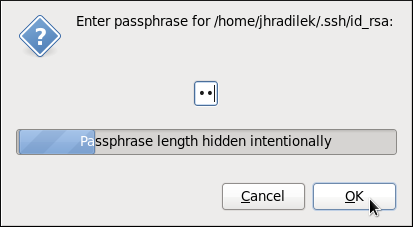
Log out and then log back in. A dialog box will appear prompting you for your passphrase. From this point on, you should not be prompted for a password by
ssh,scp, orsftp.Figure 12.4. Entering a passphrase
To save your passphrase for a certain shell prompt, use the following command:
~]$ ssh-add
Enter passphrase for /home/USER/.ssh/id_rsa:
Note that when you log out, your passphrase will be forgotten. You must execute the command each time you log in to a virtual console or a terminal window.
12.3. OpenSSH Clients
To connect to an OpenSSH server from a client machine, you must have the openssh-clients package installed (see Section 9.2.4, “Installing Packages” for more information on how to install new packages in Red Hat Enterprise Linux).
12.3.1. Using the ssh Utility
The ssh utility allows you to log in to a remote machine and execute commands there. It is a secure replacement for the rlogin, rsh, and telnet programs.
Similarly to the telnet command, log in to a remote machine by using the following command:
ssh hostname
For example, to log in to a remote machine named penguin.example.com, type the following at a shell prompt:
~]$ ssh penguin.example.comThis will log you in with the same user name you are using on the local machine. If you want to specify a different user name, use a command in the following form:
ssh username@hostname
For example, to log in to penguin.example.com as USER, type:
~]$ ssh USER@penguin.example.comThe first time you initiate a connection, you will be presented with a message similar to this:
The authenticity of host 'penguin.example.com' can't be established.
ECDSA key fingerprint is SHA256:vuGKK9dsW34zrZzwjl5g+vOE6EZQvHRQ8zObKYO2mW4.
ECDSA key fingerprint is MD5:7e:15:c3:03:4d:e1:dd:ee:99:dc:3e:f4:b9:67:6b:62.
Are you sure you want to continue connecting (yes/no)?
Users should always check if the fingerprint is correct before answering the question in this dialog. The user can ask the administrator of the server to confirm the key is correct. This should be done in a secure and previously agreed way. If the user has access to the server’s host keys, the fingerprint can be checked by using the ssh-keygen command as follows:
~]# ssh-keygen -l -f /etc/ssh/ssh_host_ecdsa_key.pub
SHA256:vuGKK9dsW34zrZzwjl5g+vOE6EZQvHRQ8zObKYO2mW4
To get an MD5 key fingerprint, which was the default fingerprint in previous versions, use the ssh-keygen command with the -E md5 option, for example:
~]# ssh-keygen -l -f /etc/ssh/ssh_host_ecdsa_key.pub -EM md5
MD5:7e:15:c3:03:4d:e1:dd:ee:99:dc:3e:f4:b9:67:6b:62
Type yes to accept the key and confirm the connection. You will see a notice that the server has been added to the list of known hosts, and a prompt asking for your password:
Warning: Permanently added 'penguin.example.com' (ECDSA) to the list of known hosts.
USER@penguin.example.com's password:
If the SSH server’s host key changes, the client notifies the user that the connection cannot proceed until the server’s host key is deleted from the ~/.ssh/known_hosts file. Before doing this, however, contact the system administrator of the SSH server to verify the server is not compromised.
To remove a key from the ~/.ssh/known_hosts file, issue a command as follows:
~]# ssh-keygen -R penguin.example.com
# Host penguin.example.com found: line 15 type ECDSA
/home/USER/.ssh/known_hosts updated.
Original contents retained as /home/USER/.ssh/known_hosts.old
After entering the password, you will be provided with a shell prompt for the remote machine.
Alternatively, the ssh program can be used to execute a command on the remote machine without logging in to a shell prompt:
ssh username@hostname command
For example, the /etc/redhat-release file provides information about the Red Hat Enterprise Linux version. To view the contents of this file on penguin.example.com, type:
~]$ ssh USER@penguin.example.com cat /etc/redhat-release
USER@penguin.example.com's password:
Red Hat Enterprise Linux Server release 7.0 (Maipo)
After you enter the correct password, the user name will be displayed, and you will return to your local shell prompt.
12.3.2. Using the scp Utility
scp can be used to transfer files between machines over a secure, encrypted connection. In its design, it is very similar to rcp.
To transfer a local file to a remote system, use a command in the following form:
scp localfile username@hostname:remotefile
For example, if you want to transfer taglist.vim to a remote machine named penguin.example.com, type the following at a shell prompt:
~]$ scp taglist.vim USER@penguin.example.com:.vim/plugin/taglist.vim
USER@penguin.example.com's password:
taglist.vim                  100% 144KB 144.5KB/s  00:00
Multiple files can be specified at once. To transfer the contents of .vim/plugin/ to the same directory on the remote machine penguin.example.com, type the following command:
~]$ scp .vim/plugin/* USER@penguin.example.com:.vim/plugin/
USER@penguin.example.com's password:
closetag.vim                 100%  13KB 12.6KB/s  00:00
snippetsEmu.vim                100%  33KB 33.1KB/s  00:00
taglist.vim                  100% 144KB 144.5KB/s  00:00
To transfer a remote file to the local system, use the following syntax:
scp username@hostname:remotefile localfile
For instance, to download the .vimrc configuration file from the remote machine, type:
~]$ scp USER@penguin.example.com:.vimrc .vimrc
USER@penguin.example.com's password:
.vimrc                    100% 2233   2.2KB/s  00:00
12.3.3. Using the sftp Utility
The sftp utility can be used to open a secure, interactive FTP session. In its design, it is similar to ftp except that it uses a secure, encrypted connection.
To connect to a remote system, use a command in the following form:
sftp username@hostname
For example, to log in to a remote machine named penguin.example.com with USER as a user name, type:
~]$ sftp USER@penguin.example.com
USER@penguin.example.com's password:
Connected to penguin.example.com.
sftp>
After you enter the correct password, you will be presented with a prompt. The sftp utility accepts a set of commands similar to those used by ftp (see Table 12.3, “A selection of available sftp commands”).
Table 12.3. A selection of available sftp commands
| Command | Description |
|---|---|
|
| List the content of a remote directory. If none is supplied, a current working directory is used by default. |
|
| Change the remote working directory to directory. |
|
| Create a remote directory. |
|
| Remove a remote directory. |
|
| Transfer localfile to a remote machine. |
|
| Transfer remotefile from a remote machine. |
For a complete list of available commands, see the sftp(1) manual page.
12.4. More Than a Secure Shell
A secure command-line interface is just the beginning of the many ways SSH can be used. Given the proper amount of bandwidth, X11 sessions can be directed over an SSH channel. Or, by using TCP/IP forwarding, previously insecure port connections between systems can be mapped to specific SSH channels.
12.4.1. X11 Forwarding
To open an X11 session over an SSH connection, use a command in the following form:
ssh -Y username@hostname
For example, to log in to a remote machine named penguin.example.com with USER as a user name, type:
~]$ ssh -Y USER@penguin.example.com
USER@penguin.example.com's password:
When an X program is run from the secure shell prompt, the SSH client and server create a new secure channel, and the X program data is sent over that channel to the client machine transparently.
Note that the X Window system must be installed on the remote system before X11 forwarding can take place. Enter the following command as root to install the X11 package group:
~]# yum group install "X Window System"
For more information on package groups, see Section 9.3, “Working with Package Groups”.
X11 forwarding can be very useful. For example, X11 forwarding can be used to create a secure, interactive session of the Print Settings utility. To do this, connect to the server using ssh and type:
~]$ system-config-printer &The Print Settings tool will appear, allowing the remote user to safely configure printing on the remote system.
12.4.2. Port Forwarding
SSH can secure otherwise insecure TCP/IP protocols via port forwarding. When using this technique, the SSH server becomes an encrypted conduit to the SSH client.
Port forwarding works by mapping a local port on the client to a remote port on the server. SSH can map any port from the server to any port on the client. Port numbers do not need to match for this technique to work.
Setting up port forwarding to listen on ports below 1024 requires root level access.
To create a TCP/IP port forwarding channel which listens for connections on the localhost, use a command in the following form:
ssh -L local-port:remote-hostname:remote-port username@hostname
For example, to check email on a server called mail.example.com using POP3 through an encrypted connection, use the following command:
~]$ ssh -L 1100:mail.example.com:110 mail.example.com
Once the port forwarding channel is in place between the client machine and the mail server, direct a POP3 mail client to use port 1100 on the localhost to check for new email. Any requests sent to port 1100 on the client system will be directed securely to the mail.example.com server.
If mail.example.com is not running an SSH server, but another machine on the same network is, SSH can still be used to secure part of the connection. However, a slightly different command is necessary:
~]$ ssh -L 1100:mail.example.com:110 other.example.com
In this example, POP3 requests from port 1100 on the client machine are forwarded through the SSH connection on port 22 to the SSH server, other.example.com. Then, other.example.com connects to port 110 on mail.example.com to check for new email. Note that when using this technique, only the connection between the client system and other.example.com SSH server is secure.
The OpenSSH suite also provides local and remote port forwarding of UNIX domain sockets. To forward UNIX domain sockets over the network to another machine, use the ssh -L local-socket:remote-socket username@hostname command, for example:
~]$ ssh -L /var/mysql/mysql.sock:/var/mysql/mysql.sock username@hostnamePort forwarding can also be used to get information securely through network firewalls. If the firewall is configured to allow SSH traffic via its standard port (that is, port 22) but blocks access to other ports, a connection between two hosts using the blocked ports is still possible by redirecting their communication over an established SSH connection.
Using port forwarding to forward connections in this manner allows any user on the client system to connect to that service. If the client system becomes compromised, the attacker also has access to forwarded services.
System administrators concerned about port forwarding can disable this functionality on the server by specifying a No parameter for the AllowTcpForwarding line in /etc/ssh/sshd_config and restarting the sshd service.
12.5. Additional Resources
For more information on how to configure or connect to an OpenSSH server on Red Hat Enterprise Linux, see the resources listed below.
Installed Documentation
-
sshd(8) — The manual page for thesshddaemon documents available command line options and provides a complete list of supported configuration files and directories. -
ssh(1) — The manual page for thesshclient application provides a complete list of available command line options and supported configuration files and directories. -
scp(1) — The manual page for thescputility provides a more detailed description of this utility and its usage. -
sftp(1) — The manual page for thesftputility. -
ssh-keygen(1) — The manual page for thessh-keygenutility documents in detail how to use it to generate, manage, and convert authentication keys used byssh. -
ssh_config(5) — The manual page namedssh_configdocuments available SSH client configuration options. -
sshd_config(5) — The manual page namedsshd_configprovides a full description of available SSH daemon configuration options.
Online Documentation
- OpenSSH Home Page — The OpenSSH home page containing further documentation, frequently asked questions, links to the mailing lists, bug reports, and other useful resources.
- OpenSSL Home Page — The OpenSSL home page containing further documentation, frequently asked questions, links to the mailing lists, and other useful resources.
See Also
-
Chapter 6, Gaining Privileges documents how to gain administrative privileges by using the
suandsudocommands. -
Chapter 10, Managing Services with systemd provides more information on systemd and documents how to use the
systemctlcommand to manage system services.